Experiencing frequent blue screen dump errors on Windows? Here’s how to fix them.
Understanding the Blue Screen of Death
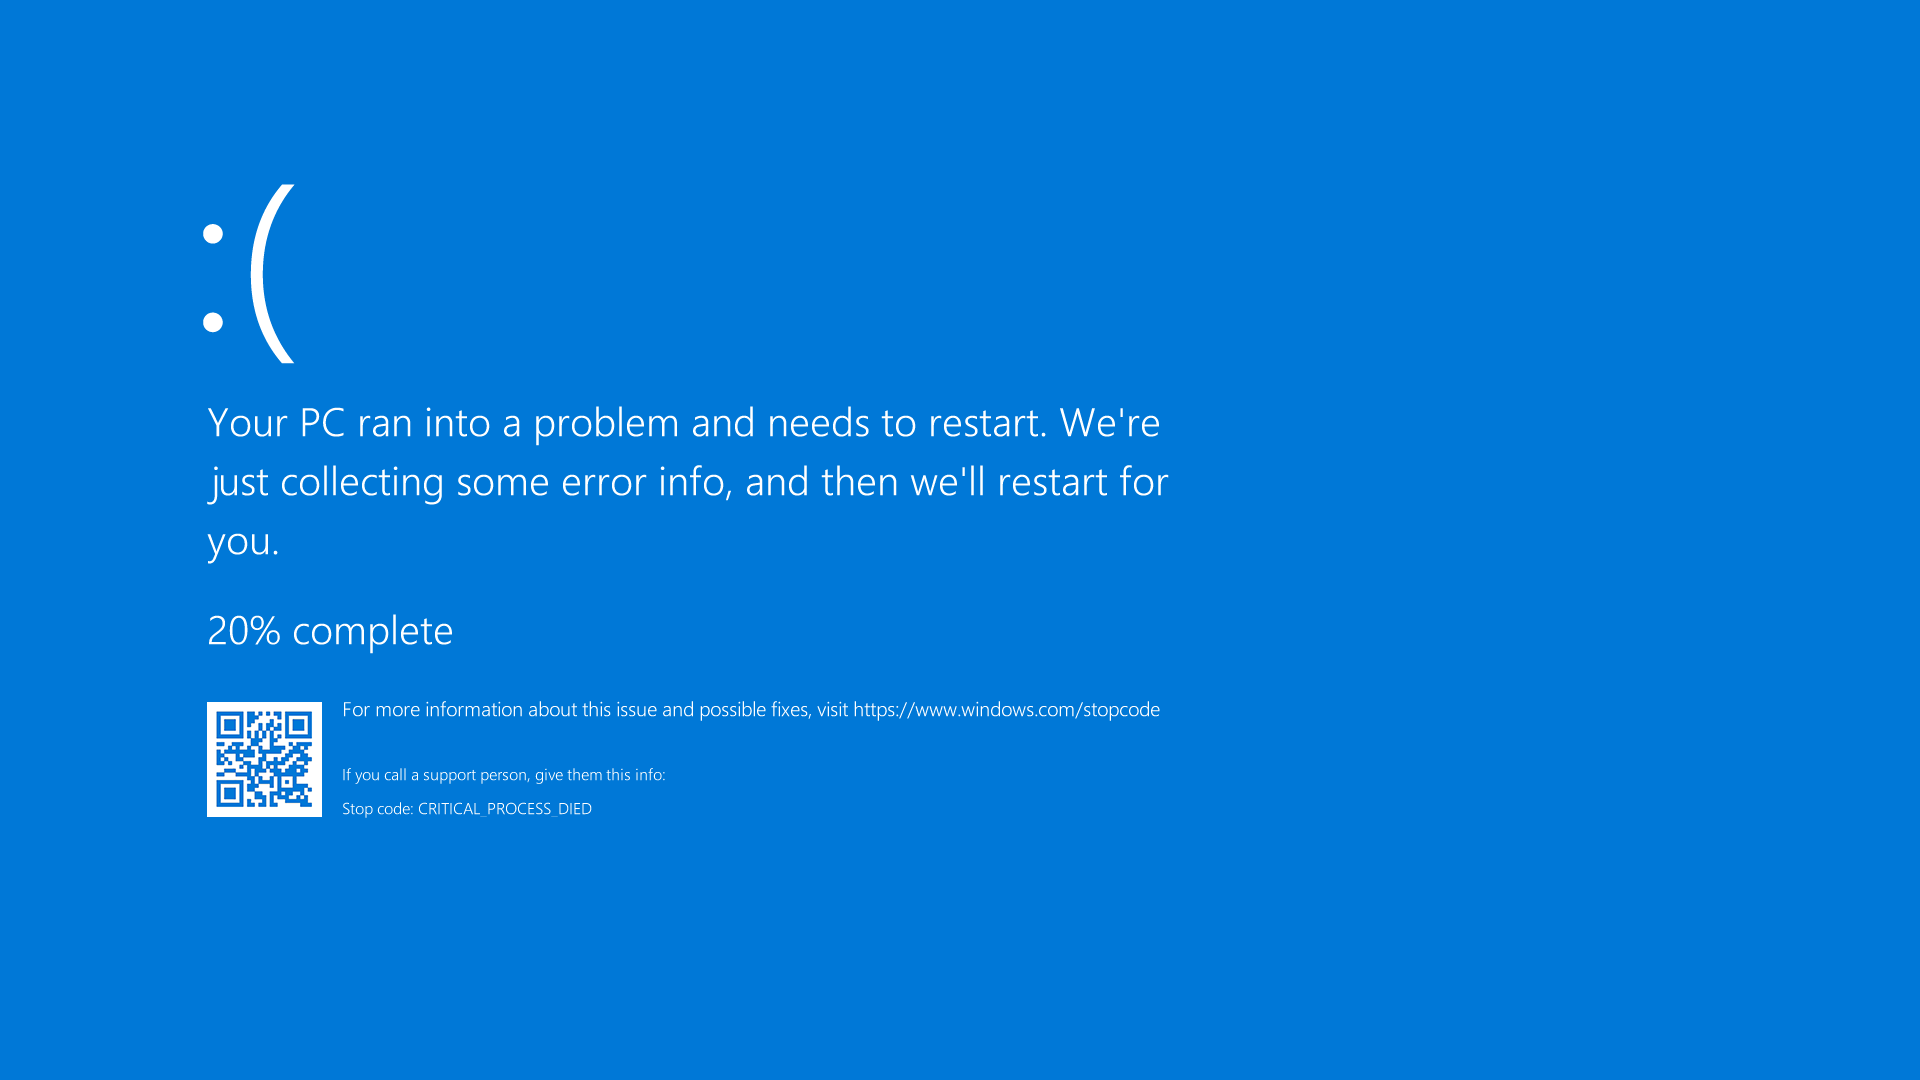
– Blue Screen of Death (BSOD)
– Dump errors in Windows
– Causes of BSOD
– Steps to fix BSOD
Content:
The Blue Screen of Death (BSOD) is a critical error message that appears on Windows computers. It indicates a system crash or failure, causing the computer to stop working. If you are encountering BSOD with dump errors, here are some steps to help you fix the issue.
Firstly, it is important to understand the possible causes of the BSOD. Common reasons include hardware or driver issues, software conflicts, memory problems, or overheating. Identifying the root cause can help you resolve the issue more effectively.
To fix the blue screen dump errors in Windows, follow these steps:
1. Check for hardware issues: Ensure all hardware components are properly connected and functioning correctly. If you recently installed new hardware, such as RAM or a graphics card, consider removing it temporarily to see if the problem persists.
2. Update drivers: Outdated or incompatible drivers can cause BSOD errors. Update your drivers, especially those related to the hardware components or devices you suspect might be causing the issue. Visit the manufacturer’s website or use a reliable driver updater tool.
3. Scan for malware: Malicious software can also trigger BSOD errors. Run a thorough scan using a reputable antivirus program to detect and remove any malware.
4. Check for software conflicts: Certain software applications can conflict with Windows and lead to BSOD errors. Uninstall any recently installed software or third-party programs that might be causing the issue.
5. Check for Windows updates: Ensure your operating system is up to date. Microsoft regularly releases updates that include bug fixes and security patches. Install any pending updates and restart your computer.
6. Test your RAM: Faulty RAM can cause BSOD errors. Use the Windows Memory Diagnostic tool or third-party software to test your RAM for any issues. If errors are found, consider replacing the faulty RAM module.
7. Cool down your system: Overheating can lead to system crashes and BSOD errors. Ensure proper airflow and clean any dust accumulated in your computer. Consider using a cooling pad or adjusting the fan speeds to keep your system temperature in check.
8. Restore Windows: If none of the above steps resolve the issue, you can try restoring Windows to a previous stable state using System Restore. This will revert your system settings and configurations to an earlier point in time.
Identifying Common Causes
- Check for recent software or hardware changes
- Examine the error message displayed on the blue screen
- Analyze the minidump files
- Use Windows Event Viewer to gather additional information
Troubleshooting Steps Overview
The troubleshooting steps for fixing blue screen dump errors in Windows are straightforward and can help you resolve the issue quickly. Follow these steps to diagnose and fix the problem:
1. Restart your computer: Sometimes, a simple restart can resolve the blue screen error. If the error persists, move on to the next step.
2. Check for hardware issues: Ensure that all hardware components are properly connected and functioning correctly. Make sure to firmly reseat any loose components such as RAM, hard drives, or graphics cards.
3. Update drivers: Outdated or incompatible drivers can cause blue screen dump errors. Visit the manufacturer’s website for your hardware components and download the latest drivers. Install them and restart your computer.
4. Scan for malware: Malicious software can also trigger blue screen errors. Run a full system scan with your antivirus software to detect and remove any malware.
5. Check for Windows updates: Keeping your operating system up to date is vital for stability and security. Go to Settings > Update & Security > Windows Update and click on “Check for updates.” Install any available updates and restart your computer.
6. Run a memory test: Faulty RAM can cause blue screen errors. Use the Windows Memory Diagnostic tool to check for memory problems. Type “Windows Memory Diagnostic” in the search bar, open the tool, and follow the on-screen instructions.
7. Uninstall recently installed software or updates: If you started experiencing blue screen errors after installing new software or updates, uninstall them and check if the problem persists.
8. Restore system settings: Using the System Restore feature, you can revert your computer’s settings to a previous state when it was working correctly. Type “System Restore” in the search bar and follow the instructions to restore your system.
Collecting Memory Dump for Analysis
To effectively fix blue screen dump errors in Windows, it is crucial to collect a memory dump for analysis. This process allows you to identify the root cause of the error and find the appropriate solution. Follow these steps to collect a memory dump:
1. First, ensure that your computer is set to create memory dumps when a blue screen error occurs. To do this, right-click on the “This PC” icon on your desktop and select “Properties.” Then, click on “Advanced system settings” and navigate to the “Advanced” tab. Under the “Startup and Recovery” section, click on the “Settings” button.
2. In the “Write debugging information” section, select “Complete memory dump” from the drop-down menu. This option provides the most detailed information for analysis. Click “OK” to save the changes.
3. Once the memory dump settings are configured, wait for a blue screen error to occur. When it does, your computer will automatically create a memory dump file.
4. The memory dump file is typically located in the “C:\Windows\Minidump” folder. To access this folder, open File Explorer and navigate to the mentioned path.
5. If you cannot locate the memory dump file in the “Minidump” folder, it’s possible that your computer is not set to create memory dumps or that the file has been deleted. In this case, you can try using a third-party software tool like “BlueScreenView” to analyze the error.
Remember, analyzing a memory dump requires specialized knowledge and tools. If you are not familiar with this process, it is recommended to seek assistance from a professional or consult relevant online resources.
Adjusting Pagefile Settings
To adjust pagefile settings in Windows and fix blue screen dump errors, follow these steps:
1. Open the Control Panel by typing “Control Panel” in the search bar and selecting it from the results.
2. In the Control Panel, click on “System and Security” and then choose “System.”
3. In the System window, click on “Advanced system settings” on the left sidebar.
4. Under the Advanced tab, click on the “Settings” button in the Performance section.
5. In the Performance Options window, go to the Advanced tab.
6. Under the Virtual Memory section, click on the “Change” button.
7. Uncheck the “Automatically manage paging file size for all drives” option.
8. Select the drive where Windows is installed (usually the C: drive).
9. Choose the “Custom size” option.
10. Set the Initial size and Maximum size to the same value or let Windows manage the size by selecting “System managed size.”
11. Click on the “Set” button, then “OK” to save the changes.
12. Restart your computer for the changes to take effect.
Advanced Debugging Techniques

- Check for hardware issues: Inspect the hardware components for any signs of damage or loose connections.
- Update drivers: Ensure that all device drivers are up to date, as outdated drivers can cause blue screen dump errors.
- Scan for malware: Run a thorough antivirus scan to detect and remove any malware that could be causing the issue.
- Check for overheating: Monitor the temperature of your computer’s components, as overheating can lead to blue screen dump errors.
- Perform a system restore: Use the system restore feature to revert your computer’s settings to a previous point in time when the issue was not present.
- Disable unnecessary startup programs: Limit the number of programs that start automatically when your computer boots up, as these programs can conflict with one another and cause blue screen errors.
- Check memory modules: Test the RAM modules for errors using built-in Windows memory diagnostic tools.
- Use the Windows Event Viewer: Analyze the events logged in the Windows Event Viewer to identify any specific error messages related to the blue screen dump errors.
- Disable overclocking: If your computer is overclocked, revert the settings to their default values, as overclocking can lead to instability and blue screen dump errors.
- Perform a clean boot: Start your computer with a minimal set of drivers and startup programs to identify if any third-party software is causing the issue.
Utilizing Driver Verifier for Diagnosis
Driver Verifier is a powerful tool in Windows that can help diagnose and fix blue screen dump errors. By enabling Driver Verifier, you can identify problematic drivers causing the crashes and take appropriate actions to resolve them.
To enable Driver Verifier, follow these steps:
1. Press Win + X and select “Command Prompt (Admin)” to open an elevated Command Prompt.
2. In the Command Prompt, type “verifier” and press Enter to launch the Driver Verifier Manager.
3. Select “Create standard settings” and click Next.
4. Choose “Automatically select unsigned drivers” or “Select driver names from a list” based on your specific needs and click Next.
5. Restart your computer to activate Driver Verifier.
Once Driver Verifier is enabled, it will monitor your system for any driver-related issues. If a problematic driver is detected, Windows will crash with a blue screen and generate a memory dump file for analysis.
To analyze the dump file and identify the faulty driver, follow these steps:
1. After your computer restarts, go to the folder where the dump file is located. This is usually “C:\Windows\Minidump” or “C:\Windows\Memory.DMP”.
2. Open the dump file with a debugger tool like WinDbg or Visual Studio Debugger.
3. Analyze the dump file by running a command such as “!analyze -v” to get detailed information about the crash.
4. Look for clues or error messages that point to a specific driver as the cause of the crash.
Once you have identified the problematic driver, you can take appropriate actions to fix it. Here are a few options:
1. Update the driver: Visit the manufacturer’s website and download the latest driver version for the problematic device. Install it and see if the issue is resolved.
2. Roll back the driver: If you recently updated a driver and started experiencing crashes, you can try rolling back to the previous version.
3. Uninstall the driver: If updating or rolling back the driver doesn’t resolve the issue, you can uninstall the driver and let Windows reinstall it automatically.
Remember to always create a system restore point before making any driver changes, as it allows you to revert back in case anything goes wrong.
Utilizing Driver Verifier can greatly assist in diagnosing and fixing blue screen dump errors in Windows.
Recognizing Common Stop Codes
- Read the full error message displayed on the blue screen.
- Identify the stop code, which is a series of numbers and letters located at the bottom of the screen.
- Take note of any additional information provided, such as a file name or error description.
Repair Method 2: Searching for Solutions
- Open a web browser and search for the stop code along with any additional information obtained.
- Look for official Microsoft support articles or community forums discussing the specific stop code.
- Read through the suggested solutions provided and determine which ones apply to your situation.
Repair Method 3: Updating Drivers
- Press Win + X and select Device Manager from the menu.
- Expand the categories and locate the devices that have a yellow exclamation mark or are related to the stop code.
- Right-click on the device and select Update driver.
- Choose the option to search automatically for updated driver software.
- Follow the on-screen instructions to complete the driver update process.
Repair Method 4: Checking for Hardware Issues
- Shut down the computer and disconnect any external devices or peripherals.
- Remove and reinsert RAM modules, graphics cards, or any other easily removable hardware components.
- Ensure all cables are securely connected inside the computer, including power and data cables.
- Turn on the computer and check if the blue screen error persists.
Repair Method 5: Running System File Checker
- Open Command Prompt as an administrator by pressing Win + X and selecting Command Prompt (Admin).
- Type sfc /scannow and press Enter.
- Wait for the System File Checker to scan and repair any corrupt system files.
- Restart the computer and check if the blue screen error is resolved.
Preventive Measures for System Stability
To ensure system stability and prevent blue screen dump errors in Windows, it is essential to take proactive measures. Here are some preventive steps you can follow:
1. Keep your operating system updated: Regularly install Windows updates to ensure you have the latest security patches and bug fixes. These updates often address system stability issues and can help prevent blue screen errors.
2. Update device drivers: Outdated or incompatible device drivers can cause system instability and lead to blue screen errors. Visit the manufacturer’s website or use a reliable driver update tool to ensure all your drivers are up to date.
3. Scan for malware: Malware infections can corrupt system files and trigger blue screen errors. Run a reputable antivirus or anti-malware program to scan your system regularly and remove any threats.
4. Check hardware compatibility: Incompatible hardware components can cause system instability. Before adding or upgrading any hardware, ensure it is compatible with your operating system and other components.
5. Clean up disk space: Insufficient disk space can lead to system slowdowns and errors. Regularly clean up unnecessary files and folders, and consider using disk cleanup tools to free up disk space.
6. Monitor system temperature: Overheating can cause system instability and trigger blue screen errors. Ensure proper ventilation and use monitoring software to keep an eye on your system’s temperature. Clean dust from fans and heatsinks regularly.
7. Disable unnecessary startup programs: Too many programs launching at startup can overload your system and lead to instability. Disable unnecessary startup programs to improve system performance and stability.
8. Run system maintenance: Use built-in system maintenance tools like Disk Cleanup and Disk Defragmenter to optimize your system’s performance and stability.
Video Guides for Additional Help
- Introduction to Blue Screen Dump Errors: Understand what a blue screen dump error is and why it occurs.
- Common Causes of Blue Screen Dump Errors: Identify the major reasons behind these errors, such as hardware issues or driver conflicts.
- How to Analyze Blue Screen Dump Files: Learn how to interpret the information in dump files to identify the root cause of the error.
- Updating Device Drivers: Discover the steps to update outdated or incompatible device drivers that can trigger blue screen dump errors.
- Checking Hardware Components: Find out how to test hardware components like RAM, hard drive, and graphics card for any faults that may lead to dump errors.
- Resolving Software Conflicts: Explore methods to resolve conflicts between software applications that can result in blue screen dump errors.
- Performing System Restore: Understand how to use System Restore to revert your computer’s settings to a previous state, eliminating any recent changes that may be causing dump errors.
- Updating Windows and Installing Patches: Learn the importance of keeping your operating system up to date and how to install the latest patches to fix known issues that can trigger dump errors.
- Using System File Checker: Discover how to run the System File Checker tool to scan and repair corrupted system files, which can resolve blue screen dump errors.
- Reinstalling Windows: Learn the steps to reinstall Windows as a last resort if all other troubleshooting methods fail to fix the blue screen dump errors.
References for Further Reading
- Update Device Drivers
- Open Device Manager by pressing Win+X and selecting Device Manager
- Expand the categories and locate the device driver that needs updating
- Right-click on the driver and select Update driver
- Choose the option to search automatically for updated driver software
- Follow the on-screen instructions to complete the driver update
- Scan for Malware
- Open Windows Security by pressing Win+I and selecting Update & Security
- Click on Windows Security in the left pane
- Click on Virus & threat protection and then Quick scan
- Wait for the scan to complete and follow any recommended actions
- Check for Memory Issues
- Open Windows Memory Diagnostic by pressing Win+R and typing mdsched.exe
- Select Restart now and check for problems
- Wait for the system to restart and perform the memory test
- Check the test results for any memory issues
- Disable Overclocking
- Restart the computer and enter the BIOS/UEFI settings by pressing the appropriate key (usually Delete or F2)
- Locate the Overclocking or Performance section in the BIOS/UEFI
- Disable any overclocking settings or set them back to default
- Save the changes and exit the BIOS/UEFI settings
- Check for Hard Drive Errors
- Open Command Prompt as an administrator by pressing Win+X and selecting Command Prompt (Admin)
- Type chkdsk C: /f and press Enter (replace C: with the appropriate drive letter if necessary)
- Follow the on-screen instructions to schedule a disk check on the next system restart
- Restart the computer and wait for the disk check to complete
F.A.Q.
How bad is a blue screen error?
A blue screen error can be quite problematic and frustrating, especially if it occurs regularly. It may indicate a deeper issue and can potentially lead to data loss upon every reboot.
What causes memory dump?
Memory dump, specifically system memory dump, is caused when Windows experiences a fatal crash resulting in a Blue Screen of Death (BSOD). This dump file contains the contents of the computer’s memory and can be analyzed by technicians or software vendors to determine the cause of the crash.
How do I read a dump file with a blue screen?
To read a dump file with a blue screen, you can follow these steps:
1. Open the Taskbar and search for WinDbg.
2. Right-click on WinDbg and choose to Run as administrator.
3. Go to the File menu.
4. Click on Start debugging.
5. Select Open Dump file.
6. Choose the Dump file from its folder location (e.g., %SystemRoot%\Minidump).
7. Click Open.
What causes crash dump?
A crash dump is caused when an application or the operating system on a mobile device crashes or encounters an error, resulting in the creation of a log file or memory dump.
