If you are encountering DNSAPI.dll errors in your Windows System32 folder, this article provides solutions to fix them effectively.
Understanding Dnsapi.dll
The DNSAPI.dll is a crucial file in the Windows System32 directory that is responsible for helping your computer communicate with the internet. However, sometimes errors can occur with this file, causing various issues with your system. In this article, we will provide concise and helpful instructions on how to fix DNSAPI.dll errors in Windows System32.
1. Run a System File Checker scan: The System File Checker (SFC) scan is a built-in Windows tool that can help identify and repair corrupted system files. To run an SFC scan, follow these steps:
– Press the Windows key + X and select “Command Prompt (Admin)”.
– In the Command Prompt window, type “sfc /scannow” and press Enter.
– The scan may take some time to complete. Once it finishes, restart your computer and check if the DNSAPI.dll error persists.
2. Perform a malware scan: Malware infections can also cause DNSAPI.dll errors. Use a reliable antivirus or anti-malware program to scan your computer for any malicious software. If any malware is detected, follow the program’s instructions to remove it.
3. Update your operating system: Keeping your Windows operating system up to date is essential for the smooth functioning of your computer. To check for updates, follow these steps:
– Press the Windows key + I to open the Settings app.
– Click on “Update & Security” and select “Windows Update”.
– Click on “Check for updates” and wait for the process to complete.
– If any updates are available, click on “Install now” and follow the on-screen instructions.
4. Re-register the DNSAPI.dll file: Sometimes, re-registering the DNSAPI.dll file can help resolve any issues associated with it. Follow these steps to re-register the file:
– Press the Windows key + X and select “Command Prompt (Admin)”.
– In the Command Prompt window, type “regsvr32 /u DNSAPI.dll” and press Enter.
– Then, type “regsvr32 DNSAPI.dll” and press Enter.
– Restart your computer and check if the DNSAPI.dll error is resolved.
5. Perform a clean boot: A clean boot can help identify if any third-party software is causing conflicts with the DNSAPI.dll file. To perform a clean boot, follow these steps:
– Press the Windows key + R to open the Run dialog box.
– Type “msconfig” and press Enter to open the System Configuration window.
– In the General tab, select “Selective startup” and uncheck the box next to “Load startup items”.
– Go to the Services tab and check the box next to “Hide all Microsoft services”.
– Click on “Disable all” and then click on “Apply” and “OK”.
– Restart your computer and check if the DNSAPI.dll error persists. If it doesn’t, you can gradually enable the startup items and services to identify the culprit.
6. Restore your system: If none of the above methods work, you can try restoring your system to a previous point when the DNSAPI.dll error was not present. To do this, follow these steps:
– Press the Windows key + X and select “System”.
– Click on “System protection” in the left pane.
– In the System Properties window, click on “System Restore”.
– Follow the on-screen instructions to choose a restore point and complete the restoration process.
Identifying and Mitigating Security Risks
- Understanding DNSAPI.dll: Learn what DNSAPI.dll is and its role in the Windows System32 folder.
- Common Error Messages: Identify the typical error messages associated with DNSAPI.dll errors.
- Causes of DNSAPI.dll Errors: Explore the various factors that can lead to DNSAPI.dll errors in Windows System32.
- Malware and Security Risks: Understand how DNSAPI.dll errors can be related to malware infections and potential security risks.
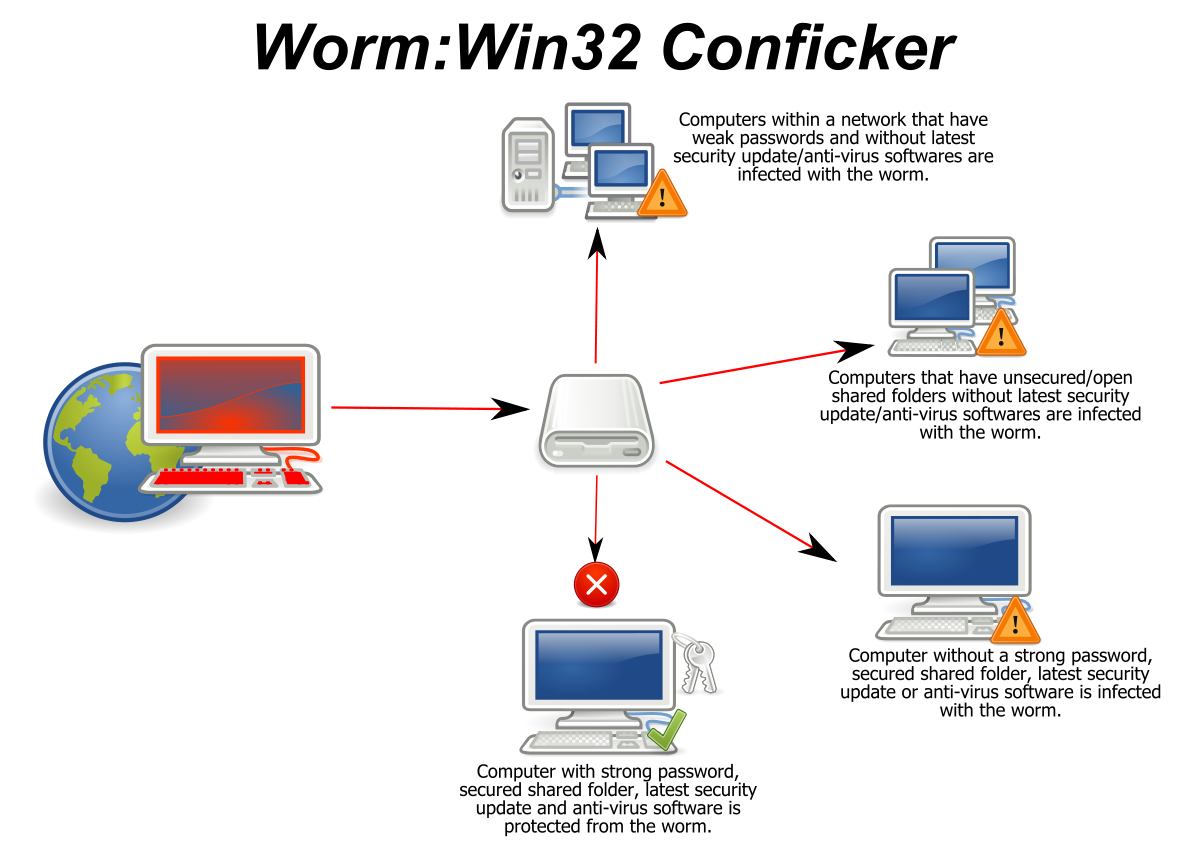
- Signs of Compromised Security: Recognize the indicators that your system may be compromised due to DNSAPI.dll errors.
- Prevention Measures: Discover proactive steps to mitigate security risks associated with DNSAPI.dll errors.
- Updating Windows: Learn how keeping your Windows operating system up to date can help prevent DNSAPI.dll errors and security vulnerabilities.
- Scanning for Malware: Understand the importance of regular malware scans to detect and remove any threats affecting DNSAPI.dll.
- Using Reliable Antivirus Software: Find out how utilizing trusted antivirus software can aid in preventing DNSAPI.dll errors and enhancing overall security.
- Implementing Firewall Protection: Explore the significance of a firewall in safeguarding against potential security risks associated with DNSAPI.dll errors.
Best Practices for Issue Resolution
When encountering DNSAPI.dll errors in the Windows System32 folder, it’s important to follow best practices for issue resolution to ensure a smooth and effective fix. Here are some concise tips to help you address this problem:
1. Identify the error: Start by identifying the specific DNSAPI.dll error you are encountering. This will help in finding the most appropriate solution.
2. Run a malware scan: DNSAPI.dll errors can sometimes be caused by malware or spyware infections. Use a reliable antivirus or anti-malware program to scan your system and remove any potential threats. Make sure to update the virus definitions before running the scan.
3. Perform a system file check: Use the built-in System File Checker tool to check for and repair any corrupted or missing system files that may be causing the DNSAPI.dll error. Open the Command Prompt as an administrator and type “sfc /scannow” to initiate the scan.
4. Update Windows: Keeping your operating system up to date is crucial for resolving various issues, including DNSAPI.dll errors. Check for available updates through the Windows Update feature and install them accordingly.
5. Update device drivers: Outdated or incompatible device drivers can also cause DNSAPI.dll errors. Visit the manufacturer’s website of your hardware components (e.g., network adapter) to download and install the latest drivers.
6. Repair or reinstall applications: If the DNSAPI.dll error is specific to certain applications, try repairing or reinstalling them. This process can fix any corrupted or missing DLL files associated with the application.
7. Restore Windows system files: If the DNSAPI.dll error persists after trying the above steps, you can use the System Restore feature to revert your system back to a previous state when it was functioning properly. Open the Control Panel, search for “System Restore,” and follow the on-screen instructions to restore your system.
8. Seek professional help: If you have tried all the above steps and are still unable to resolve the DNSAPI.dll error, it may be best to seek assistance from a professional technician or contact the software vendor for further guidance.
Remember, it’s crucial to take appropriate precautions while troubleshooting DNSAPI.dll errors. Always create a backup of important files and system settings before making any changes to your computer. Additionally, be cautious when downloading files or visiting websites, as these can be potential sources of malware or spyware infections.
Advanced Methods for Repair and Management
| Advanced Methods for Repair and Management | |
|---|---|
| Article Title: | Fix DNSAPI.dll Errors in Windows System32 |
| Method | Description |
| 1. System File Checker (SFC) |
Use the built-in System File Checker tool to scan and repair corrupted system files, including DNSAPI.dll.
|
| 2. Windows Update |
Make sure your Windows operating system is up to date, as updates often include bug fixes and patches for DLL errors.
|
| 3. DLL File Repair |
Try using a reliable DLL repair tool to automatically fix DNSAPI.dll errors.
|
| 4. System Restore |
If the DNSAPI.dll errors started recently, consider performing a system restore to a point before the errors occurred.
|
| 5. Manual DLL Replacement |
If all else fails, you can try manually replacing the DNSAPI.dll file.
|
F.A.Qs
How do I fix system32 DLL error?
To fix a system32 DLL error, you can restore the original User32.dll file from your Windows CD.
How do I fix netapi32 DLL?
To fix the netapi32 DLL error, reinstalling the program that uses the DLL file is a probable solution.
How do I get rid of DLL errors?
To get rid of DLL errors, you can try these steps:
– Clean the registry keys
– Re-register the contaminated DLL file
– Use system restore
– Run SFC to fix damaged system files
– Check for hard drive errors using CHKDSK utility
– Install DirectX
– Reinstall Visual C++ redistribution.
