Have you ever encountered the frustrating situation where your drive shows as full but no files are visible in Windows?
Main Causes for Hard Drive Appearing Full
There are several main causes for a hard drive appearing full even though there are no files visible in Windows. This can be frustrating, but there are solutions to resolve this issue.
One possible cause is the presence of hidden files or folders taking up space on the drive. To check for hidden files, open File Explorer and go to the “View” tab. Then, check the box that says “Hidden items” to reveal any hidden files or folders. Delete any unnecessary hidden files to free up space.
Another cause could be memory paging, where Windows uses a portion of the hard drive as virtual memory. To adjust the virtual memory settings, go to the Control Panel and search for “System.” Then, click on “Advanced system settings” and go to the “Advanced” tab. Under the “Performance” section, click on “Settings” and go to the “Advanced” tab again. Here, you can change the virtual memory settings to free up space on the hard drive.
Additionally, malware or viruses can also cause a hard drive to appear full. Run a full system scan using a reliable antivirus program to detect and remove any malware that may be taking up space on the drive.
By addressing these main causes, you can resolve the issue of a hard drive appearing full even though no files are visible in Windows.
Symptoms of Hard Disk Space Issues
- Drive showing full but no files
Verify and Remove Viruses or Malicious Software
If your drive is showing as full but you can’t find any files, it’s possible that your system is infected with viruses or malicious software. These can hide your files and take up valuable space on your drive. To verify and remove these threats, follow these steps:
1. Run a full system scan using a reliable antivirus software. Make sure your antivirus software is up to date and scan your entire system for any viruses or malware. Quarantine or delete any detected threats.
2. Use an anti-malware program to perform a deep scan of your system. Some malware may not be detected by traditional antivirus software, so using an anti-malware program can help identify and remove hidden threats.
3. If the issue persists, try using the CHKDSK tool to check for any errors on your drive. Open a command prompt and type “chkdsk /f” followed by the drive letter of the affected drive. This tool will scan and fix any file system errors that may be causing the issue.
4. Consider using data recovery software if you accidentally deleted any important files. These programs can help recover lost or deleted files from your drive.
Unhide Hidden Files and Folders
1. Open File Explorer by pressing the Windows key + E.
2. Click on the “View” tab at the top of the File Explorer window.
3. In the “Show/hide” section, check the box next to “Hidden items”. This will reveal any hidden files and folders on your drive.
4. If you still can’t see the files, it’s possible that they are hidden due to system settings or malware. In this case, run a full scan using a reliable antivirus program to detect and remove any potential threats.
5. If the above steps don’t help, it’s possible that the files are corrupted or the drive has a bad sector. Try using data recovery software to retrieve the files or consult a professional for assistance.
6. Remember to check the recycle bin as well. Sometimes files are mistakenly deleted and end up in the trash.
7. If you’re still unable to find the missing files, it’s recommended to create a backup of your drive and consider formatting it to resolve any underlying issues.
Clean Temporary and Junk Files
1. Open the “File Explorer” by pressing the Windows key + E.
2. Right-click on the drive that is showing as full but has no files and select “Properties.”
3. In the “General” tab, click on the “Disk Cleanup” button to open the Disk Cleanup utility.
4. The utility will analyze the drive and present you with a list of file types that can be safely deleted. Check the boxes next to “Temporary files” and “Recycle Bin” to delete these files.
5. Click on the “OK” button and then select “Delete Files” to confirm the deletion.
6. You can also clean up system files by clicking on the “Clean up system files” button in the Disk Cleanup utility. This will provide additional options to remove files such as Windows Update files and Windows upgrade log files.
7. Once the cleanup process is complete, close the Disk Cleanup utility.
Manage System Restore Points and Windows Updates
1. Open the Control Panel by pressing the Windows key + X and selecting “Control Panel” from the menu.
2. In the Control Panel, click on “System and Security” and then click on “System.”
3. In the left-hand menu, click on “System Protection.”
4. In the System Properties window, you will see a list of available drives. Select the drive that is showing as full but has no files.
5. Click on the “Configure” button.
6. In the System Protection tab, you can adjust the amount of disk space allocated for System Restore Points. Reduce this value to free up space on the drive.
7. Click on “Apply” and then “OK” to save the changes.
8. To manage Windows Updates, go back to the Control Panel and click on “Windows Update.”
9. In the Windows Update window, click on “Change settings” on the left-hand side.
10. Here, you can choose how Windows Updates are installed. You can select “Check for updates but let me choose whether to download and install them” to have more control over the updates.
11. Click on “OK” to save the changes.
By managing System Restore Points and Windows Updates, you can free up disk space and ensure that your system is up to date.
Adjust or Remove Drive Letter for Recovery Partition
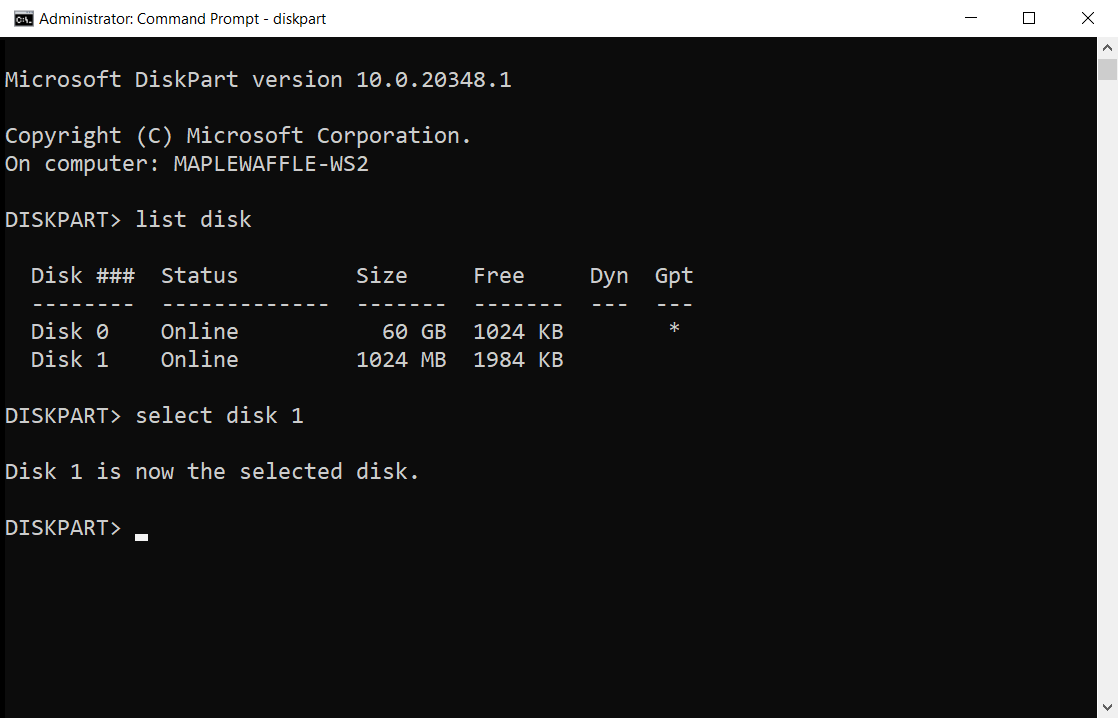
To adjust or remove the drive letter for a recovery partition in Windows, follow these steps:
1. Press the Windows key + R to open the Run dialog box.
2. Type “diskmgmt.msc” and press Enter to open the Disk Management tool.
3. Locate the recovery partition in the list of disks and partitions.
4. Right-click on the recovery partition and select “Change Drive Letter and Paths”.
5. In the new window, click the “Remove” or “Change” button, depending on what you want to do.
6. If you want to remove the drive letter, click “Remove” and then “Yes” to confirm.
7. If you want to change the drive letter, click “Change” and select a new letter from the drop-down menu.
8. Click “OK” to apply the changes.
9. Close the Disk Management tool.
Optimize Disk Space Usage
| Solution | Description |
|---|---|
| Empty Recycle Bin | Deleted files are moved to the Recycle Bin and still occupy disk space. Emptying the Recycle Bin can free up space. |
| Check Hidden Files and Folders | Some files and folders may be hidden, causing them to not be visible in the file explorer. Enable “Show hidden files and folders” to find and delete them. |
| Scan for Malware | Malware or viruses can create hidden files that consume disk space. Run a thorough antivirus scan to detect and remove any malicious files. |
| Use Disk Cleanup | Windows provides a built-in tool called Disk Cleanup that helps remove unnecessary files, temporary files, and other junk data from the disk. |
| Check for System Restore Points | System Restore Points can consume a significant amount of disk space. Check the System Protection settings and delete unnecessary restore points. |
| Move or Delete Large Files | Identify and move large files to another drive or delete them if they are no longer needed to free up disk space. |
| Disable Hibernation | Hibernation creates a large file (hiberfil.sys) equal to the amount of RAM installed. Disable hibernation if not required to regain disk space. |
| Use Disk Compression | Windows provides a feature called NTFS compression that can compress files and save disk space. Compress files and folders selectively to optimize disk space. |
| Move User Folders | By moving user folders like Documents, Downloads, Pictures, etc., to another drive, you can free up space on the system drive. |
| Resize the Page File | Adjust the size of the page file (virtual memory) to a smaller value or move it to another drive to free up disk space. |
Consider Upgrading or Replacing the Hard Disk
If you’re experiencing the issue of your drive showing full but no files in Windows, one possible solution is to upgrade or replace your hard disk. This can help resolve any potential hardware issues that may be causing the problem.
Before proceeding with upgrading or replacing the hard disk, make sure to:
1. Back up your important data: Before making any changes to your hard disk, it’s crucial to back up all your files and data to prevent any loss.
2. Choose the right hard disk: When upgrading or replacing your hard disk, make sure to choose a compatible and reliable one that suits your needs.
3. Follow proper installation procedures: If you’re upgrading or replacing the hard disk yourself, carefully follow the manufacturer’s instructions to ensure a successful installation.
4. Consider seeking professional help: If you’re not comfortable or experienced with hardware installations, it’s recommended to seek assistance from a professional technician.
By upgrading or replacing your hard disk, you can potentially resolve the issue of your drive showing full but no files in Windows.
Recovering Lost Data from Hard Drive
If your hard drive is showing as full but you can’t find any files, there are a few possible solutions to recover your lost data in Windows.
1. Check the Recycle Bin: Sometimes, files that you delete may still be in the Recycle Bin. Double-click on the Recycle Bin icon on your desktop to open it and see if your files are there.
2. Use a Data Recovery Software: There are various data recovery software available online that can help you recover lost files from your hard drive. Download and install a reliable data recovery program and follow the instructions to scan your drive for any recoverable files.
3. Try Command Prompt: Open the Command Prompt by typing “cmd” in the Windows search bar and selecting the Command Prompt app. Type “chkdsk /f *drive letter*:” and press Enter. Replace *drive letter* with the letter assigned to your hard drive. This command will check for and fix any errors on your drive.
F.A.Q.
Why is my D drive full for no reason?
Your D drive may be full for several reasons. It could be due to a small disk space, too many applications or files saved on the D drive, hidden files taking up space, or a virus or malware attack.
Why does my C drive say its full when it’s not?
The C drive may say it’s full when it’s not due to various reasons. One possibility is the accumulation of temporary files, system logs, or updates. Another reason could be hidden files taking up space. To resolve this, try running disk cleanup or using a disk space analyzer tool to identify and clear unnecessary files.
Why is my disk space full when I have nothing?
My disk space may be full even though I have no files because temporary files generated by applications or system processes can accumulate over time and occupy storage space. To resolve this, I can use disk cleanup tools or manually delete temporary files to free up storage.
Why is my hard drive full but no files?
Your hard drive may be full, but you cannot see any files. This could be due to hidden files or malware/virus infection. To resolve this issue, you can start by checking for hidden files on the hard drive.
