Are you experiencing high CPU usage due to the Desktop Window Manager (dwm.exe)? Find out how to fix this issue in no time.
Understanding Desktop Window Manager
The Desktop Window Manager (dwm.exe) is a crucial component of the Windows operating system that manages the visual effects, transparency, and rendering of windows on your desktop. However, sometimes it can cause high CPU usage, impacting your computer’s performance. To fix this issue, follow these steps:
1. Open the Task Manager by pressing Ctrl + Shift + Esc.
2. In the Processes tab, locate dwm.exe and right-click on it.
3. From the context menu, select End Task.
4. Confirm the action when prompted.
5. Wait for a moment, and then press Ctrl + Shift + Esc again to reopen the Task Manager.
6. Go to the File menu and click on Run new task.
7. In the Open field, type dwm.exe and press Enter.
8. Check if the CPU usage has reduced. If not, try updating your graphics drivers or disabling hardware acceleration in your display settings.
Causes of High CPU Usage & Malware Concerns
1. Malware Infections: Malicious software can cause high CPU usage by running unwanted processes in the background. To fix this, scan your computer with a reliable antivirus software and remove any detected threats.
2. Resource-Intensive Programs: Certain applications or processes running on your computer may consume excessive CPU resources. Use the Task Manager to identify these programs and close or uninstall them to reduce CPU usage.
3. Windows Updates: Outdated operating systems or software may result in high CPU usage. Keep your Windows OS and applications up to date to resolve compatibility issues and optimize system performance.
4. Hardware Issues: Faulty hardware components like a failing hard drive or insufficient RAM can cause high CPU usage. Check your hardware for any potential issues and replace or upgrade them if necessary.
5. Graphics Settings: High graphical settings, such as hardware acceleration or transparency effects, can strain the CPU. Adjust your graphics settings to reduce the load on the CPU and improve performance.
6. Background Processes: Some background processes or services may consume CPU resources unnecessarily. Disable unnecessary startup programs and services in the Control Panel to reduce CPU usage.
7. Windows Search Indexing: The Windows Search feature can use a significant amount of CPU resources, especially during indexing. Disable or limit Windows Search indexing to reduce CPU usage.
Checking and Updating Windows System
To check and update your Windows system, follow these steps:
1. Open the Control Panel by pressing the Windows key + R, then typing “control” and pressing Enter.
2. In the Control Panel, navigate to the “System and Security” section and click on “Windows Update.”
3. In the Windows Update window, click on “Check for updates” to see if there are any available updates for your operating system.
4. If updates are found, click on “Install updates” to begin the installation process. Make sure to save any unsaved work before proceeding.
5. Once the updates are installed, restart your computer to apply the changes.
6. If you’re still experiencing high CPU usage caused by the Desktop Window Manager (dwm.exe), you can try disabling or changing the settings of your screensaver. Right-click on your desktop, select “Personalize,” then click on “Screen Saver” and choose “None” or a different screensaver option.
7. Additionally, you can try updating your graphics card driver. Open the Device Manager by pressing the Windows key + X, then selecting “Device Manager.” Expand the “Display adapters” category, right-click on your graphics card, and select “Update driver.”
Updating Graphics Drivers and Checking GPU Usage
To fix high CPU usage caused by the Desktop Window Manager (dwm.exe), it’s important to update your graphics drivers and check GPU usage. Outdated or incompatible graphics drivers can contribute to high CPU usage. To update your graphics drivers, follow these steps:
1. Open the Control Panel (Windows) and search for “Device Manager”.
2. Expand the “Display adapters” category.
3. Right-click on your graphics card and select “Update driver”.
4. Choose the option to search automatically for updated driver software.
Additionally, you can check GPU usage to identify any potential issues. Here’s how:
1. Press Ctrl + Shift + Esc to open the Task Manager.
2. Go to the “Performance” tab.
3. In the left-hand pane, click on “GPU”.
4. Monitor the GPU usage and make note of any abnormal spikes or consistent high usage.
By updating your graphics drivers and monitoring GPU usage, you can help resolve high CPU usage caused by dwm.exe.
Steps to Disable Unnecessary Features
- Identify unnecessary features causing high CPU usage
- Access the Control Panel on your computer
- Navigate to Programs or Programs and Features
- Click on Turn Windows features on or off
- Uncheck unneeded features that may be causing the issue
- Apply the changes and restart your computer
- Monitor CPU usage to verify if the issue has been resolved
Optimizing System Performance Settings
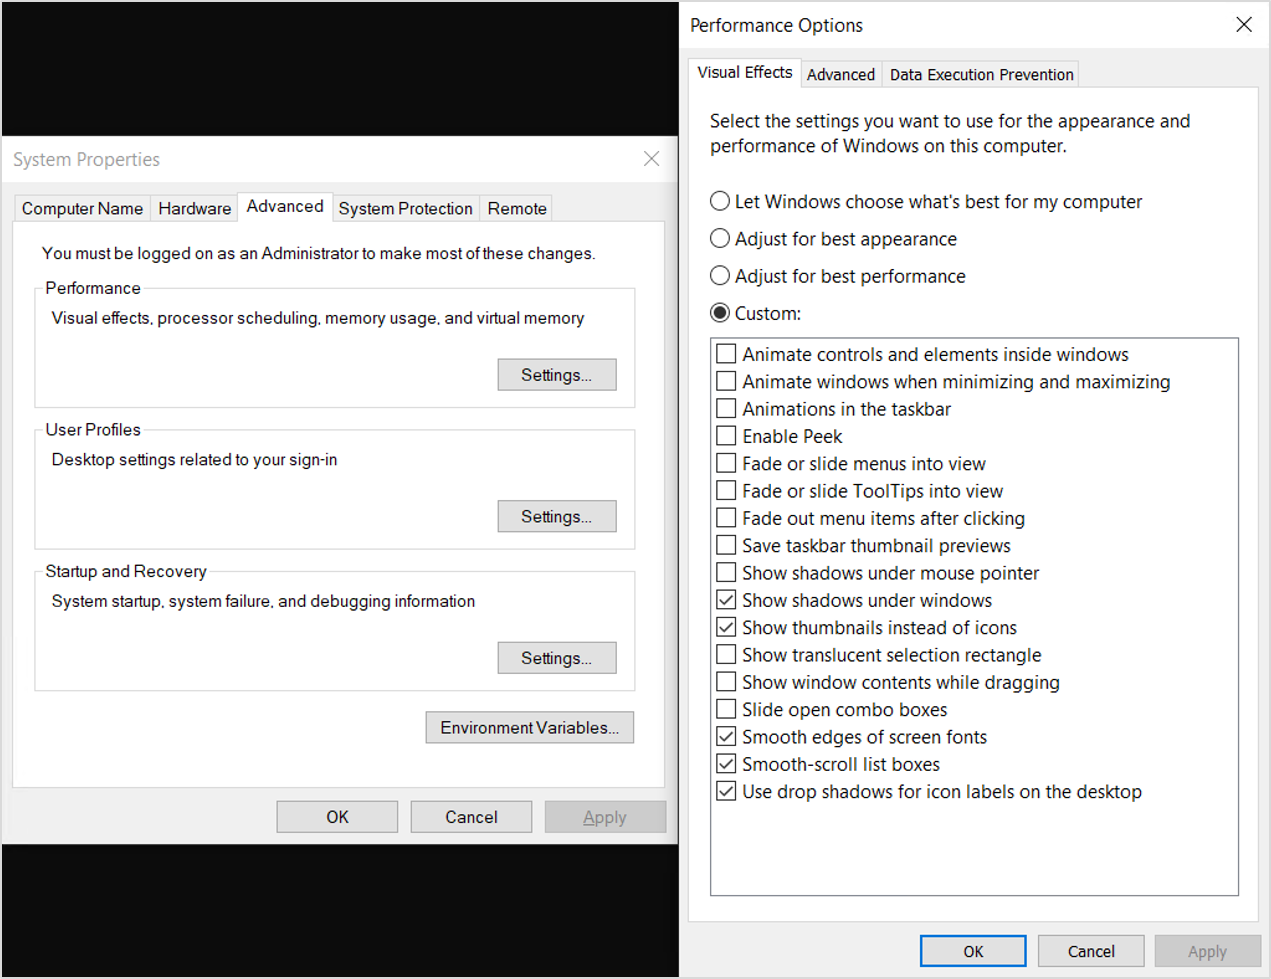
To optimize system performance and fix high CPU usage caused by the Desktop Window Manager (dwm.exe), follow these steps:
1. Access the Control Panel on your Windows computer.
2. Open the “System” settings.
3. Click on “Advanced system settings” in the left sidebar.
4. In the “Performance” section, click on the “Settings” button.
5. In the new window, select the “Adjust for best performance” option.
6. Click “Apply” and then “OK” to save the changes.
Additionally, you can try the following steps to further optimize system performance:
1. Disable unnecessary visual effects:
– Right-click on your desktop and select “Personalize.”
– Click on “Window color and appearance.”
– Uncheck the “Enable transparency” option.
– Click “OK” to apply the changes.
2. Update your device drivers:
– Press the Windows key + X and select “Device Manager.”
– Expand each category and right-click on a device.
– Select “Update driver” and follow the on-screen instructions.
3. Scan for malware and viruses:
– Use a reliable antivirus software to scan your computer for any malicious programs.
4. Close unnecessary background applications:
– Press Ctrl + Shift + Esc to open the Task Manager.
– Go to the “Processes” tab and close any unnecessary applications.
Scanning and Removing Malware
To scan and remove malware from your computer, follow these steps:
1. Open the Control Panel by clicking the Start button, selecting “Control Panel,” and then choosing “System and Security.”
2. In the System and Security window, click on “Windows Defender Firewall” or “Windows Defender Firewall with Advanced Security.”
3. In the left-hand menu, click on “Advanced settings.”
4. In the Advanced settings window, select “Windows Defender Firewall Properties.”
5. Click on the “Domain Profile,” “Private Profile,” and “Public Profile” tabs one by one.
6. Under the “Firewall state” section, make sure the “On” option is selected.
7. Navigate to the “Actions” tab and click on “Restore Defaults.”
8. Click “Apply” and then “OK” to save the changes.
9. Next, open your preferred antivirus software or use Windows Defender (built-in on Windows 10) to perform a full system scan.
10. Follow the on-screen instructions to complete the scan and remove any detected malware.
Ensuring All Software Is Up-to-Date
To ensure that all software is up-to-date on your computer, follow these steps:
1. Open the Control Panel by clicking on the Start menu and searching for “Control Panel.”
2. In the Control Panel, locate and click on “Programs” or “Programs and Features.”
3. Look for any software that needs to be updated. This could include your operating system (Windows Vista, Windows 7, Windows 8, Windows 10), application software (Microsoft Office), or device drivers.
4. Click on the software that needs updating, and then click on the “Update” or “Check for Updates” button. Follow any on-screen instructions to complete the update process.
5. If you encounter any issues during the update process, try restarting your computer and attempting the update again.
6. It is also recommended to regularly check for updates using Windows Update, which can be accessed through the Control Panel.
Troubleshooting with Clean Boot and Xperf
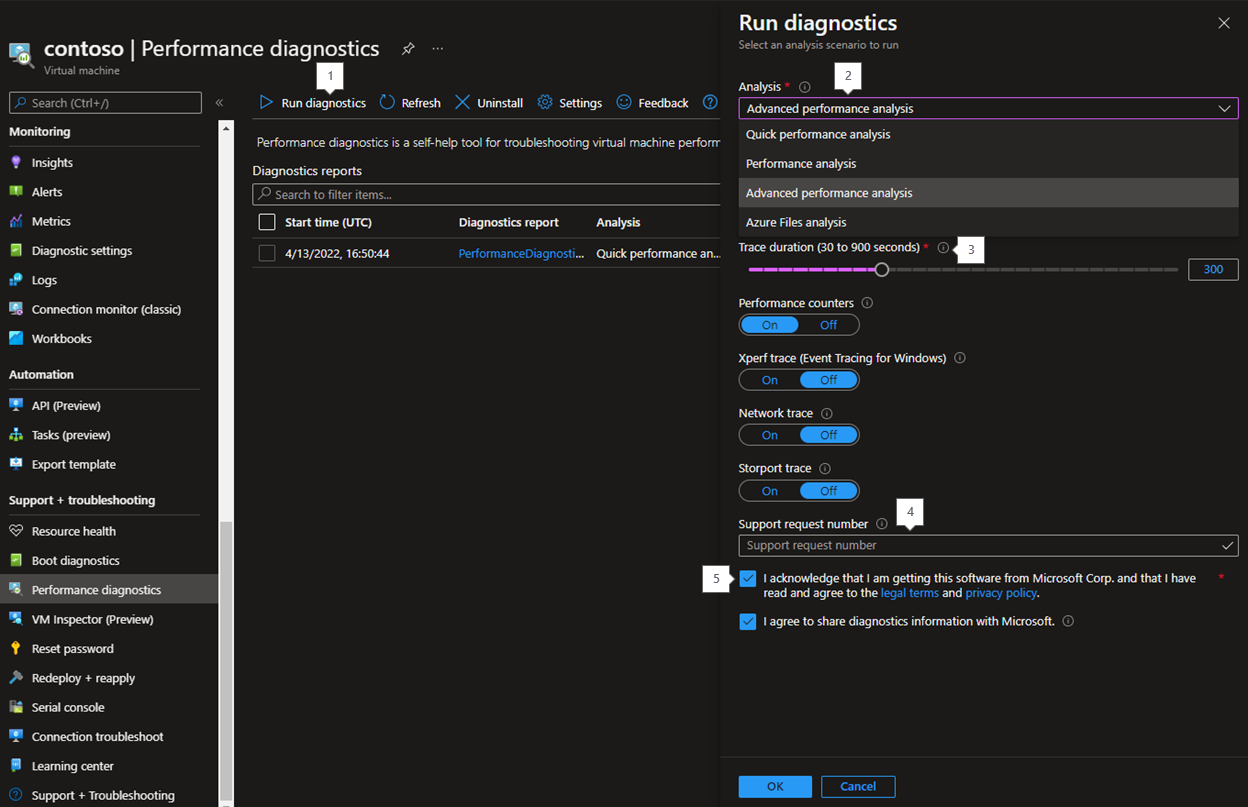
To start, perform a Clean Boot to disable all non-Microsoft services and startup items. This will help identify if a third-party program is causing the problem.
Next, use Xperf to analyze the CPU usage of dwm.exe. Xperf is a command-line tool available in Windows Vista and later versions.
Follow these steps:
1. Open a Command Prompt as an administrator.
2. Run the following command to start the Xperf trace: xperf -on PROC_THREAD+LOADER+PROFILE+DRIVERS
3. Reproduce the high CPU usage by using the computer as you normally would.
4. Stop the Xperf trace by running the following command: xperf -d trace.etl
5. Analyze the trace by opening the trace.etl file in Windows Performance Analyzer.
This process will help identify any specific processes or drivers causing the high CPU usage. From there, you can take appropriate action such as updating drivers, disabling unnecessary startup items, or uninstalling problematic programs.
How to Disable Desktop Window Manager
To disable the Desktop Window Manager (dwm.exe) and fix high CPU usage, follow these steps:
1. Press the Windows key + R to open the Run dialog box.
2. Type services.msc and press Enter to open the Services window.
3. Scroll down and find Desktop Window Manager Session Manager.
4. Right-click on it and select Properties.
5. In the Properties window, select the General tab.
6. Under Startup type, select Disabled.
7. Click Apply and then OK to save the changes.
8. Restart your computer for the changes to take effect.
Disabling the Desktop Window Manager may affect the visual experience on your computer, but it can help resolve high CPU usage issues. If you encounter any problems or want to re-enable the dwm.exe, simply follow the same steps and select Automatic or Manual under Startup type.
F.A.Q.
Can I uninstall DWM?
No, you cannot uninstall DWM.
Do I need dwm.exe on my computer?
You need dwm.exe on your computer as it is a vital part of Windows, responsible for compositing windows and enabling various visual effects like transparency and live taskbar thumbnails. It cannot be turned off and is essential in Windows 10 and Windows 11.
Is it safe to disable DWM?
It is not recommended to disable or delete the dwm.exe file as it is important for Windows systems. However, if you want to improve performance or reduce memory usage, you can choose to disable it.
Why does DWM use so much CPU?
DWM uses a significant amount of CPU due to various reasons, such as running background processes and managing system resources.
