In this article, I will discuss the steps to fix Windows Update Error 0x80190001.
Troubleshooting with Update and System File Tools
To troubleshoot Windows Update Error 0x80190001, you can use Update and System File Tools to fix the issue. Follow these steps to resolve the error:
1. Run the System File Checker (SFC) tool by opening a Command Prompt with administrative privileges. Type “sfc /scannow” and press Enter. This tool will scan and repair any corrupted system files that may be causing the error.
2. Reset the Windows Update components by using the Windows Update Troubleshooter. Go to the Control Panel and search for “Troubleshooting.” Select “Troubleshooting” from the results and click on “Fix problems with Windows Update.” Follow the on-screen instructions to reset the Windows Update components.
3. Clear the Windows Update cache. Open a Command Prompt with administrative privileges and type “net stop wuauserv” followed by “net stop bits“. Then, navigate to the folder path C:\Windows\SoftwareDistribution and delete all the files and folders inside it. After that, type “net start wuauserv” and “net start bits” to start the Windows Update services again.
4. Check if any third-party software is interfering with the Windows Update process. Temporarily disable any antivirus or firewall software and try updating again.
5. Use PowerShell to reset Windows Update components. Open PowerShell as an administrator and type “Get-WindowsUpdateLog“. This command will generate a log file with detailed information about the Windows Update process. Analyze the log file for any errors or issues and take appropriate action.
Configuring Date, Time, and Boot Settings
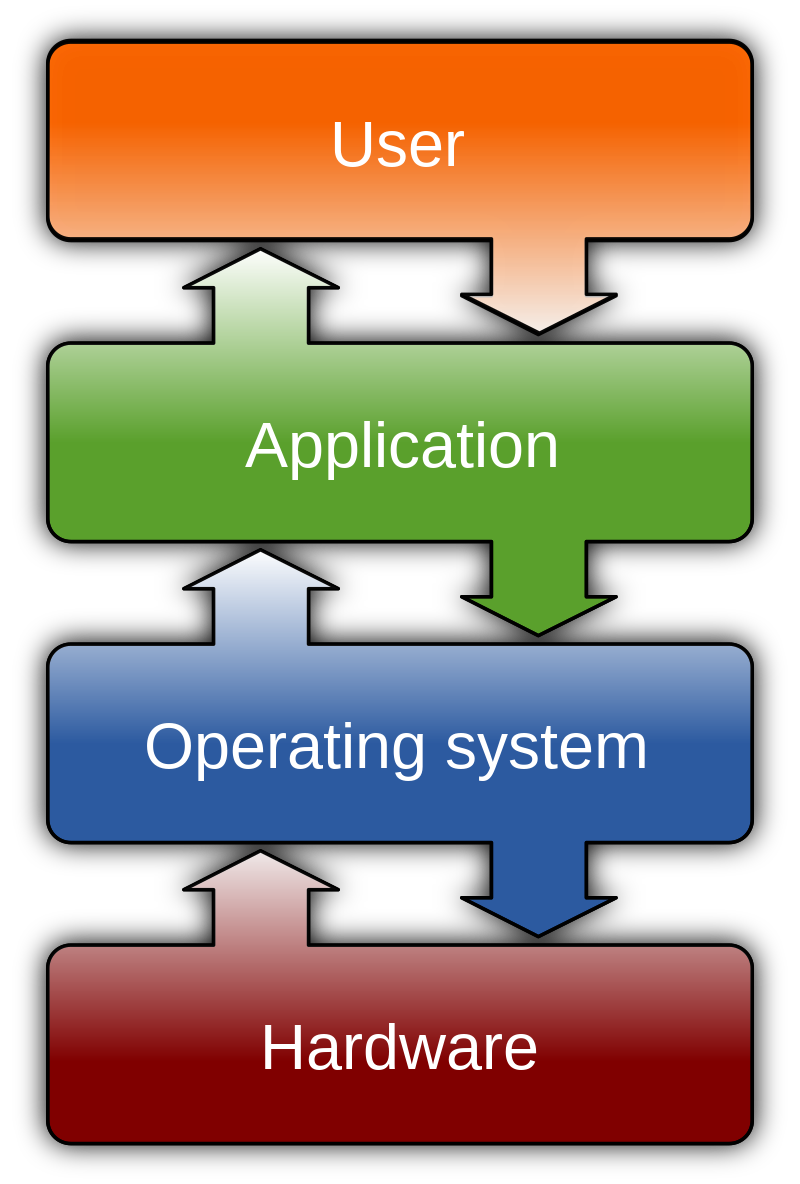
To fix Windows Update Error 0x80190001, you may need to configure your date, time, and boot settings. Follow these steps:
1. Configure Date and Time Settings:
– Open the Control Panel by searching for it in the Start menu.
– In the Control Panel, click on “Clock and Region” and then “Date and Time.”
– In the Date and Time settings, ensure that the correct date, time, and time zone are selected.
– If necessary, click on “Change date and time” to manually adjust the settings.
– Click on “OK” to save the changes.
2. Configure Boot Settings:
– Press the Windows key + R to open the Run dialog box.
– Type “msconfig” and press Enter to open the System Configuration window.
– In the System Configuration window, click on the “Boot” tab.
– Check the box next to “Safe boot” and select “Minimal” or “Network” depending on your needs.
– Click on “Apply” and then “OK” to save the changes.
– Restart your computer for the changes to take effect.
These steps should help resolve Windows Update Error 0x80190001 by configuring your date, time, and boot settings. If the error persists, you may need to try other troubleshooting steps or seek further assistance.
Optimizing Antivirus and Windows Update Services
![]()
To optimize antivirus and Windows Update services and fix Windows Update Error 0x80190001, follow these steps:
1. Disable antivirus software temporarily: Sometimes, antivirus programs can interfere with Windows Update. Temporarily disable your antivirus software and check if the error persists.
2. Run Windows Update troubleshooter: Use the built-in Windows Update troubleshooter to automatically detect and fix common issues. Open the Control Panel, search for “Troubleshooting,” and select “Fix problems with Windows Update.”
3. Reset Windows Update components: If the troubleshooter doesn’t resolve the issue, you can try resetting the Windows Update components. Open the Command Prompt as an administrator and run the following commands one by one:
– net stop wuauserv
– net stop cryptSvc
– net stop bits
– net stop msiserver
– Ren C:\Windows\SoftwareDistribution SoftwareDistribution.old
– Ren C:\Windows\System32\catroot2 catroot2.old
– net start wuauserv
– net start cryptSvc
– net start bits
– net start msiserver
4. Check disk space: Ensure that you have enough free disk space for Windows Update to download and install updates. Use the Disk Cleanup tool to remove unnecessary files and free up space.
5. Check network connection: Make sure your computer has a stable internet connection and can access the Windows Update servers. Try accessing other websites to confirm connectivity.
6. Update device drivers: Outdated or incompatible device drivers can cause Windows Update errors. Visit your computer manufacturer’s website to download and install the latest drivers for your hardware.
7. Install updates manually: If the error persists, you can try manually downloading and installing the updates from the Microsoft Update Catalog website.
Cleaning and Maintaining System Health

- Perform a full system scan using a reliable antivirus software to detect and remove any malware or viruses that may be interfering with the Windows Update process.
- Check your internet connection to ensure it is stable and not experiencing any disruptions. A weak or unstable connection can prevent Windows Update from downloading and installing updates properly.
- Disable any third-party firewall or antivirus software temporarily to eliminate potential conflicts that may be causing the error. Remember to re-enable these security programs after troubleshooting.
- Clear the Windows Update cache by stopping the Windows Update service, deleting the contents of the SoftwareDistribution folder, and restarting the service. This can resolve issues related to corrupt or stuck update files.
- Ensure that Windows Update is running properly by restarting the Windows Update service if it is not functioning correctly. You can do this through the Services tool in the Control Panel.
- Update your device drivers to the latest versions available. Outdated or incompatible drivers can cause errors during the Windows Update process. Visit the manufacturer’s website to download and install the appropriate drivers.
- Temporarily disable any proxy settings that may be configured on your system. Proxy settings can sometimes interfere with Windows Update and cause the error. Re-enable the proxy settings once the update process is completed.
- Run the Windows Update Troubleshooter tool, a built-in utility that can automatically detect and fix common Windows Update problems. This tool can be found in the Windows Settings or Control Panel.
- Make sure your system date and time are accurate. Incorrect system date and time settings can lead to Windows Update errors. Adjust the date and time settings if necessary.
Restoring and Extending System Capabilities
To fix the Windows Update Error 0x80190001 and restore and extend system capabilities, follow these steps:
1. Run the System File Checker tool to scan for and repair corrupted system files. Open a Command Prompt with administrative privileges by pressing Win + X and selecting “Command Prompt (Admin)”. Then, type “sfc /scannow” and hit Enter. Let the tool complete the scan and repair any issues it finds.
2. Clear the Windows Update cache to resolve any conflicts or errors. Open a Command Prompt with administrative privileges and type “net stop wuauserv” followed by “net stop cryptSvc” and “net stop bits“. Hit Enter after each command. Then, navigate to the “C:\Windows\SoftwareDistribution” folder and delete all its contents. Finally, restart the Windows Update services by typing “net start wuauserv“, “net start cryptSvc“, and “net start bits” in the Command Prompt.
3. Disable any third-party antivirus or firewall software temporarily, as they may interfere with the Windows Update process. Check if the error persists after disabling these programs and, if not, consider updating or replacing them.
4. Check your internet connection and ensure that it is stable and not experiencing any issues. Poor connectivity can cause update errors. Additionally, make sure that your computer’s date and time settings are accurate, as incorrect settings can also lead to update errors.
5. If you are using Windows 7, consider upgrading to a newer version of Windows, such as Windows 10 or Windows 11. Microsoft provides regular updates and support for newer operating systems, which may help resolve the error.
FAQ
How do I fix error code 0x80072EFD in Windows 10?
To fix error code 0x80072EFD in Windows 10, you can try the following methods:
1. Reset the Windows Store cache.
2. Register the Windows Store.
3. Temporarily disable Windows Firewall and Antivirus.
4. Disable any proxy settings.
5. Fix permission issues.
6. Rename the Software Distribution folder.
What is Windows 11 installation assistant 0x80190001?
Windows 11 installation assistant 0x80190001 is an error code that may occur when trying to update Windows. It is often caused by antivirus software interfering with the update process. To resolve this issue, you can try disabling your antivirus and security software.
How do I fix Microsoft error code 0x80190001?
To fix Microsoft error code 0x80190001, you can try running Command Prompt as an administrator and entering the following commands: netsh winsock reset, netsh int ip reset c:\resetlog.txt, netsh int ip reset, ipconfig /release, and ipconfig /renew. Finally, restart your computer.
