Having a corrupted SD card on your Android device can be a frustrating experience. However, there are ways to fix it and recover your valuable data. In this article, I will guide you through the process of fixing a corrupted SD card on Android and retrieving your important files.
Understanding SD Card Corruption in Android
SD card corruption in Android can be a frustrating problem, but there are steps you can take to fix it and recover your data. First, check if your SD card is physically damaged or dirty. If it’s dirty, gently clean it with a soft cloth. If it’s damaged, you may need to replace it. Next, try using an antivirus software to scan your SD card for malware or viruses. If any are found, quarantine or delete them.
If your SD card is still corrupted, you can try using data recovery software to retrieve your files. Connect your SD card to a computer using a card reader, then use the software to scan and recover your data. Finally, make sure to regularly backup your data to prevent future loss.
Initial Steps: Remove and Reinsert the Card
If you’re dealing with a corrupted SD card on your Android device, one of the first steps you can take is to remove and reinsert the card. This simple action can sometimes fix minor issues and restore functionality to your card.
To begin, power off your Android device and locate the SD card slot. Carefully remove the SD card from the slot and inspect it for any visible damage or dirt. If you notice any dirt or debris on the card, gently clean it with a soft, lint-free cloth.
Next, reinsert the SD card back into the slot, making sure it is properly aligned. Apply gentle pressure until you hear a click, indicating that the card is securely in place.
Once the card is inserted, power on your Android device and check if the card is recognized. If it is, you may be able to access your data and retrieve any important files. If not, further troubleshooting may be required.
Cleaning the SD Card and Slot
To clean the SD card and slot on your Android device, follow these steps:
1. Turn off your smartphone or tablet to avoid any data corruption during the cleaning process.
2. Remove the SD card from the device by gently pushing it in and then releasing it.
3. Inspect the SD card and slot for any dust, dirt, or debris. Use a soft, dry cloth to wipe away any visible particles.
4. If the SD card or slot is still dirty, use a can of compressed air to blow away any stubborn debris. Be sure to hold the can upright to prevent any moisture from escaping.
5. For a more thorough cleaning, you can lightly dampen a cotton swab with isopropyl alcohol and carefully clean the metal contacts on both the SD card and slot. Allow them to dry completely before reinserting the SD card.
6. Once the cleaning is complete, insert the SD card back into the slot and power on your device.
Unlocking the Memory Card
To unlock the memory card on your Android device and fix a corrupted SD card, follow these steps:
1. Insert the corrupted SD card into your Android device.
2. Open the File Explorer or any file management app on your device.
3. Locate the memory card in the file directory.
4. Tap and hold on the memory card to select it.
5. Tap on the “More” or “Options” button, usually represented by three dots or lines.
6. Select the “Properties” or “Storage” option.
7. Look for the “Lock” or “Write Protected” option and toggle it off.
8. If the option is already off, try toggling it on and then off again.
9. Close the file management app and restart your Android device.
10. After the device restarts, try accessing the memory card again.
If the above steps do not unlock the memory card, it may be due to physical damage or severe corruption. In such cases, it is recommended to consult a professional data recovery service to retrieve your data.
Reformatting the Card as a Last Resort
Reformatting the card should only be considered as a last resort when attempting to fix a corrupted SD card on an Android device. Before proceeding with this step, it is important to note that reformatting the card will erase all the data stored on it. If you have not yet attempted any data recovery methods, it is recommended to try those first to retrieve any important files. However, if all else fails, reformatting the card may be necessary. Here’s how to do it:
1. Connect the SD card to your computer using a card reader or adapter.
2. Open File Explorer or the equivalent file management tool on your computer.
3. Locate the SD card in the list of available drives.
4. Right-click on the SD card and select “Format” from the context menu.
5. Choose the desired file system for the SD card. It is recommended to select “FAT32” for compatibility with most devices.
6. Check the box that says “Quick Format” to speed up the process.
7. Click “Start” to begin the formatting process.
8. Wait for the formatting to complete. This may take a few minutes.
9. Once the formatting is finished, safely remove the SD card from your computer.
10. Insert the SD card back into your Android device and check if it is now working properly.
Scanning for Malware
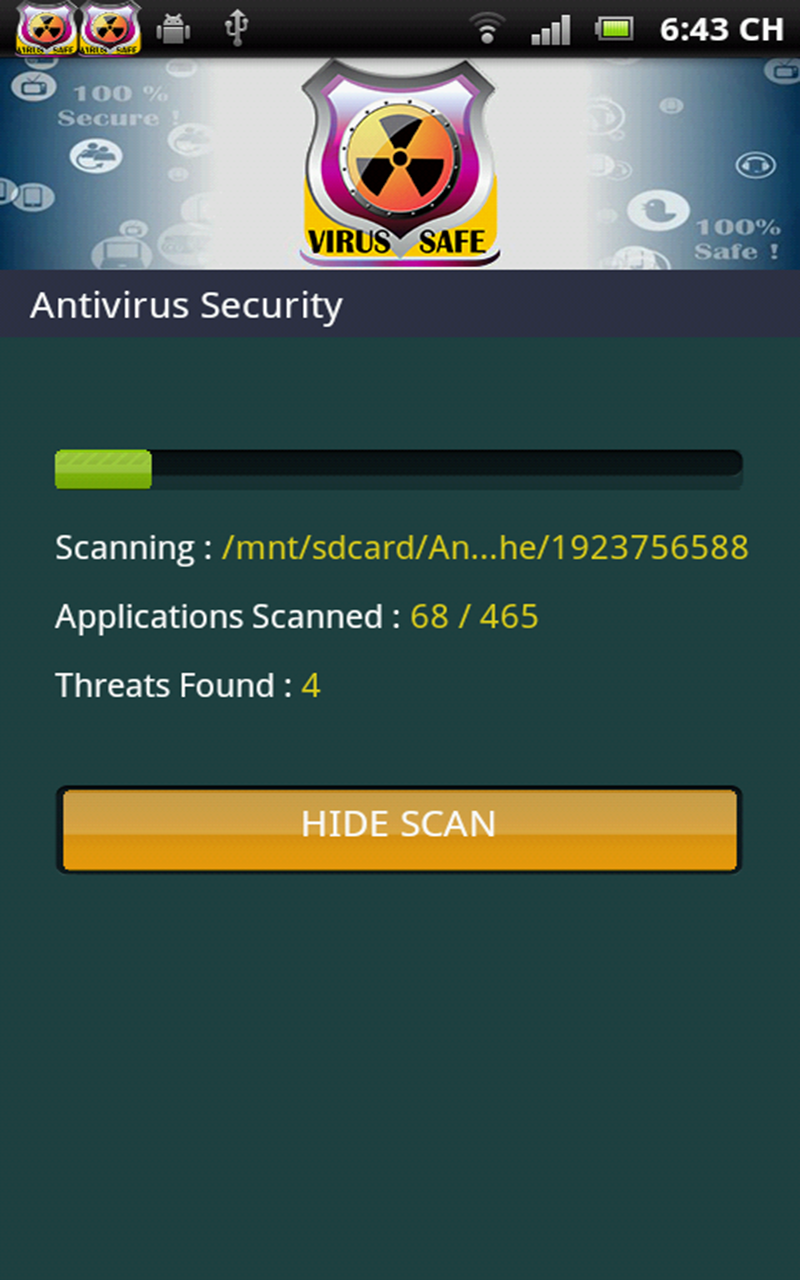
If you suspect that your Android device’s SD card is corrupted and you need to recover your data, it’s important to scan for malware before proceeding. Malware can further damage your files and compromise your device’s security.
To scan for malware on your SD card:
1. Connect your SD card to a computer using a card reader or adapter.
2. Open your preferred antivirus software and update it to the latest version.
3. Select the option to scan the connected SD card for malware.
4. Wait for the scan to complete. This may take some time depending on the size of your SD card and the number of files on it.
5. If any malware is detected, follow the recommended actions provided by your antivirus software to remove or quarantine it.
By scanning for malware, you can ensure that your recovered data is safe and prevent any further damage to your device.
Updating Android to Prevent Issues
To prevent issues with your Android device, it’s important to regularly update the operating system. Updating your Android system can help fix any bugs or vulnerabilities that may be causing problems with your device. Additionally, updating can provide improvements to performance and security.
To update your Android device, follow these steps:
1. Open the Settings app on your device.
2. Scroll down and tap on “System” or “About phone/tablet.”
3. Look for the “Software update” or “System updates” option and tap on it.
4. If an update is available, tap on “Download and install” or a similar option.
5. Follow the on-screen prompts to complete the update process.
Note: It’s recommended to connect your device to a stable Wi-Fi network before updating, as updates can be large in size.
Regularly updating your Android device can help prevent issues and ensure that your device is running smoothly.
Data Recovery from Corrupted SD Cards
If you’re dealing with a corrupted SD card on your Android device and need to recover your data, follow these simple steps:
1. Stop using the SD card immediately. Continuing to use the card could potentially overwrite the lost data, making it harder to recover.
2. Connect the SD card to a computer. Use a card reader or adapter to connect the SD card to your computer’s USB port.
3. Use data recovery software. There are various software options available that can help you recover data from a corrupted SD card. Look for reputable software that supports Android devices.
4. Follow the software instructions. Each recovery software will have its own set of instructions to follow. Typically, you’ll need to select the corrupted SD card as the target drive and initiate the recovery process.
5. Preview and recover your data. Once the software completes the scanning process, you’ll be able to preview the recoverable files. Select the files you want to recover and choose a location on your computer to save them.
Alternative: Using Cloud Storage
Instead of trying to fix a corrupted SD card on your Android device and recover the data stored on it, an alternative solution is to use cloud storage. Cloud storage allows you to store your files securely on remote servers accessible through the internet. This eliminates the need for physical storage devices like SD cards, USB flash drives, or external hard drives.
To use cloud storage as an alternative, follow these steps:
1. Choose a cloud storage provider: There are several options available, such as Google Drive, Dropbox, or Microsoft OneDrive. Consider factors like storage capacity, pricing, and ease of use when selecting a provider.
2. Install the cloud storage app: Download and install the mobile app for your chosen cloud storage provider from the Google Play Store.
3. Create an account: Sign up for a new account or use an existing account to log in to the cloud storage app.
4. Upload your files: Open the cloud storage app and use the upload feature to select the files you want to backup. You can choose to upload individual files or entire folders.
5. Access your files: Once your files are uploaded to the cloud storage, you can access them from any device with an internet connection. Simply log in to your cloud storage account through the app or a web browser.
Using cloud storage as an alternative to physical storage devices like SD cards provides several benefits. It reduces the risk of data corruption or loss due to physical damage or device failure. Additionally, cloud storage allows you to easily access your files from different devices, making it convenient for those who use multiple devices like smartphones, tablets, or computers.
Repair Tools and Apps for SD Card Issues
- Using built-in tools:
- Insert the corrupted SD card into your Android device.
- Open the “Settings” app on your Android device.
- Scroll down and tap on “Storage” or “Storage & USB” (may vary depending on your Android version).
- Select the corrupted SD card from the list of available storage options.
- Tap on the three-dot menu icon in the top-right corner of the screen.
- Choose the “Storage settings” or “Storage info” option.
- Select “Repair” or “Repair SD card” (if available).
- Follow the on-screen instructions to complete the repair process.
- Using third-party repair apps:
- Download and install a reliable SD card repair app from the Google Play Store.
- Launch the SD card repair app on your Android device.
- Allow the app necessary permissions to access your device’s storage.
- Select the corrupted SD card from the list of available storage options.
- Tap on the “Repair” or “Fix” button to initiate the repair process.
- Follow the on-screen instructions provided by the app to complete the repair.
- Using computer-based repair tools:
- Remove the corrupted SD card from your Android device.
- Insert the SD card into your computer’s SD card reader (or use an external SD card reader).
- Open a web browser and search for a reliable SD card repair tool compatible with your computer’s operating system.
- Download and install the SD card repair tool on your computer.
- Launch the repair tool and select the corrupted SD card as the target device.
- Choose the appropriate repair option (such as “Quick Repair” or “Full Repair”).
- Click on the “Start” or “Repair” button to begin the repair process.
- Wait for the repair tool to scan and fix any issues with the SD card.
- Once the repair process is complete, safely eject the SD card from your computer.
Running CHKDSK to Fix File System Errors

To fix file system errors on your Android device’s corrupted SD card, you can use the CHKDSK command. This command is available on Windows computers and can help repair any issues with the file system on your SD card.
First, connect your corrupted SD card to your computer using a card reader. Open the Command Prompt by pressing Windows + R, typing “cmd,” and hitting Enter.
In the Command Prompt window, type “chkdsk [drive letter]: /f” and press Enter. Replace “[drive letter]” with the letter assigned to your SD card. This command will scan and fix any file system errors on your SD card.
After CHKDSK completes, safely eject your SD card from the computer and insert it back into your Android device. You should now be able to access your data on the SD card without any issues.
Preventing Corruption: Regular Maintenance Tips
- Keep your SD card clean and free from dust and debris
- Regularly check for any signs of physical damage or wear
- Ensure your Android device is fully updated with the latest software version
- Use a reliable and reputable antivirus software to scan your SD card for any potential malware
- Avoid abruptly removing the SD card from your Android device without properly ejecting it
- Regularly back up the data stored on your SD card to avoid any potential loss
- Use a high-quality SD card that is compatible with your Android device
- Keep your Android device and SD card away from extreme temperatures and moisture
- Avoid downloading or transferring files from untrusted sources that may contain corrupted data
- Regularly check for any software updates or patches for your Android device
- Consider using a reliable data recovery software to recover any lost or corrupted data
F.A.Q.
How do I fix corrupted files on Android?
To fix corrupted files on Android, you can use the built-in file manager app. Simply open the app, navigate to the folder containing the corrupt file, locate the file, and try opening it. In some cases, the file manager may be able to repair minor issues with certain file types.
How to fix Android SD card without formatting?
To fix a corrupted Android SD card without formatting, you can use the chkdsk command with the parameter /r to repair any logical or physical issues.
How do I fix a corrupted memory card on my Android?
To fix a corrupted memory card on your Android, you can try the following steps:
– Update your Android device.
– Ensure that you are using a SIM card.
– Unlock the SD card.
– Check the SD card for any physical damage.
– Clean the SD card.
– Clean the SD card slot.
– Consider using an external SD drive.
– Verify the USB drive location.
Can a corrupted SD card be fixed?
A corrupted SD card can potentially be fixed using SD card data recovery software such as Disk Drill, which is a reliable solution for recovering files from all types of SD cards.
