Having trouble starting up your Windows 7 computer? Learn how to troubleshoot and repair your startup issues using Bootrec.exe.
Overview of Boot Repair
Boot Repair is a powerful tool that can help troubleshoot and repair Windows 7 startup issues. It is a command-line interface tool that is included with Windows 7.
To use Boot Repair, you will need a Windows 7 installation DVD or a USB flash drive with the Windows 7 installation files.
Boot Repair can fix various startup issues, including problems with the bootloader, corrupt system files, and missing or damaged boot files.
To access Boot Repair, you will need to boot your computer from the Windows 7 installation DVD or USB flash drive. Once you are in the Windows Setup menu, press Shift + F10 to open a command prompt.
In the command prompt, type “bootrec.exe” followed by the desired repair command, such as “/fixmbr“, “/fixboot“, or “/rebuildbcd“.
After running the repair command, you can restart your computer and see if the startup issue has been resolved.
It is always recommended to backup your important files before attempting any repairs.
Boot Repair is a valuable tool for troubleshooting and repairing Windows 7 startup issues.
Running Startup Repair with Installation Disc
When the “Press any key to boot from CD or DVD” message appears, press any key to continue. Select the language settings and click “Next”. On the next screen, click “Repair your computer”.
In the System Recovery Options, select your operating system and click “Next”. Choose “Startup Repair” from the list of recovery tools. The tool will scan your computer for problems and attempt to fix them.
After the process is complete, restart your computer and see if the startup issue is resolved. If not, you can try other troubleshooting methods like System Restore or using the command-line interface with Bootrec.exe.
Booting to Command Prompt
To boot to Command Prompt on Windows 7 using Bootrec.exe, follow these steps:
1. Start your computer and access the BIOS settings by pressing the appropriate key during startup. This key is usually displayed on the screen or mentioned in your computer’s manual.
2. In the BIOS settings, change the boot order to prioritize the device you have the Windows 7 installation media on, such as a USB drive or DVD.
3. Save the changes and exit the BIOS settings. Your computer will now boot from the Windows 7 installation media.
4. When prompted, select your language preferences and click “Next.” Then, click on “Repair your computer” at the bottom left corner of the screen.
5. In the System Recovery Options, select “Command Prompt” from the list of available options.
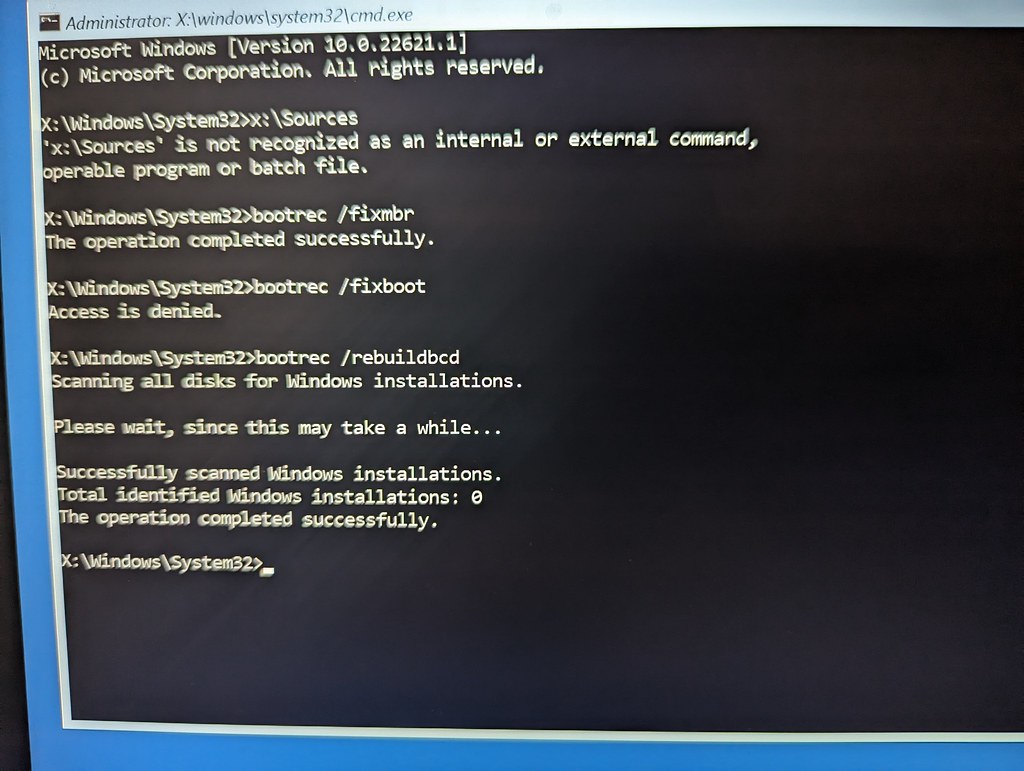
6. In the Command Prompt window, type the following command: bootrec /fixmbr and press Enter. This will repair the master boot record of your computer.
7. Next, type the command: bootrec /fixboot and press Enter. This will repair the boot sector of your computer.
8. Finally, type the command: bootrec /rebuildbcd and press Enter. This will scan for Windows installations on your computer and add them to the boot configuration data.
9. Once the process is complete, type “exit” and press Enter to close the Command Prompt window.
10. Restart your computer and it should now boot normally into Windows 7.
Using Command Prompt for Repair
To troubleshoot and repair startup issues in Windows 7 using the Command Prompt, you can use the Bootrec.exe tool. This tool is especially helpful if your computer is having trouble booting into Windows or if you’re seeing error messages related to the bootloader.
To begin, start your computer and press the F8 key repeatedly until the Advanced Boot Options menu appears. From there, select “Repair Your Computer” and press Enter.
Next, choose the language settings for your keyboard and click “Next.” Then, enter your username and password and click “OK.”
In the System Recovery Options window, select “Command Prompt” to open the Command Prompt window.
Once the Command Prompt window is open, you can use the following commands to repair your Windows 7 startup:
1. bootrec /fixmbr – This command repairs the Master Boot Record (MBR), which is responsible for booting the operating system.
2. bootrec /fixboot – This command repairs or replaces the boot sector of the system partition.
3. bootrec /rebuildbcd – This command scans for Windows installations on your computer and allows you to add or remove entries in the boot configuration data (BCD) store.
4. bootrec /scanos – This command scans all disks for Windows installations and displays them in the output.
After running these commands, restart your computer and check if the startup issue has been resolved. If not, you may need to try other troubleshooting steps, such as using System Restore, checking your hard disk drive for errors, or performing a clean installation of Windows.
Repairing Boot Sector with DiskPart
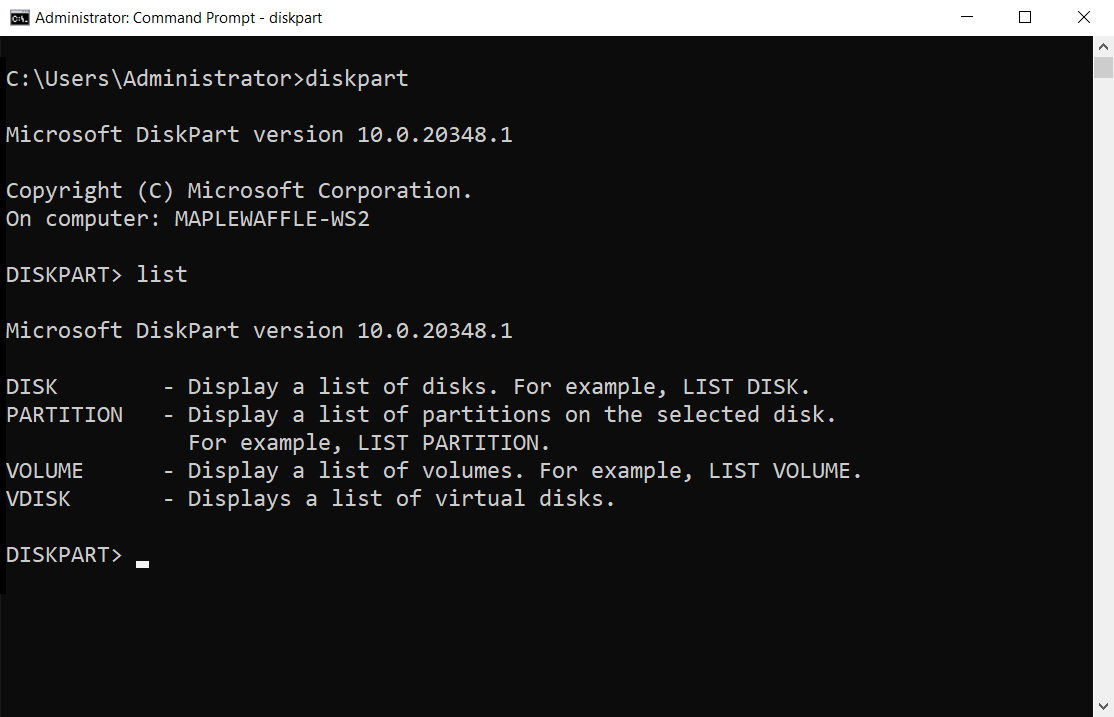
To repair the boot sector on Windows 7 using DiskPart, follow these steps:
1. Insert your Windows 7 installation disc or a system repair disc into your computer’s optical disc drive.
2. Restart your computer and boot from the disc. You may need to change the boot order in your computer’s BIOS settings to prioritize the disc drive.
3. When the “Press any key to boot from CD or DVD” message appears, press any key on your computer keyboard to start the Windows installation process.
4. Select your language preferences and click “Next.”
5. Click on “Repair your computer” at the bottom left corner of the screen.
6. In the System Recovery Options dialog box, select the operating system you want to repair and click “Next.”
7. Click on “Command Prompt” to open a command prompt window.
8. Type diskpart and press Enter to open the DiskPart utility.
9. Type list disk and press Enter to see a list of all the hard disk drives connected to your computer.
10. Identify the disk that contains the boot sector you want to repair, and then type select disk [disk number] (replace [disk number] with the appropriate number) and press Enter.
11. Type list partition and press Enter to see a list of all the partitions on the selected disk.
12. Identify the partition that contains the Windows 7 installation, and then type select partition [partition number] (replace [partition number] with the appropriate number) and press Enter.
13. Type active and press Enter to mark the selected partition as active.
14. Type exit and press Enter to exit the DiskPart utility.
15. Close the command prompt window and click on “Restart” to reboot your computer.
After following these steps, the boot sector on your Windows 7 installation should be repaired, allowing your computer to start up properly.
Rebuilding BCD with Bootrec
To troubleshoot and repair the Windows 7 startup issue using Bootrec.exe, follow these steps:
1. Start by booting your computer from the Windows 7 installation disc or a system repair disc.
2. Once the Windows Setup screen appears, select your language preferences and click “Next.”
3. On the next screen, click “Repair your computer” at the bottom left corner.
4. In the System Recovery Options window, select “Command Prompt.”
5. In the Command Prompt window, type “bootrec /fixmbr” and press Enter. This command will repair the Master Boot Record (MBR) on your hard disk drive.
6. Next, type “bootrec /fixboot” and press Enter. This command will repair the boot sector of your Windows 7 installation.
7. If the above steps don’t resolve the issue, you can also try the following commands in the Command Prompt:
– “bootrec /scanos” – This command scans for Windows installations on your computer.
– “bootrec /rebuildbcd” – This command rebuilds the Boot Configuration Data (BCD) store.
8. After executing the necessary commands, restart your computer and check if the Windows 7 startup issue is resolved.
Fixing MBR with Bootrec
To fix the MBR (Master Boot Record) on Windows 7, you can use the Bootrec.exe tool. This tool is built into Windows and can help troubleshoot and repair startup issues. Here’s how to use it:
1. Insert your Windows 7 installation disc or a system repair disc into your computer’s optical disc drive.
2. Restart your computer and boot from the disc. You may need to change the boot order in your computer’s BIOS settings.
3. Choose your language preferences and click “Next.”
4. Click on “Repair your computer” at the bottom left corner of the screen.
5. Select the operating system you want to repair and click “Next.”
6. In the System Recovery Options menu, click on “Command Prompt.”
7. In the command prompt window, type bootrec /fixmbr and press Enter. This command will repair the MBR.
8. Once the process is complete, you can close the command prompt and restart your computer.
9. Remove the installation disc from your computer’s optical disc drive before it boots up.
Renaming BCD Files for Repair
To rename BCD files for repair in Windows 7, you can use the Bootrec.exe tool. This tool is especially useful when troubleshooting and repairing startup issues.
To start, you’ll need to access the Command Prompt. You can do this by booting your computer using the Windows 7 installation disc or by using the Advanced Boot Options menu.
Once you’re in the Command Prompt, you can use the following steps to rename the BCD files:
1. Type bootrec /rebuildbcd and press Enter. This command will scan your computer for Windows installations and give you the option to add them to the BCD store.
2. If the previous step doesn’t work, you can try typing bootrec /fixboot and press Enter. This command will write a new boot sector to the system partition.
3. If you’re still experiencing issues, you can try typing bootrec /fixmbr and press Enter. This command will repair the Master Boot Record.
Remember to follow any on-screen instructions that may appear during these steps. It’s also a good idea to backup your important files before making any changes to your system.
By renaming the BCD files using Bootrec.exe, you can troubleshoot and repair startup issues in Windows 7.
Checking Disk for Errors with Chkdsk
To check your disk for errors using Chkdsk in Windows 7, follow these steps:
1. Open the Command Prompt by pressing the Windows key and typing “cmd.” Press Enter to open the Command Prompt.
2. In the Command Prompt, type “chkdsk C: /f” and press Enter. Replace “C:” with the drive letter of the disk you want to check.
3. Chkdsk will start scanning the disk for errors and repair any it finds. This process may take some time, so be patient.
4. Once Chkdsk has finished scanning and repairing the disk, you can close the Command Prompt.
It’s important to note that you may need to restart your computer for the changes to take effect. Additionally, if you want to check and repair system files, you can use the “/r” parameter instead of “/f” in the Chkdsk command.
Creating a System Image Post-Repair
To create a system image post-repair in Windows 7 using Bootrec.exe, follow these steps:
1. Start your computer and press the F8 key repeatedly to enter the Advanced Boot Options menu.
2. Select “Safe Mode with Command Prompt” using the arrow keys on your keyboard and press Enter.
3. In the Command Prompt window, type “cd X:” (replace X with the drive letter where Windows is installed) and press Enter.
4. Type “bootrec /fixboot” and press Enter to repair the boot sector of your Windows installation.
5. Type “bootrec /scanos” and press Enter to scan for Windows installations on your computer.
6. Type “bootrec /rebuildbcd” and press Enter to rebuild the Boot Configuration Data (BCD) store.
7. Once the repair process is complete, type “exit” and press Enter to exit the Command Prompt.
8. Restart your computer and check if the startup issue has been resolved.
Troubleshooting Common Boot Issues
- Check hardware connections:
- Ensure all cables are securely connected to the computer (power, data, etc.).
- Check that the power source is functioning properly.
- Verify that the monitor, keyboard, and mouse are connected correctly.
- Remove external devices:
- Disconnect any external USB devices (printers, scanners, external hard drives, etc.).
- Remove any CDs or DVDs from the optical drive.

- Attempt a power cycle:
- Turn off the computer by holding down the power button for a few seconds.
- Unplug the power cord from the back of the computer.
- Wait for about 30 seconds before plugging the power cord back in.
- Turn on the computer and check if the boot issue persists.
- Boot into Safe Mode:
- Restart the computer and continuously press the F8 key before the Windows logo appears.
- Select Safe Mode from the Advanced Boot Options menu.
- If Windows boots successfully in Safe Mode, it indicates a possible issue with a recently installed driver or software.
- Run Startup Repair:
- Insert the Windows installation disc or a system repair disc.
- Boot the computer from the disc.
- Select the appropriate language settings and click Next.
- Click on Repair your computer.
- Select Startup Repair and follow the on-screen instructions.
- Use Bootrec.exe tool:
- Boot the computer from the Windows installation disc or a system repair disc.
- Select the appropriate language settings and click Next.
- Click on Repair your computer.
- Select Command Prompt.
- Execute the following commands:
- bootrec /fixmbr
- bootrec /fixboot
- bootrec /scanos
- bootrec /rebuildbcd
- Restart the computer and check if the boot issue is resolved.
Preventing Boot Failure with UEFI Settings
| UEFI Setting | Description |
|---|---|
| Secure Boot | A security feature that prevents unauthorized operating systems from booting. Disable this if you are having trouble booting Windows 7. |
| Legacy Support | Enabling legacy support allows the system to boot using traditional BIOS instead of UEFI. Useful if Windows 7 was installed in legacy mode. |
| Fast Boot | When enabled, the system skips certain initialization steps to decrease boot time. Disable this if you are experiencing boot issues as it may cause conflicts. |
| CSM (Compatibility Support Module) | Similar to Legacy Support, enabling CSM allows the system to boot using BIOS instead of UEFI. This may be necessary if Windows 7 was installed in legacy mode or if you have incompatible hardware. |
| Boot Order | Specify the order in which devices are checked for bootable media. Ensure that the primary boot device is set to the correct Windows 7 installation source. |
| UEFI Firmware Settings | Access the UEFI firmware settings to make changes to the boot configuration. This is usually done by pressing a specific key during system startup, such as F2 or Del. |
Frequently Asked Questions
How to Fixboot Windows 7?
To fix the boot issue in Windows 7, you can follow these steps:
1. Insert the Windows 7 installation media into your computer and restart it.
2. Press the F8 key repeatedly during the boot process to access the Advanced Boot Options.
3. Choose your preferred language, time, currency, keyboard, or input method, and click Next.
4. Click on “Repair your computer.”
5. Follow the on-screen instructions to complete the repair process and fix the boot issue.
How do I fix a corrupted boot in Windows 7?
To fix a corrupted boot in Windows 7, you can use the System File Checker (SFC) tool. Open the Command Prompt as an administrator and type “sfc /scannow” (without quotes), then press Enter. This will scan and repair any corrupted system files.
How do I put Windows 7 in repair mode?
To put Windows 7 in repair mode, press and hold the F8 key before the Windows logo appears while your computer restarts. This will open the System Recovery Options menu.
How do I run Windows 7 Startup Repair?
To run Windows 7 Startup Repair, you need to follow these steps:
1. Click Start.
2. Click the power button icon.
3. Press and hold down the Shift key and then click Restart.
4. Select Troubleshoot.
5. Go to Advanced Options > Startup Repair.
6. After the startup repair process is complete, reboot the computer.
