Having trouble connecting your laptop to your TV via HDMI? Look no further. In this guide, I’ll provide troubleshooting tips to help you resolve the issue and enjoy seamless connectivity between your devices.
Restart and Reconnect Devices

To troubleshoot a laptop HDMI connection to a TV, one of the first steps you can take is to restart and reconnect your devices. This simple solution can often resolve any temporary glitches or conflicts that may be causing the connection issue.
1. Restart your laptop and TV: Begin by turning off both your laptop and TV. Once they are completely powered down, turn them back on. This can help refresh the connection between the two devices and establish a stable connection.
2. Reconnect the HDMI cable: Ensure that the HDMI cable is securely plugged into both your laptop and TV. Sometimes, a loose connection can result in poor or no display. Remove the cable and firmly reinsert it into the HDMI ports on both devices.
3. Check the input source on your TV: Using your TV remote control, access the input/source menu and make sure the correct HDMI input is selected. Some TVs have multiple HDMI ports, so ensure you have chosen the one that corresponds to your laptop.
4. Update your device drivers: Visit the manufacturer’s website of your laptop and look for any available driver updates for your graphics card or HDMI port. Download and install any updates that are relevant to your system.
5. Experiment with different HDMI cables: In some cases, the HDMI cable itself may be faulty. Try using a different HDMI cable to see if that resolves the issue. If the problem persists, it may be worthwhile to try connecting your laptop to a different TV or monitor to determine if the issue lies with the cable or the laptop itself.
Select Correct TV Input and Check HDMI Connections
To troubleshoot your laptop HDMI connection to your TV, the first step is to select the correct TV input. Use your TV remote control to navigate to the input/source selection menu. Look for options such as “HDMI 1” or “HDMI 2” and choose the corresponding input that matches the HDMI port you have connected your laptop to.
Next, check the HDMI connections. Ensure that the HDMI cable is securely plugged into both your laptop and your TV. If you have multiple HDMI ports on your TV, try switching to a different port to see if that resolves the issue.
If you are still experiencing problems, try the following steps:
1. Make sure your laptop is set to display the screen on the TV. On a Windows laptop, press the Windows key + P to open the display settings. Select “Duplicate” or “Extend” to show your laptop screen on the TV. On a Mac, go to System Preferences > Displays and select the “Arrangement” tab. Check the “Mirror Displays” option.
2. Update your graphics card drivers. Visit the website of your graphics card manufacturer (such as NVIDIA or AMD) and download the latest drivers for your specific model.
3. Restart your laptop and TV. Sometimes a simple restart can resolve connectivity issues.
4. Try using a different HDMI cable or adapter. Faulty cables or adapters can cause connection problems.
5. Experiment with different display resolutions. Some TVs may have compatibility issues with certain resolutions. Adjusting the resolution on your laptop may help establish a connection.
Configure Display Settings for External Output
1. Connect your laptop to the TV using an HDMI cable. Make sure both devices are turned on and the correct input source is selected on the TV.
2. On your laptop, right-click on the desktop and select “Display settings” or “Screen resolution.”
3. In the display settings window, you should see multiple displays listed. Identify the TV display and select it.
4. Choose the desired display mode for the TV output. You can either duplicate the laptop screen on the TV or extend the desktop to the TV as a second screen.
5. Adjust the display resolution if needed. The recommended resolution for your TV may be listed, but you can also experiment with different resolutions to find the best fit.
6. Configure any other display settings that are available, such as orientation or scaling options.
7. Test the connection by playing a video or opening an application on your laptop. The content should now be displayed on the TV.
Note: If the TV display is not detected or the image appears distorted, you may need to update the device driver for your graphics card. Visit the manufacturer’s website for the latest driver updates.
Remember to adjust the audio settings separately if you want the sound to play through the TV speakers. Use the audio output settings on your laptop to select the HDMI output as the default audio device.
Update Device Drivers
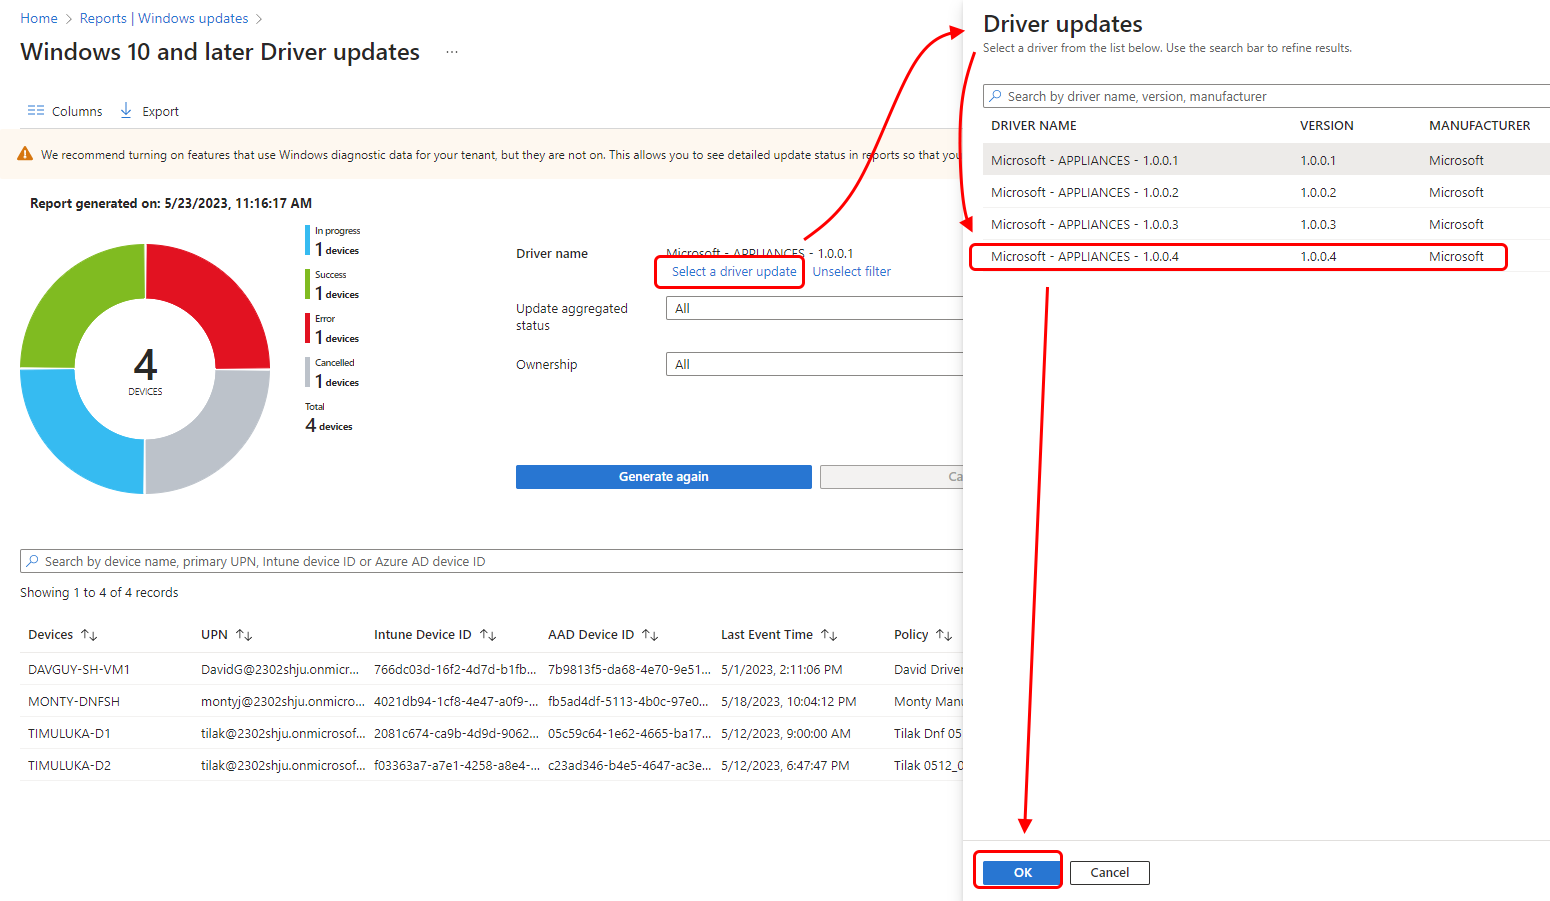
To troubleshoot a laptop HDMI connection to a TV, one possible solution is to update the device drivers. Device drivers are software programs that allow your computer’s operating system to communicate with and control the hardware devices connected to it, such as the HDMI port on your laptop.
To update your device drivers, follow these steps:
1. Press the Windows key + X on your keyboard and select “Device Manager” from the menu that appears.
2. In the Device Manager window, locate and expand the “Display adapters” category.
3. Right-click on the display adapter listed (e.g. “Intel HD Graphics” or “NVIDIA GeForce”) and select “Update driver” from the context menu.
4. Choose the option to search automatically for updated driver software. Windows will then search for and install any available updates for your device driver.
5. If Windows does not find any updates, you can also visit the manufacturer’s website (e.g. Intel or NVIDIA) and download the latest driver software from there. Make sure to select the correct driver for your specific laptop model and operating system.
6. Once the driver update is complete, restart your laptop and reconnect it to the TV using the HDMI cable.
Updating your device drivers can help resolve compatibility issues and ensure that your laptop’s HDMI connection works properly with your TV. If updating the drivers does not solve the problem, there may be other factors at play, such as a faulty HDMI cable or a problem with the TV’s HDMI port.
HDMI Troubleshooting Tips
- Check the HDMI cable connection
- Ensure that the HDMI cable is securely connected to both the laptop and the TV.
- If possible, try using a different HDMI cable to rule out any issues with the cable itself.
- Verify the TV input source
- Make sure that the TV is set to the correct input source for the HDMI connection.
- Use the TV remote or the buttons on the TV itself to navigate through the input sources and select the appropriate HDMI input.
- Adjust the display settings on the laptop
- Press the Windows key + P to open the display settings.
- Select the desired display option, such as “Duplicate” or “Extend,” to ensure that the laptop screen is being properly displayed on the TV.
- Update the graphics driver
- Open the Device Manager by pressing Windows key + X and selecting “Device Manager” from the menu.
- Expand the “Display adapters” category and right-click on the graphics driver.
- Select “Update driver” and follow the on-screen instructions to update the driver.
- Restart the laptop and TV
- Turn off both the laptop and the TV.
- Unplug the power cables from both devices.

- Wait for a few minutes, then plug in the power cables and turn on both devices.
- Try a different HDMI port on the TV
- If the TV has multiple HDMI ports, try connecting the laptop to a different port to see if the issue is specific to one port.
- Reset the TV to factory settings
- Refer to the TV’s user manual for instructions on how to reset it to its factory settings.
- Note that resetting the TV will erase any custom settings and preferences.
- Test the HDMI port on the laptop
- If possible, try connecting the laptop to a different HDMI display, such as a monitor or another TV, to determine if the issue is with the laptop’s HDMI port.
Final Considerations for Connecting Successfully
1. Check Compatibility: Ensure that both your laptop and TV support HDMI connections. Some older laptops may only have VGA or DVI ports, which will require different adapters.
2. Update Drivers: Before connecting your laptop to the TV, make sure to update your graphics drivers. Outdated drivers can often cause connection issues or poor display quality.
3. Select the Correct Input: On your TV, switch to the correct HDMI input. Use your TV’s remote or the input button on the TV itself to cycle through the available inputs until you find the one connected to your laptop.
4. Adjust Resolution Settings: If the display on your TV appears stretched or cut off, adjust the resolution settings on your laptop. Right-click on your desktop, select “Display Settings,” and choose the appropriate resolution for your TV.
5. Enable Audio: By default, most laptops will transmit audio through HDMI once connected to a TV. However, if you experience audio issues, right-click on the volume icon in your system tray, select “Playback Devices,” and ensure that HDMI is set as the default audio output.
6. Troubleshoot Connection Problems: If you encounter connection problems, try the following steps:
– Disconnect and reconnect the HDMI cable firmly on both ends.
– Restart both your laptop and TV.
– Try a different HDMI cable or port on your TV.
– Update your laptop’s operating system and drivers.
– If using an adapter, ensure it is properly connected and compatible.
7. Consider Other Options: If you’re still experiencing issues, consider alternative methods for connecting your laptop to the TV. This could include using a VGA or DVI adapter, connecting via USB, or using wireless streaming devices like Chromecast or Apple TV.
Frequently Asked Questions
Why is my laptop screen black when I connect to my TV HDMI?
Your laptop screen may be black when you connect it to your TV via HDMI due to an outdated graphics driver. Updating the graphics driver can help resolve this issue.
Why does my monitor say no signal when HDMI is plugged in?
When HDMI is plugged in, the monitor may display “no signal” due to various factors such as an unstable connection, corrupted monitor, outdated drivers, or a faulty hardware condition.
How do I enable HDMI on my laptop to my TV?
To enable HDMI connection between your laptop and TV, start by connecting one end of the HDMI cable to your laptop’s HDMI output. Then, connect the other end of the cable to one of the HDMI inputs on your TV. Finally, use the remote control to select the input that corresponds to the HDMI connection (e.g., HDMI 1, HDMI 2, HDMI 3).
Why is my laptop not connecting to my TV via HDMI?
Your laptop may not be connecting to your TV via HDMI due to loose connections or a faulty HDMI cable. To resolve the issue, try disconnecting and reconnecting the HDMI cable securely. If the problem persists, consider using a different HDMI cable. Additionally, attempt connecting your laptop to a different HDMI port on your TV and ensure that the TV input is set to the corresponding port.
