Having a Windows 10 laptop stuck at the spinning circle can be frustrating.
Use the Ctrl + Alt + Del Key Combination
If your Windows 10 laptop is stuck at the spinning circle, you can try using the Ctrl + Alt + Del key combination to fix the issue. This keyboard shortcut will bring up the Task Manager, which can help you identify and resolve any problems that may be causing the spinning circle.
To use the Ctrl + Alt + Del key combination, follow these steps:
1. Press and hold the Ctrl key, the Alt key, and the Del key at the same time.
2. Release all three keys.
3. The Task Manager window should now appear on your screen.
4. In the Task Manager, you can see a list of running processes and applications. Look for any processes that are not responding or taking up a lot of system resources.
5. Right-click on the problematic process and select “End Task” from the context menu. This will force the process to close.
6. If the spinning circle persists, try restarting your laptop by selecting “Restart” from the Start menu or pressing the power button.
Using the Ctrl + Alt + Del key combination and the Task Manager can help you troubleshoot and resolve issues that may be causing your Windows 10 laptop to get stuck at the spinning circle.
Disconnect All USB Devices

Here’s how to do it:
1. Shut down your laptop completely. Make sure it’s turned off before proceeding.
2. Unplug all USB devices from your laptop. This includes any external storage, dongles, wireless keyboards, headsets, game controllers, or any other USB devices that are connected.
3. Wait for a few seconds. Give your laptop some time to recognize that the USB devices have been disconnected.
4. Power on your laptop. Press the power button and let your laptop boot up normally.
By disconnecting all USB devices, you eliminate the possibility of any faulty device causing the spinning circle issue. If the problem persists, it might be worth trying other troubleshooting steps or seeking further assistance. Remember to reconnect your USB devices once the issue is resolved.
Note: This solution assumes that the spinning circle issue is not caused by other factors like a software conflict, malware, or hardware problems. If the problem persists, consider consulting a professional or referring to more comprehensive troubleshooting guides.
Uninstall Third-party Anti-virus Software
To uninstall third-party antivirus software on your Windows 10 laptop that is stuck at the spinning circle, follow these steps:
1. Press Ctrl + Alt + Delete on your keyboard to open the Task Manager.
2. In the Task Manager window, click on the “More details” option if it’s not already expanded.
3. Look for the antivirus software in the list of processes. It may be listed under the name of the software or the antivirus company.
4. Right-click on the antivirus process and select End task to stop it from running.
5. Close the Task Manager.
After stopping the antivirus software, you can uninstall it using the following steps:
1. Press the Windows key + I on your keyboard to open the Settings app.
2. In the Settings app, click on Apps.
3. On the “Apps & features” page, scroll down and locate the antivirus software you want to uninstall.
4. Click on the antivirus software and then click on the Uninstall button.
5. Follow the on-screen instructions to complete the uninstallation process.
Once the antivirus software is uninstalled, you can consider using Microsoft Defender Antivirus, which is built-in to Windows 10, for your computer’s security. Microsoft Defender Antivirus provides real-time protection against malware and can be enabled in the Windows Security settings.
Scan and Remove Virus or Malware
If your Windows 10 laptop is stuck at the spinning circle, it could be due to a virus or malware. Follow these steps to scan and remove any potential threats:
1. Start your laptop in Safe Mode by pressing the Windows key + R to open the Run dialog box. Type “msconfig” and press Enter. In the System Configuration window, go to the Boot tab and check the “Safe boot” option. Click Apply and then OK. Restart your laptop.
2. Once in Safe Mode, open the Windows Security app. Go to the Virus & threat protection tab and click on “Quick scan“. This will scan your laptop for any viruses or malware.
3. If any threats are detected, click on “Remove” or “Quarantine” to get rid of them. Make sure to follow any additional instructions provided by the security app.
4. After the scan and removal process is complete, restart your laptop normally. This should resolve the issue of being stuck at the spinning circle.
It’s always a good idea to regularly backup your important files and data to an external storage device or cloud storage, as viruses and malware can cause data loss.
If the issue persists even after scanning and removing viruses or malware, it could be related to other factors such as a hardware problem or a software conflict. In such cases, it’s recommended to seek professional help or contact the laptop manufacturer for further assistance.
Enter Windows Safe Mode
1. Press and hold the Shift key on your keyboard.
2. While holding Shift, click the Restart button in the Windows Start menu.
3. Your laptop will restart and display the Choose an option screen.
4. Select Troubleshoot from the options.
5. In the Troubleshoot menu, select Advanced options.
6. Choose Startup Settings from the Advanced options.
7. Click the Restart button in the Startup Settings.
8. When your laptop restarts, you’ll see a list of options. Press the 4 or F4 key on your keyboard to enter Safe Mode.
9. Your laptop will now boot into Safe Mode, bypassing the spinning circle issue.
In Safe Mode, you can troubleshoot and fix any software-related issues that may be causing the spinning circle problem.
Uninstall Recently Installed Updates
![]()
1. Press Ctrl + Alt + Delete on your keyboard to open the Task Manager.
2. In the Task Manager window, click on the File menu and select Run new task.
3. Type control panel and press Enter to open the Control Panel.
4. In the Control Panel, click on Programs and then select Programs and Features.
5. On the left-hand side of the window, click on View installed updates.
6. A list of recently installed updates will appear. Right-click on the update you want to uninstall and select Uninstall.
7. Follow the on-screen prompts to complete the uninstallation process.
8. Restart your laptop to apply the changes.
By uninstalling the recently installed updates, you may be able to resolve the issue of your Windows 10 laptop being stuck at the spinning circle. If the problem persists, you may consider performing a system restore or seeking further assistance from a professional.
Reinstall Graphics Card Driver
To reinstall the graphics card driver on your Windows 10 laptop stuck at the spinning circle, follow these steps:
1. Press the Ctrl + Shift + Esc keys to open the Task Manager.
2. In the Task Manager, go to the “File” menu and select “Run new task”.
3. Type devmgmt.msc and press Enter to open the Device Manager.
4. Expand the “Display adapters” category in the Device Manager.
5. Right-click on your graphics card and select “Uninstall device”.
6. Check the box that says “Delete the driver software for this device” and click “Uninstall”.
7. Restart your laptop.
8. After rebooting, Windows will automatically reinstall the graphics card driver.
9. If the issue persists, visit the manufacturer’s website to download and install the latest driver for your graphics card.
Use Startup Repair
If your Windows 10 laptop is stuck at the spinning circle on the loading screen, you can try using Startup Repair to fix the issue. Startup Repair is a built-in feature in Windows 10 that can help resolve startup problems and get your laptop back up and running. Here’s how to use it:
1. Press the Control + Alt + Delete keys on your keyboard to open the Task Manager.
2. In the Task Manager, click on the “File” menu and select “Run new task”.
3. Type “msconfig” (without quotes) in the “Open” field and click “OK”.
4. In the System Configuration window, go to the “Boot” tab.
5. Under the “Boot options” section, check the box next to “Safe boot” and select “Minimal”.
6. Click “Apply” and then “OK”.
7. Restart your laptop and it should boot into Safe Mode.
8. Once in Safe Mode, press the Windows key + R to open the Run dialog box.
9. Type “msconfig” (without quotes) and click “OK”.
10. In the System Configuration window, go to the “Boot” tab again.
11. Under the “Boot options” section, uncheck the box next to “Safe boot”.
12. Click “Apply” and then “OK”.
13. Restart your laptop again and it should boot normally.
If the spinning circle issue persists, you may need to perform a System Restore or seek further assistance.
Use a Windows 10 Recovery Disk

1. Insert the Windows 10 Recovery Disk into your laptop’s DVD drive.
2. Restart your laptop and boot from the recovery disk.
3. When the recovery options screen appears, select “Troubleshoot” and then “Advanced options”.
4. Choose “Startup Repair” from the list of advanced options.
5. Follow the on-screen instructions to let Windows repair any issues that may be causing the spinning circle problem.
6. If the startup repair doesn’t resolve the issue, go back to the advanced options and select “System Restore” to restore your laptop to a previous working state.
7. If none of the above options work, you can try using the “Reset this PC” option to reinstall Windows 10 while keeping your personal files intact.
8. If all else fails, you may need to perform a clean installation of Windows 10 using the recovery disk.
Do System Restore
If your Windows 10 laptop is stuck at the spinning circle, you can try doing a System Restore to fix the issue.
Here’s how you can do it:
1. Press the Ctrl, Alt, and Delete keys together to open the Task Manager.
2. In the Task Manager, click on the “File” tab and select “Run new task”.
3. Type rstrui.exe and press Enter to open the System Restore window.
4. Follow the on-screen instructions to choose a restore point and start the restoration process.
5. Wait for the restoration to complete and then restart your laptop.
Performing a System Restore can help resolve software conflicts or system errors that may be causing your laptop to be stuck at the spinning circle. It will revert your system back to a previous point in time, without affecting your personal files.
Note: Make sure you have a backup of your important files before proceeding with the System Restore.
Clear CMOS Memory
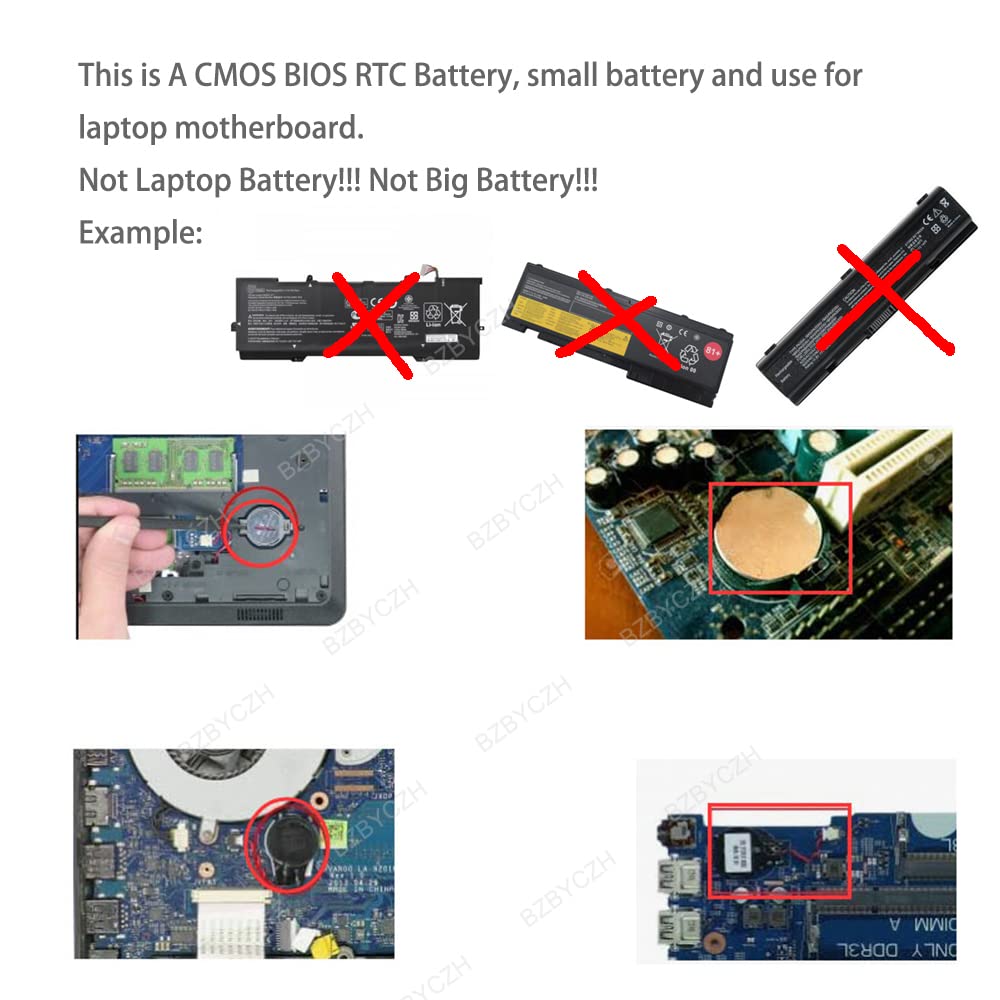
To clear the CMOS memory on a Windows 10 laptop stuck at the spinning circle, follow these steps:
1. Power off your laptop completely.
2. Locate the CMOS battery on your laptop’s motherboard. It is usually a small, round battery.
3. Carefully remove the CMOS battery from its socket.
4. Press and hold the laptop’s power button for 10-15 seconds to discharge any remaining power.
5. Wait for a few minutes to ensure that all residual power is drained from the system.
6. Reinsert the CMOS battery back into its socket.
7. Power on your laptop and check if the spinning circle issue is resolved.
If the problem persists, it may be necessary to reset the BIOS settings to default. This can usually be done by pressing a specific key (such as F2 or Del) during the boot process to access the BIOS setup utility. Look for an option to “Load Default Settings” or “Reset BIOS to Defaults” and select it. Save the changes and exit the BIOS.
Replace CMOS Battery
To replace the CMOS battery on your Windows 10 laptop stuck at the spinning circle, follow these steps:
1. Shut down your laptop and disconnect any power source.
2. Locate the CMOS battery on your laptop’s motherboard. It is usually a small round battery.
3. Use a small screwdriver or your fingers to carefully remove the old CMOS battery.
4. Insert the new CMOS battery into the same slot, ensuring it is properly seated.
5. Reconnect any power source and turn on your laptop.
6. If the spinning circle issue persists, try pressing Ctrl + Alt + Delete on your keyboard to bring up the Task Manager.
7. In the Task Manager, locate any programs that are not responding and end them.
8. If the issue still persists, consider updating your operating system and drivers by going to the Windows Update settings.
9. Additionally, you can try booting your laptop into Safe Mode to troubleshoot any software conflicts.
10. If all else fails, it may be worth seeking professional help to diagnose any hardware issues that may be causing the problem.
Replace Hard Drive
If your Windows 10 laptop is stuck at the spinning circle and you’ve ruled out other possible causes, it may be time to replace your hard drive. Follow these steps to fix the issue:
1. Power off your laptop and disconnect any external devices.
2. Remove the back cover of your laptop to access the hard drive. Refer to your laptop’s manual for specific instructions.
3. Locate the hard drive and disconnect any cables connected to it.
4. Carefully remove the hard drive from its slot.
5. Install the new hard drive by securely inserting it into the slot.
6. Reconnect any cables that were disconnected earlier.
7. Replace the back cover of your laptop.
8. Power on your laptop and wait for it to boot up.
9. If your laptop is still stuck at the spinning circle, try pressing Ctrl+Alt+Delete to open the Task Manager.
10. In the Task Manager, go to the “Processes” tab and look for any programs that may be causing the issue. End these processes by selecting them and clicking on “End Task”.
11. If the issue persists, you may need to reinstall your operating system. Refer to your laptop’s manual or the manufacturer’s website for instructions on how to do this.
Clean Reinstall Windows
If your Windows 10 laptop is stuck at the spinning circle and you’ve tried all the other fixes without success, a clean reinstall of Windows may be your best option. This process will erase all the data on your laptop, so be sure to back up any important files before proceeding.
To clean reinstall Windows 10, follow these steps:
1. Create a Windows 10 installation media using a USB drive or DVD. You can download the Windows 10 ISO file from the Microsoft website.
2. Insert the installation media into your laptop and restart it.
3. During the boot process, press the appropriate key (usually F12 or Del) to enter the boot menu. Select the installation media as the boot device.
4. Follow the on-screen prompts to begin the Windows 10 installation. When you reach the installation type screen, select “Custom: Install Windows only (advanced).”
5. On the next screen, you’ll see a list of partitions. Select the partition where Windows is currently installed and click “Delete.” This will remove all the data on that partition.
6. After deleting the partition, select the unallocated space and click “Next” to begin the installation.
7. Follow the remaining prompts to complete the installation. Once it’s finished, your laptop will restart.
8. After the restart, you’ll need to go through the initial setup process, including setting up a new user account and connecting to a Wi-Fi network.
9. Once you’re logged in, make sure to install all the necessary drivers for your laptop’s hardware. You can usually find these on the manufacturer’s website.
10. Finally, reinstall any necessary applications and restore your files from your backup.
By performing a clean reinstall of Windows 10, you should be able to fix the issue of your laptop being stuck at the spinning circle. Just remember to back up your important data before proceeding and follow the steps carefully.
Frequently Asked Questions
How do I stop my computer screen from spinning?
To stop your computer screen from spinning, you can go to the Action Center icon on your taskbar. Use either the touchscreen or mouse to select the on-screen options and then choose Rotation lock to turn it on or off.
Why does my computer just keep spinning?
Your computer may just keep spinning because of conflicts with third-party software. Performing a clean boot can help identify the conflicting app and uninstall it.
How do I stop the spinning wheel on my laptop?
To stop the spinning wheel on your laptop, you can try performing a hard reset by holding down the power button for 10 seconds until the computer turns off.
