Having trouble with your laptop getting stuck on the shutting down screen? Don’t worry, I’ve got you covered. Find out how to fix this issue on Windows 10 and 11.
Forced Shutdown Techniques
If your laptop is stuck on the shutting down screen in Windows 10 or 11, there are a few techniques you can try to fix the issue. Here are some direct instructions that may help:
1. Hold the power button: Press and hold the power button on your laptop for about 10 seconds until it turns off. This will force a shutdown and may resolve the problem.
2. Disconnect the power: If holding the power button doesn’t work, unplug the power cable from your laptop and remove the battery, if possible. Wait for a few minutes, then reconnect the power cable and battery, and try turning on your laptop again.
3. Boot into Safe Mode: Restart your laptop and repeatedly press the F8 key during startup to access the Advanced Boot Options menu. From there, select “Safe Mode” and let your laptop boot into this mode. Once in Safe Mode, try shutting down your laptop normally and see if the issue persists.
4. Use MSConfig: Press the Windows key + R to open the Run dialog box, then type “msconfig” and press Enter. In the System Configuration window, go to the “Services” tab and check the box next to “Hide all Microsoft services.” Then, click “Disable all” and click OK. Restart your laptop and see if it shuts down properly.
Booting in Safe Mode and Clean Boot Procedures
Booting in Safe Mode can help resolve issues when your laptop is stuck on shutting down in Windows 10 & 11. To enter Safe Mode, follow these steps:
1. Press the Windows key to open the Start menu.
2. Click on the power icon, then hold the Shift key and select Restart.
3. On the blue screen that appears, select Troubleshoot, then Advanced options.
4. Choose Startup Settings and click Restart.
5. When the Startup Settings menu appears, press the F4 key to boot into Safe Mode.
In Safe Mode, Windows starts with only essential drivers and services, allowing you to troubleshoot and identify the cause of the issue.
If Safe Mode doesn’t help, you can try a Clean Boot. This process disables all non-essential startup programs and services, which can help identify conflicting software or malware. Here’s how:
1. Press the Windows key and type “msconfig” to open the System Configuration utility.
2. In the General tab, select the “Selective startup” option.
3. Uncheck the “Load startup items” box.
4. Go to the Services tab and check “Hide all Microsoft services.”
5. Click on “Disable all” to disable all non-Microsoft services.
6. Click Apply and then OK.
7. Restart your laptop.
By performing a Clean Boot, you can isolate the issue and determine if it’s caused by a specific application or service. If the problem is resolved, you can gradually enable the disabled programs and services to identify the culprit.
Disabling Fast Startup and Hybrid Shutdown
1. Press the Windows key + X to open the Power User menu.
2. Select “Power Options” from the menu.
3. In the Power Options window, click on “Choose what the power buttons do” on the left-hand side.
4. Click on “Change settings that are currently unavailable” at the top of the window.
5. Scroll down to the “Shutdown settings” section and uncheck the box next to “Turn on fast startup.”
6. Click on “Save changes” to apply the settings.
This will disable Fast Startup. Next, you’ll want to disable Hybrid Shutdown using the following steps:
1. Press the Windows key + X to open the Power User menu again.
2. Select “Device Manager” from the menu.
3. In the Device Manager window, expand the “System devices” category.
4. Right-click on “Intel(R) Management Engine Interface” (or a similar entry) and select “Properties.”
5. Go to the “Power Management” tab.
6. Uncheck the box next to “Allow the computer to turn off this device to save power.”
7. Click on “OK” to save the changes.
Disabling both Fast Startup and Hybrid Shutdown can help resolve issues with a laptop getting stuck on shutting down. Give it a try and see if it helps resolve the problem.
Updating Windows and Driver Updates
![]()
To fix a laptop stuck on shutting down, it’s important to update Windows and your drivers regularly. These updates often include bug fixes and performance improvements that can help resolve the issue.
To update Windows, follow these steps:
1. Open the Start menu and click on “Settings.”
2. In the Settings window, click on “Update & Security.”
3. Click on “Windows Update” in the left-hand menu.
4. Click on “Check for updates” and wait for Windows to search for available updates.
5. If updates are found, click on “Install” to download and install them.
6. Restart your laptop once the updates are installed.
Updating your drivers can also help resolve the issue. Here’s how to do it:
1. Open the Start menu and type “Device Manager.”
2. Click on the “Device Manager” application that appears in the search results.
3. In the Device Manager window, expand the categories to find the drivers you want to update.
4. Right-click on the driver and select “Update driver.”
5. Choose the option to search automatically for updated driver software.
6. Follow the on-screen instructions to download and install the latest driver updates.
Updating Windows and your drivers can improve your laptop’s performance and fix various issues, including being stuck on shutting down. Make sure to check for updates regularly to keep your system running smoothly.
Running System File Checker and Repairing Bad Sectors
To troubleshoot a laptop that is stuck on shutting down in Windows 10 or 11, you can try running the System File Checker (SFC) and repairing bad sectors on your hard drive.
To run the System File Checker:
1. Press the Windows key + X and select “Command Prompt (Admin)” or “Windows PowerShell (Admin)” from the menu.
2. In the command prompt window, type “sfc /scannow” and press Enter.
3. The System File Checker will scan and repair any corrupted or missing system files. This may take some time, so be patient.
4. Once the scan is complete, restart your laptop and check if the issue is resolved.
To repair bad sectors on your hard drive:
1. Press the Windows key + X and select “Command Prompt (Admin)” or “Windows PowerShell (Admin)” from the menu.
2. In the command prompt window, type “chkdsk /f /r” and press Enter.
3. You may be prompted to schedule the disk check for the next system restart. Type “Y” and press Enter.
4. Restart your laptop and the disk check will begin. This process will scan and repair any bad sectors on your hard drive.
5. Once the disk check is complete, your laptop should no longer be stuck on shutting down.
These steps can help resolve issues related to system files and bad sectors on your hard drive, which can sometimes cause a laptop to get stuck on shutting down.
Managing Background Apps and Windows Update Settings
| Background Apps | Windows Update Settings |
|---|---|
Managing Background Apps
|
Windows Update Settings
|
System Restore and Power Troubleshooting
- Boot your laptop into Safe Mode by pressing the Shift key while clicking on the Restart button in the Start menu.
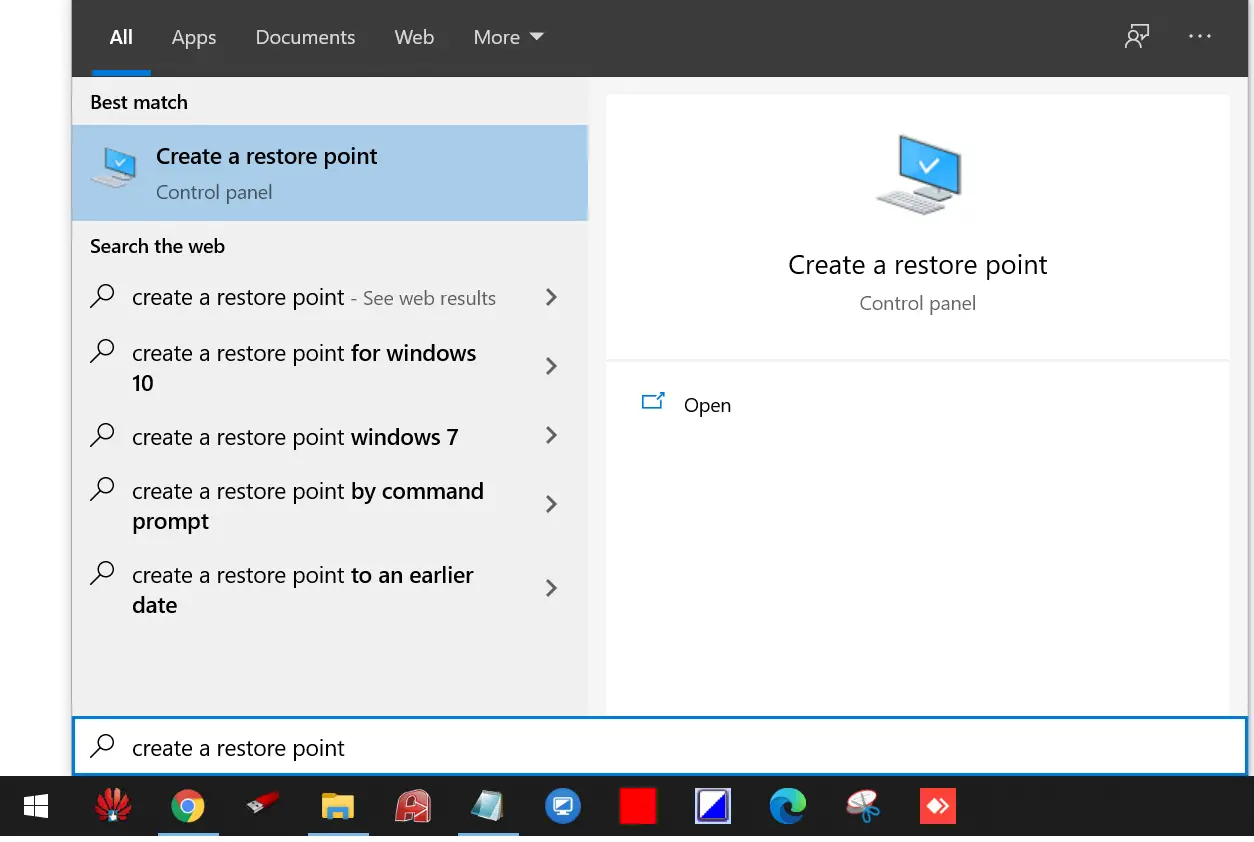
- Once in Safe Mode, open the Start menu and search for “System Restore“.
- Click on the “Create a restore point” option that appears in the search results.
- In the System Properties window, click on the “System Restore” button.
- Choose a restore point from the list that appears and click on “Next“.
- Review the details of the restore point and click on “Finish” to start the restoration process.
- Wait for the system restore to complete, and then restart your laptop.
Power Troubleshooting
- Disconnect any external devices, such as USB devices or docking stations, from your laptop.
- Remove the battery from your laptop, if it’s removable.
- Press and hold the laptop’s power button for about 30 seconds to drain any residual power.
- Plug the power adapter back into your laptop and connect it to a power source.
- Press the power button to turn on your laptop.
- If your laptop still doesn’t turn on, try using a different power adapter or power source.
- If the issue persists, it may be necessary to seek professional assistance or contact the laptop manufacturer for further support.
FAQ
Why is my laptop still on when I shut it down?
Your laptop may still be on when you shut it down due to incorrect power settings. Check the “Power Options” in the Control Panel and make sure the settings for “Choose what the power button does” and “Choose what closing the lid does” are set to shut down the computer. Additionally, ensure that your BIOS and drivers are up to date.
How do I fix Windows 11 stuck on shutting down?
To fix Windows 11 stuck on shutting down, you can try the following steps:
1. Open the Taskbar and click on Start.
2. Type “Control” and press Enter.
3. In the Control panel, select Large icons or Small icons from the drop-down menu.
4. Click on Power Options.
5. Choose “Choose what the power button does.”
6. Select “Shut down” under “When I hit the Power button.”
7. Click “Save.”
Why is my laptop shutting down so long?
Your laptop may be taking a long time to shut down due to programs running in the background that have not fully closed.
