Having your Lenovo X1 Carbon stuck on the logo screen can be frustrating, but fear not. In this article, we will explore nine easy fixes to help you resolve this issue swiftly.
Unplug External Devices and Perform a Hard Reset
Unplugging external devices and performing a hard reset can often resolve the issue of a Lenovo X1 Carbon laptop being stuck on the logo screen. To do this:
1. Disconnect all external devices such as USB mass storage devices, SD cards, printers, digital cameras, and any other peripherals.
2. Make sure the laptop is turned off.
3. Unplug the AC adapter from the laptop.
4. Press and hold the power button for about 15 seconds to discharge any residual power.
5. Reconnect the AC adapter and turn on the laptop.
6. If the logo screen still appears, press the Ctrl and Alt keys together with the Delete key to open the BIOS menu.
7. Use the arrow keys to navigate to the “Boot” or “Startup” section in the BIOS menu.
8. Look for an option related to booting or startup settings, such as “Boot order” or “UEFI/Legacy Boot.”
9. Change the boot order or boot mode to prioritize the internal hard drive or SSD.
10. Save the changes and exit the BIOS menu.
11. If the logo screen persists, repeat steps 2-5 to perform another hard reset.
12.
Remove DVD Drive
If your Lenovo X1 Carbon is stuck on the logo screen, there are 9 easy fixes you can try to resolve the issue.
1. Disconnect all external devices: Unplug any USB devices or external storage devices connected to your laptop.
2. Reset the BIOS: Power off your laptop and press the Novo button (usually located next to the power button) to access the BIOS menu. From there, choose the “Reset BIOS” or “Load Defaults” option.
3. Check the boot order: Enter the BIOS menu again and make sure the hard drive is set as the first boot device. If not, rearrange the boot order so that the hard drive is prioritized.
4. Perform a power cycle: Shut down your laptop and unplug the power cord. Then, press and hold the power button for 15-20 seconds to discharge any remaining power. Plug the power cord back in and power on your laptop.
5. Run a hardware diagnostic: Some ThinkPad models have built-in diagnostic tools that can help identify hardware issues. Access the diagnostic tool from the BIOS menu and run a thorough scan.
6. Check for loose connections: Open up your laptop and ensure all internal cables and connectors are securely plugged in, especially the cables connecting the hard drive and motherboard.
7. Remove and reinsert the RAM: Turn off your laptop and remove the back cover. Locate the RAM modules and carefully remove them. Then, reinsert them firmly into their slots.
8. Update the BIOS: Visit Lenovo’s support website and download the latest BIOS update for your specific model. Follow the instructions provided by Lenovo to update your BIOS.
9. Perform a clean Windows installation: If none of the above fixes work, you may need to reinstall Windows on your laptop. Create a bootable USB flash drive with the Windows installation media and follow the on-screen instructions to perform a clean installation.
Run Lenovo Diagnostics Tool
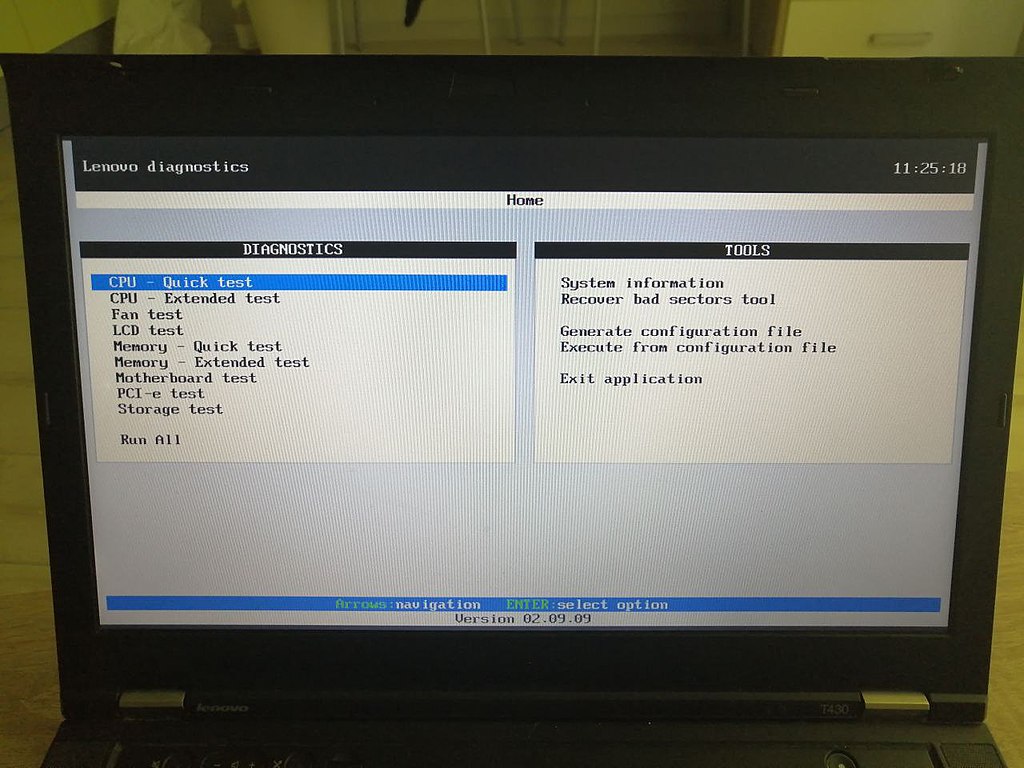
If your Lenovo X1 Carbon is stuck on the logo screen, you can try running the Lenovo Diagnostics Tool to troubleshoot the issue. This tool can help identify any hardware or software problems that may be causing the booting problem.
To run the Lenovo Diagnostics Tool, follow these steps:
1. Press the power button to turn on your Lenovo X1 Carbon.
2. As soon as the Lenovo logo appears on the screen, press the F10 or F12 key to enter the boot menu.
3. Use the arrow keys to navigate to the “Diagnostics” option and press Enter.
4. The Lenovo Diagnostics Tool will now run a series of tests to check your computer’s hardware components.
5. Wait for the tests to complete. This may take some time.
6. Once the tests are finished, the tool will display the results on the screen.
7. If any issues are detected, the tool will provide recommendations for fixing them.
8. Follow the recommended steps to resolve the problem.
If the Lenovo Diagnostics Tool does not detect any issues or if the problem persists after following the recommended steps, you may need to contact Lenovo support for further assistance.
Perform Automatic Repair
Performing an automatic repair can help resolve the issue of a Lenovo X1 Carbon being stuck on the logo screen. Here are 9 easy fixes to try:
1. Restart the computer and let it attempt to boot normally. Sometimes a simple restart can fix the problem.
2. Disconnect any external devices such as USB drives, SD cards, or printers. Sometimes these devices can interfere with the boot process.
3. Check the power supply to ensure it’s properly connected and providing enough power to the laptop. A weak or faulty power supply can cause startup issues.
4. Access the UEFI menu by pressing the appropriate key during startup (usually F1, F2, or F12). From there, you can reset the BIOS settings to default or disable any unnecessary options that may be causing the problem.
5. Boot into Safe Mode by pressing the F8 key repeatedly during startup. This will start Windows with a minimal set of drivers and services, allowing you to troubleshoot further.
6. Run a system file check to scan for and repair any corrupted system files. Open the Command Prompt as an administrator and type “sfc /scannow” to start the process.
7. Use a Windows 10 installation media (such as a USB flash drive or DVD) to repair the startup process. Boot from the installation media and select the “Repair your computer” option.
8. Perform a system restore to a previous point in time when the laptop was functioning properly. This can help revert any recent changes that may have caused the issue.
9. If all else fails, contact Lenovo support for further assistance. They may be able to provide additional troubleshooting steps or recommend hardware repairs if necessary.
Repair Boot Sector or BCD
If your Lenovo X1 Carbon is stuck on the logo screen, you may need to repair the boot sector or BCD (Boot Configuration Data) to resolve the issue. Here are nine easy fixes to try:
1. Start by restarting your computer and pressing the ThinkPad or Lenovo key (usually F12 or Enter) to access the BIOS or boot menu. Check if your hard drive or SSD is detected correctly. If not, check the connections and ensure it is properly seated.
2. If your hard drive or SSD is detected correctly, try booting into Safe Mode to see if the issue persists. Restart your computer and repeatedly press the F8 key until the Advanced Boot Options menu appears. Select Safe Mode and see if your computer boots successfully.
3. If Safe Mode doesn’t work, you can try using a Windows installation disc or USB to access the Recovery Console. Boot from the installation media and select the Repair your computer option. Then, open the Command Prompt and run the following command: bootrec /fixboot. This command repairs the boot sector.
4. If the boot sector repair doesn’t work, you can try rebuilding the BCD using the following command in the Command Prompt: bootrec /rebuildbcd. This command scans for Windows installations on your computer and adds them to the BCD.
5. In some cases, a malfunctioning hardware device can cause boot issues. Disconnect any USB mass storage devices, such as external hard drives or SD cards, and check if your computer boots normally.
6. If you have recently installed any new hardware or software, try removing it and see if the problem is resolved. Faulty or incompatible hardware or software can cause boot problems.
7. You can also try resetting the BIOS settings to their default values. Restart your computer and press the ThinkPad or Lenovo key to access the BIOS. Look for the option to reset the BIOS settings to default or load the default settings.
8. If none of the above solutions work, you can try performing a system restore to a previous point in time when your computer was working fine. This can help to undo any recent changes that may have caused the boot issue.
9. If all else fails, you may need to consider reinstalling Windows or contacting Lenovo support for further assistance.
Reset BIOS to Default Settings
To reset the BIOS settings on your Lenovo X1 Carbon, follow these steps:
1. Start by turning off your computer completely.
2. Locate the Novo button on your X1 Carbon. It is usually located next to the power button or on the side of the device.
3. Press and hold the Novo button for a few seconds until the Novo Button Menu appears on the screen.
4. Use the arrow keys on your keyboard to navigate to “BIOS Setup” and press Enter.
5. In the BIOS setup menu, navigate to the “Exit” tab using the arrow keys.
6. Select “Load Setup Defaults” or “Load Optimized Defaults” option and press Enter. This will reset the BIOS settings to their default values.
7. Confirm the reset by selecting “Yes” and pressing Enter.
8. Once the reset is complete, navigate to the “Exit” tab again and select “Exit Saving Changes” to restart your computer.
By resetting the BIOS settings to default, you can resolve issues like being stuck on the logo screen.
Disable Lenovo Service Engine in BIOS
To disable Lenovo Service Engine in the BIOS on your Lenovo X1 Carbon, follow these easy steps:
1. Start by turning on your Lenovo X1 Carbon and immediately press the F1 key to enter the BIOS setup.
2. Once you’re in the BIOS setup, navigate to the “Security” tab using the arrow keys.
3. In the “Security” tab, look for an option called “Lenovo Service Engine” or something similar.
4. Disable the Lenovo Service Engine by selecting the option and pressing the Enter key.
5. Save your changes and exit the BIOS setup by pressing the F10 key.
6. Your Lenovo X1 Carbon will now boot without the Lenovo Service Engine.
Reset PC to Factory Settings
To reset your Lenovo X1 Carbon to factory settings, follow these easy steps:
1. Power off your laptop completely.
2. Turn it back on and immediately start tapping the F12 key repeatedly until the boot menu appears.
3. From the boot menu, select the “Recovery Mode” option and press Enter.
4. In the recovery menu, choose “Reset this PC” and follow the on-screen instructions.
5. You will be given the option to keep or remove your personal files. Select the desired option and click “Next“.
6. Confirm your choice and click “Reset” to start the process.
7. Your laptop will restart and begin resetting to factory settings. This may take some time, so be patient.
8. Once the reset is complete, your X1 Carbon will boot up like it did when you first bought it.
Note: Resetting your PC to factory settings will erase all your files and installed programs, so make sure to back up any important data beforehand.
F.A.Q.
How do I fix my Lenovo boot menu stuck?
To fix a Lenovo boot menu stuck issue, you can try the following steps:
If you can access the Windows desktop, use your mouse to access the power menu and hold down the shift key while clicking the restart option. This will take you to the Windows recovery environment.
Within the recovery environment, find the appropriate button to boot from external media and enter the BIOS setup. From there, you can make necessary changes to fix the boot menu issue.
How do I unfreeze my Lenovo computer screen?
To unfreeze a Lenovo computer screen, you can try performing a force reboot. Hold down the power key for around 30 seconds to initiate the force reboot. If the first attempt is unsuccessful, try the force reboot while the computer is connected to a wall charger.
How do I fix my Lenovo laptop stuck on my Lenovo screen?
To fix a Lenovo laptop stuck on the Lenovo screen, you can try the following solutions:
1. Unplug all external devices and perform a hard reset.
2. Remove the Lenovo DVD drive if applicable.
3. Run the Lenovo Diagnostics Tool to check for any hardware issues.
4. Perform an automatic repair using the Windows recovery options.
5. Repair the boot sector or BCD (Boot Configuration Data).
6. Reset the BIOS settings to their default values.
