Are you struggling with high disk usage on your Windows 10? Let’s explore some effective solutions to fix this issue.
Restart Your System
1. Click on the Start button in the bottom left corner of your screen.
2. Click on the Power icon.
3. Select Restart from the dropdown menu.
Once your system restarts, check if the 100% disk usage issue has been resolved.
Update Windows
![]()
1. Open the Start menu and click on “Settings” or press the Windows key + I to open the Settings app.
2. In the Settings app, click on “Update & Security.”
3. Click on “Windows Update” in the left sidebar.
4. Click on the “Check for updates” button to see if any updates are available for your Windows 10 system.
5. If updates are available, click on the “Install now” button to start the update process. Make sure you have a stable internet connection as this may take some time.
6. Once the updates are installed, restart your computer to apply the changes.
7. After your computer restarts, check if the 100% disk usage issue is resolved. If not, proceed with additional troubleshooting steps or consult technical support if needed.
Remember to regularly update your Windows system to ensure you have the latest security patches and bug fixes. This can help improve overall system performance and stability.
If you’re still experiencing issues with high disk usage, it may be worth checking for any third-party software or drivers that could be causing the problem. You can do this by opening the Task Manager (press Ctrl + Shift + Esc) and checking the “Disk” tab. Look for any processes or applications that are consuming a significant amount of disk resources and consider uninstalling or updating them.
By keeping your Windows system up to date and troubleshooting any potential software conflicts, you can help resolve the 100% disk usage issue and optimize your computer’s performance.
Disable Windows Search
1. Open Task Manager by pressing Ctrl + Shift + Esc.
2. Click on the “Processes” tab and look for the “Cortana” or “SearchUI.exe” process.
3. Right-click on the process and select “End Task” to temporarily disable it.
4. Open the “Services” tab in Task Manager and scroll down to find “Windows Search”.
5. Right-click on “Windows Search” and select “Properties”.
6. In the “Properties” window, click on the “Stop” button to stop the service.
7. Under the “Startup type” dropdown, select “Disabled”.
8. Click on “Apply” and then “OK” to save the changes.
9. Restart your computer for the changes to take effect.
Check for Malware and Viruses
1. Open Task Manager by pressing Ctrl+Shift+Esc on your keyboard.
2. In the Processes tab, look for any suspicious or unknown processes consuming a high amount of disk usage.
3. Right-click on the process and select “Open file location” to see its location on your computer.
4. Use an antivirus software to scan the file and your entire system for malware or viruses. Make sure your antivirus software is up to date.
5. If the antivirus software detects any malicious files, quarantine or remove them from your system.
6. Restart your computer and check if the disk usage has decreased.
It’s important to regularly update your operating system and applications, as well as use a reliable antivirus software to prevent malware and viruses from affecting your system’s performance.
Remember to exercise caution when downloading files or visiting websites, as they can be potential sources of malware. If you suspect that your computer has been infected, it’s always a good idea to seek technical support or professional help to ensure proper removal of the malware.
Disable Superfetch Service
To disable the Superfetch service on Windows 10 and fix 100% disk usage, follow these steps:
1. Open Task Manager by pressing Ctrl+Shift+Esc.
2. Click on the “Services” tab.
3. Scroll down and find “Superfetch” in the list of services.
4. Right-click on “Superfetch” and select “Properties”.
5. In the properties window, click on the “Stop” button to stop the service.
6. Under the “Startup type” dropdown, select “Disabled”.
7. Click on “Apply” and then “OK” to save the changes.
8. Restart your computer for the changes to take effect.
Disabling the Superfetch service can help reduce disk usage on Windows 10. This service preloads frequently used applications into memory for faster access. However, in some cases, it can cause high disk usage, especially on systems with limited resources.
By following the steps above, you can disable the Superfetch service and potentially improve disk performance on your Windows 10 computer.
Remember to restart your computer after making these changes. If you experience any issues or want to enable Superfetch again, you can follow the same steps and select “Automatic” or “Manual” under the “Startup type” dropdown.
Keep in mind that disabling Superfetch may affect the overall performance of your computer, especially if you frequently launch the same applications. If you notice a decrease in performance, you can always enable the service again.
For more Windows 10 tips and troubleshooting, check out other articles and resources available online.
Update Device Drivers
1. Open the Device Manager by pressing the Windows key + X and selecting “Device Manager” from the menu.
2. In the Device Manager window, expand the categories to locate the device you want to update the driver for. It could be under categories like “Display adapters,” “Network adapters,” or “Disk drives.”
3. Right-click on the device and select “Update driver” from the context menu.
4. Choose the option “Search automatically for updated driver software.” Windows will then search for and install any available updates for the device.
5. Alternatively, you can choose the option “Browse my computer for driver software” if you have downloaded the driver from the manufacturer’s website or have it saved on your computer. Select the driver file and follow the on-screen instructions to install it.
6. After the driver update is complete, restart your computer to apply the changes.
Updating device drivers can help resolve compatibility issues and improve the performance of your hardware components, potentially reducing disk usage.
Remember to regularly check for driver updates as manufacturers frequently release new versions to address bugs and enhance functionality.
If updating the device drivers doesn’t resolve the 100% disk usage issue, you may need to further investigate other potential causes, such as malware or background processes.
Temporarily Disable Antivirus Software
1. Open Task Manager by pressing “Ctrl + Shift + Esc” on your computer keyboard.
2. In the Task Manager window, go to the “Processes” tab.
3. Look for the antivirus software that is running on your system. It may have a name like “AVG,” “Avast,” or “Norton.”
4. Right-click on the antivirus process and select “End Task” from the context menu. This will temporarily disable the antivirus software.
5. If prompted, confirm that you want to end the task.
6. Once the antivirus software is disabled, check if the disk usage has reduced. If it has, then there may be an issue with the antivirus software causing high disk usage.
7. To re-enable the antivirus software, open the software’s main interface and look for an option to turn it back on. Alternatively, you can restart your computer to automatically enable the antivirus software.
Remember that disabling antivirus software temporarily leaves your computer more vulnerable to threats, so make sure to re-enable it as soon as you have resolved the disk usage issue.
If you continue to experience high disk usage even after disabling the antivirus software, consider checking for any pending updates for Windows. Sometimes, installing the latest patches and updates from Microsoft can help resolve such issues.
Additionally, you can try optimizing your computer’s performance by cleaning up unnecessary files, disabling startup programs, and updating device drivers.
Note: Disabling antivirus software should be done cautiously, and it’s recommended to consult the software’s documentation or the manufacturer’s website for specific instructions.
For more troubleshooting tips and solutions, you can visit online forums like Reddit or consult the support resources provided by the antivirus software manufacturer.
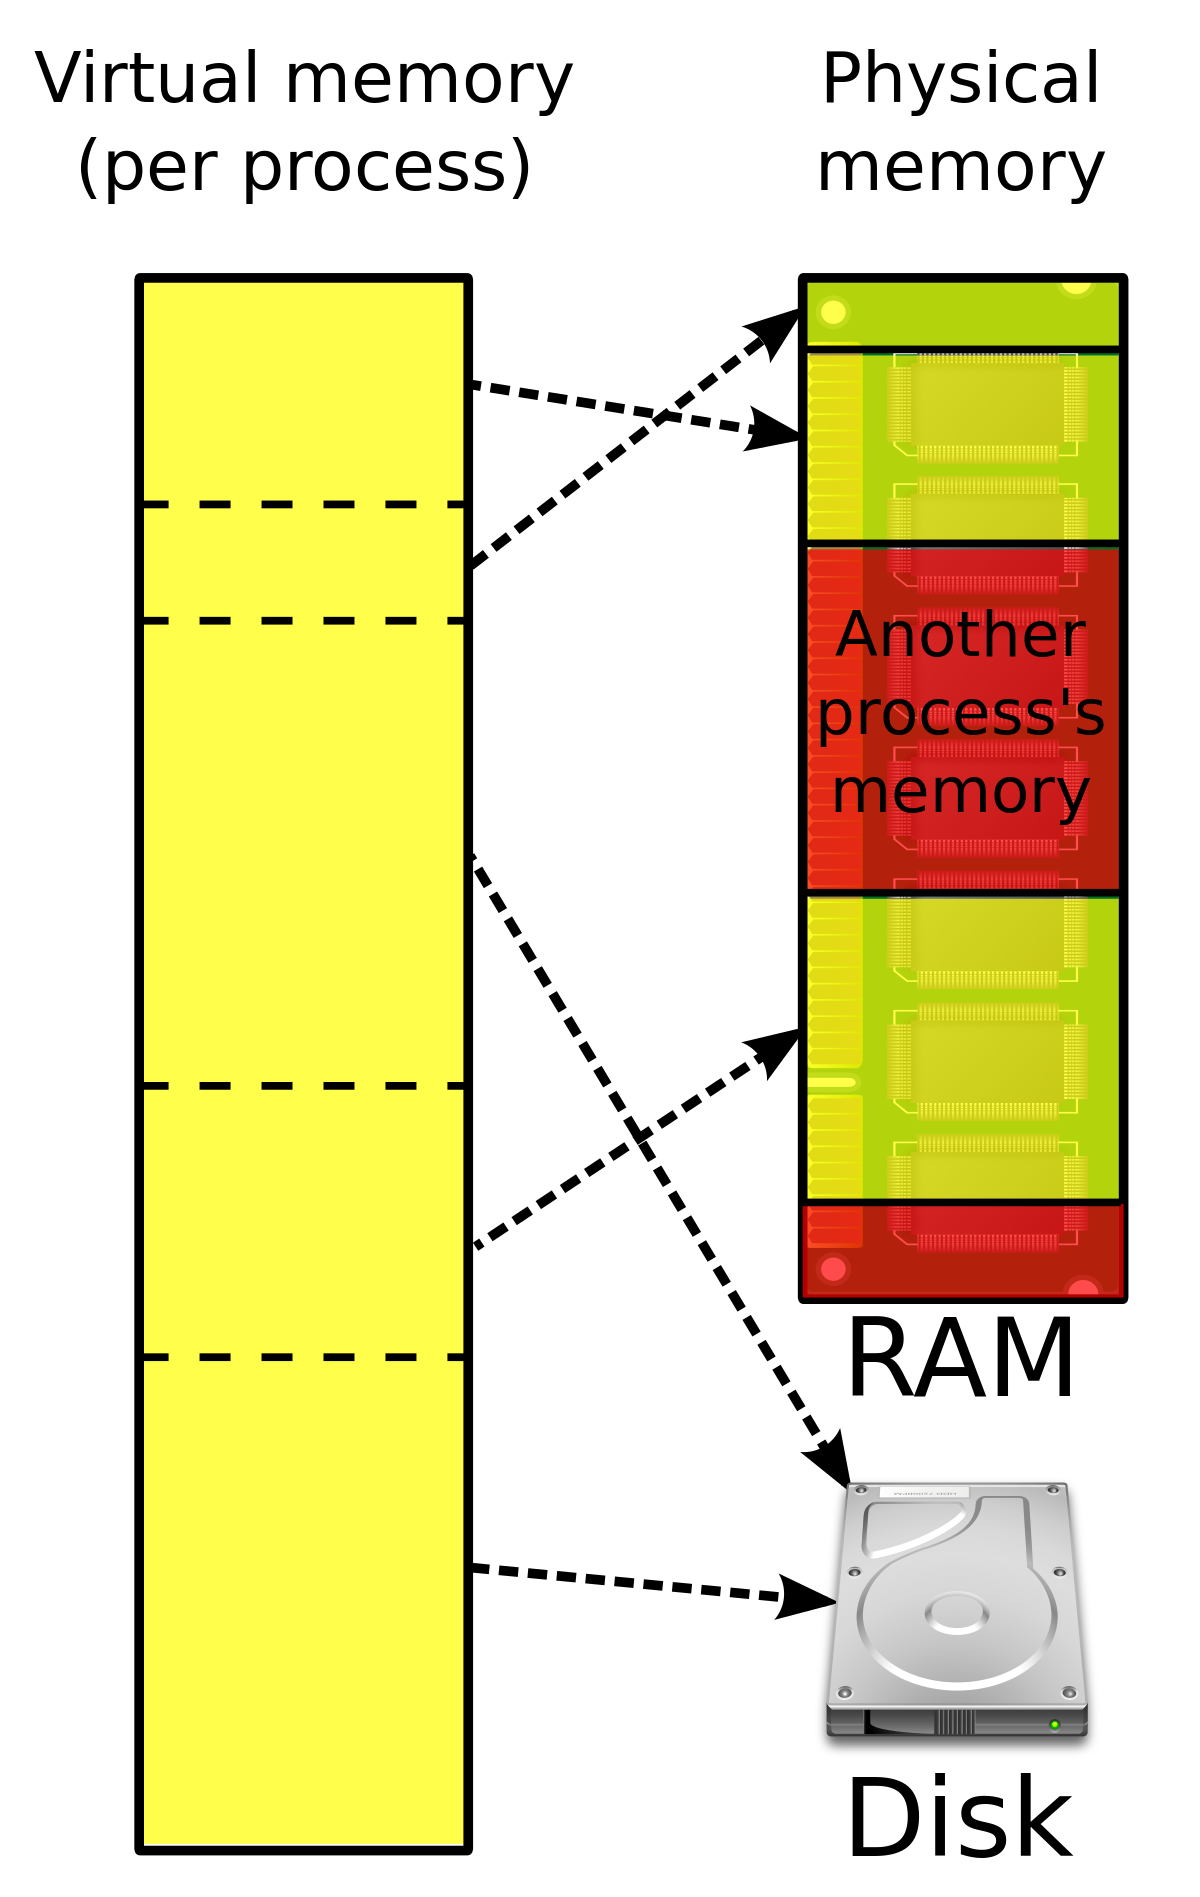
Reset Virtual Memory
1. Open Task Manager by pressing Ctrl + Shift + Esc.
2. In the Task Manager window, click on the “Performance” tab.
3. Under the “Performance” tab, click on “Memory” in the left-hand menu.
4. In the “Virtual Memory” section, click on the “Change” button.
5. Uncheck the box that says “Automatically manage paging file size for all drives.”
6. Select the drive where Windows is installed (usually C:).
7. Choose the option “No paging file” and click on the “Set” button.
8. Click on “OK” to confirm the changes.
9. Restart your computer for the changes to take effect.
By resetting the virtual memory, you are essentially clearing the space used for temporary data storage on your computer. This can help alleviate the 100% disk usage issue on Windows 10.
Perform a Disk Check
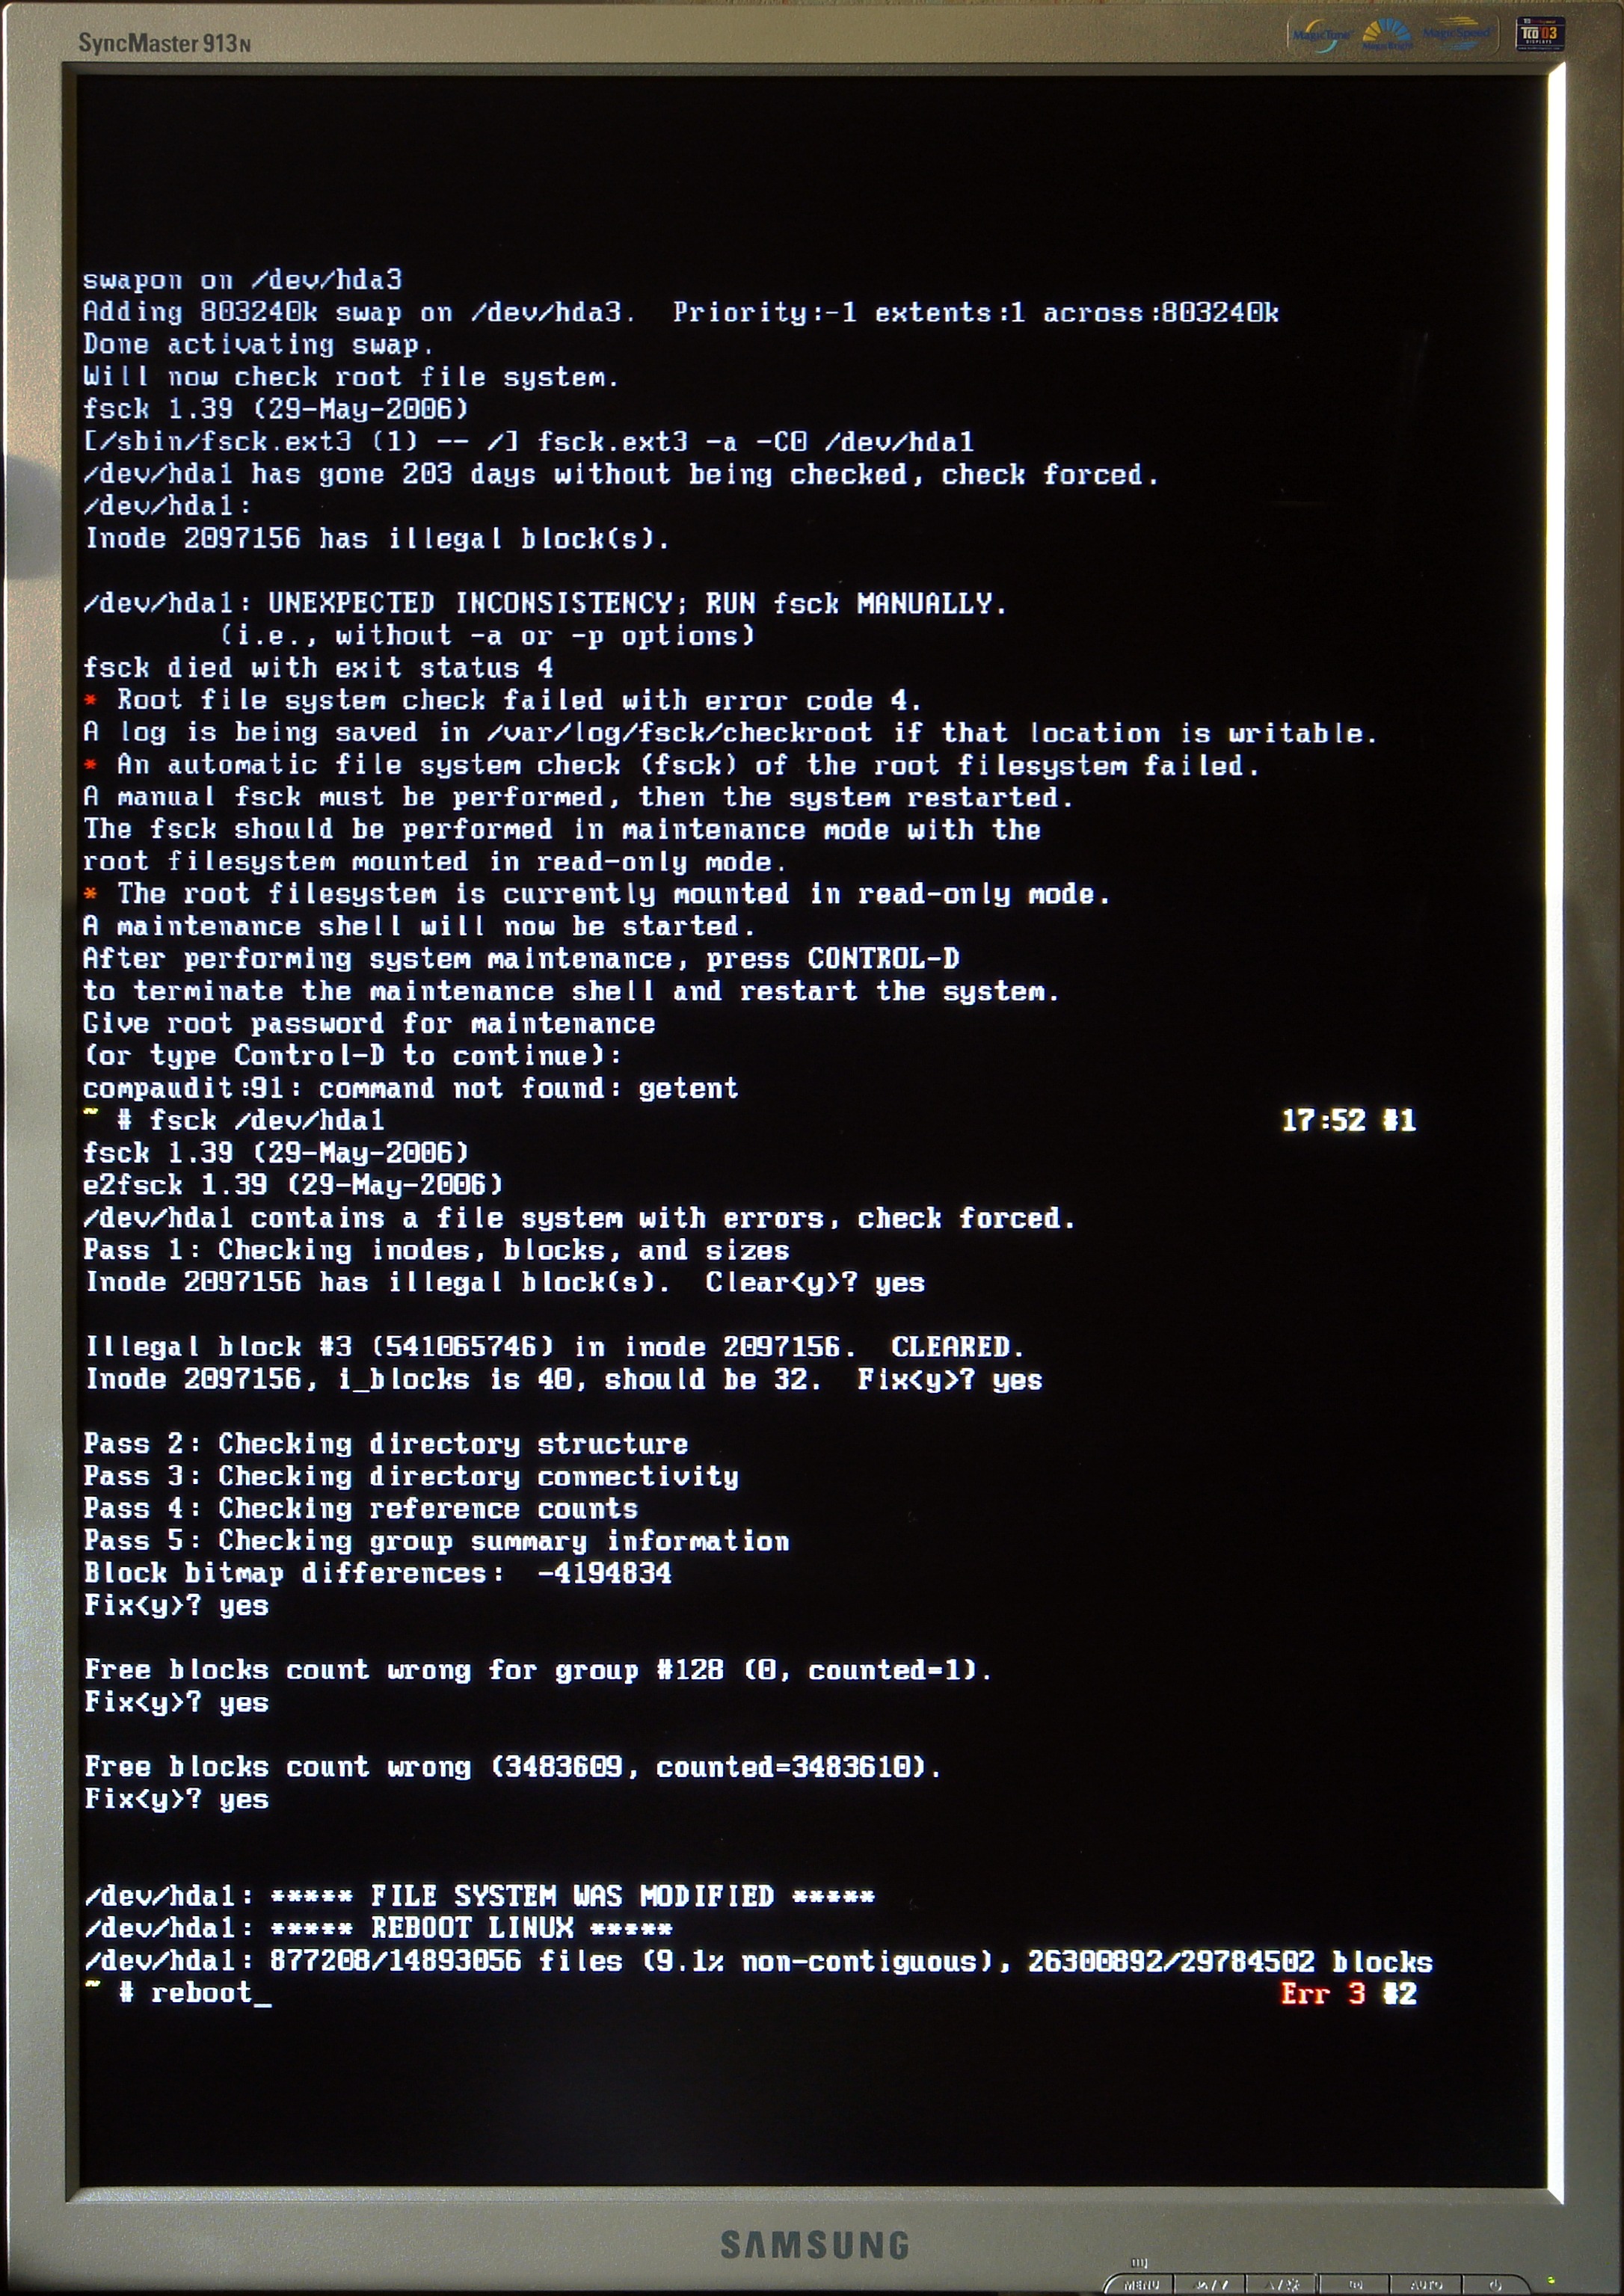
Performing a disk check can help resolve the issue of 100% disk usage on Windows 10. To do this, follow the steps below:
1. Open the Command Prompt as an administrator. You can do this by pressing the Windows key + X and selecting “Command Prompt (Admin)”.
2. In the Command Prompt window, type chkdsk /f and press Enter. This command will check your disk for errors and fix them if necessary.
3. You will be prompted to schedule the disk check for the next restart. Type Y and press Enter to confirm.
4. Restart your computer. The disk check will run automatically before Windows starts up.
5. Once the disk check is complete, Windows will start normally.
Performing a disk check can help identify and resolve any issues that may be causing the high disk usage. It is a useful tool for maintaining the health and performance of your computer’s hard drive.
Adjust Power Settings
1. Open the Control Panel by pressing the Windows key + X and selecting “Control Panel” from the menu.
2. In the Control Panel, search for and click on “Power Options.”
3. Choose the power plan you are currently using, or select “High performance” if available.
4. Click on “Change plan settings” next to the selected power plan.
5. Now, click on “Change advanced power settings.”
6. In the Power Options dialog box, navigate to the “Processor power management” section and click on the “+” symbol next to it to expand the options.
7. Expand the “Minimum processor state” option and make sure the value is set to “5%” or higher. This ensures that your processor is not running at its lowest speed, which can cause high disk usage.
8. Expand the “Maximum processor state” option and make sure the value is set to “100%.” This ensures that your processor is running at its maximum speed when needed.
9. Click “Apply” and then “OK” to save the changes.
10. Restart your computer for the new power settings to take effect.
By adjusting the power settings, you are giving your computer more resources to handle disk usage efficiently, which may help resolve the issue.
Repair or Update StorAHCI.sys Driver
To repair or update the StorAHCI.sys driver and resolve the 100% disk usage issue on Windows 10, follow these steps:
1. Open the Device Manager by right-clicking on the Start button and selecting “Device Manager.”
2. Expand the “IDE ATA/ATAPI controllers” category.
3. Locate the “Standard SATA AHCI Controller” driver and right-click on it.
4. Select “Update driver” from the context menu.
5. Choose the option to automatically search for updated driver software.
6. If Windows finds an updated driver, it will install it. Follow any on-screen instructions if prompted.
7. If Windows doesn’t find an updated driver, you can manually update it. Visit the manufacturer’s website for your computer or motherboard and search for the latest SATA AHCI driver for your specific model.
8. Download the driver and save it to a convenient location on your computer.
9. In Device Manager, right-click on the “Standard SATA AHCI Controller” driver again and select “Update driver.”
10. This time, choose the option to “Browse my computer for driver software.”
11. Navigate to the location where you saved the downloaded driver and select it.
12. Click “Next” and follow any on-screen instructions to install the driver.
13. After the installation is complete, restart your computer.
14. Once your computer has booted up, check the Task Manager to see if the disk usage has decreased. If it’s still at 100%, try the next solution.
15. If updating the driver didn’t resolve the issue, you can try repairing it. Open the Command Prompt as an administrator by right-clicking on the Start button and selecting “Command Prompt (Admin).”
16. In the Command Prompt window, type the following command and press Enter: sfc /scannow
17. The System File Checker will scan your system for any corrupted or missing files and attempt to repair them. This process may take some time.
18. Once the scan is complete, restart your computer and check the Task Manager again.
Delete Temporary Files

- Open the Start menu by clicking on the Windows icon located at the bottom left corner of the screen.
- Type “Run” in the search bar and click on the Run app that appears in the search results.
- In the Run dialog box, type “%temp%” and click OK or press Enter.
- This will open the Temp folder, where temporary files are stored.
- Select all the files and folders in the Temp folder by pressing Ctrl + A on your keyboard.
- Press the Delete key on your keyboard to permanently delete the selected files and folders.
- When prompted to confirm the deletion, click Yes.
- Close the Temp folder.
FAQs
How do I reduce disk usage?
To reduce disk usage, you can try the following steps:
1. Restart your PC.
2. Check for any malware infections.
3. Disable your antivirus program temporarily.
4. Disable Windows Defender temporarily.
5. Disable Windows Search.
6. Disable the Superfetch service.
7. Check your disk for any errors.
Why is my disk at 100 when I update?
Your disk may be at 100% when you update due to outdated drivers. To resolve this, check the Device Manager for hardware and network drivers that need updating.
Why is my disk and memory usage at 100?
Your disk and memory usage may be at 100% due to a variety of reasons, such as running too many programs simultaneously, having a faulty hard drive, or even having malware running in the background.
Why is my SSD running at 100?
Your SSD might be running at 100% due to Windows automatically encrypting it in the background or a program using it excessively. Check if Windows is encrypting your SSD and identify the program causing the high usage by checking Task Manager.
