Are you facing the frustrating issue of “No Audio Output Device Installed” on your Windows 10 computer? Here’s a quick fix to help you resolve this problem.
Use Windows 10’s Audio Troubleshooter
To fix the “No Audio Output Device Installed” error in Windows 10, you can use the built-in Audio Troubleshooter. This tool can help identify and resolve common audio issues on your computer.
To access the Audio Troubleshooter:
1. Right-click on the speaker icon in the taskbar and select “Troubleshoot sound problems” from the context menu.
2. The troubleshooter will open and automatically start scanning for audio issues.
3. Follow the on-screen instructions and let the troubleshooter attempt to fix the problem.
If the Audio Troubleshooter doesn’t resolve the issue, you can try these additional steps:
1. Press the Windows key + X and select “Device Manager” from the menu.
2. Expand the “Sound, video, and game controllers” category.
3. Right-click on your audio device and select “Uninstall device.”
4. Restart your computer.
5. After booting back up, Windows will automatically reinstall the audio driver.
If these steps don’t work, you can try updating your audio driver manually:
1. Go to your computer manufacturer’s website (e.g., Dell, HP) or the website of your audio device manufacturer.
2. Search for the latest audio driver for your specific model.
3. Download the driver and follow the installation instructions.
By using the Audio Troubleshooter and updating your audio driver, you should be able to fix the “No Audio Output Device Installed” error in Windows 10.
Update Sound Drivers
1. Open the Start menu and type “Device Manager” in the search bar. Click on the “Device Manager” app that appears in the search results.
2. In the Device Manager window, locate and expand the “Sound, video, and game controllers” category.
3. Right-click on the audio device listed under this category and select “Update driver” from the context menu.
4. Choose the option to “Search automatically for updated driver software.” Windows will then search for the latest driver updates and install them on your computer.
5. If Windows does not find any updates or if the issue persists, you can manually download the latest driver from the manufacturer’s website. Visit the support section of your computer or sound card manufacturer’s website and search for the latest driver for your specific model.
6. Download the driver file and follow the on-screen instructions to install it.
7. After the driver installation is complete, restart your computer to apply the changes.
8. Once your computer boots up, check if the “No Audio Output Device Installed” error has been resolved and if you can now hear sound.
Updating your sound drivers can often fix audio-related issues on Windows 10.
Manually Uninstall and Reinstall Audio Device
To manually uninstall and reinstall the audio device in Windows 10, follow these steps:
1. Press the Windows key + X on your keyboard and select “Device Manager” from the menu that appears.
2. In the Device Manager window, expand the “Sound, video and game controllers” category.
3. Right-click on your audio device and select “Uninstall device” from the context menu.
4. In the confirmation prompt, check the box that says “Delete the driver software for this device” and click “Uninstall”.
5. Once the device is uninstalled, restart your computer.
6. After your computer restarts, open Device Manager again.
7. Click on “Action” in the menu bar and select “Scan for hardware changes”. This will automatically reinstall the audio device.
8. Alternatively, you can right-click on any device category in Device Manager and select “Scan for hardware changes” to reinstall all devices.
9. Once the audio device is reinstalled, check if the “No Audio Output Device Installed” error is resolved.
If the issue persists, you can try updating the audio driver. Right-click on the audio device in Device Manager and select “Update driver”. Choose the option to automatically search for updated driver software.
Check and Reconnect External Audio Devices
1. First, ensure that your audio device is properly connected to your computer. Check that all cables are securely plugged in and that the device is powered on.
2. Next, right-click on the volume icon in the taskbar, located in the bottom right corner of your screen. Select “Open Sound settings” from the menu that appears.
3. In the Sound settings window, scroll down to the “Output” section and click on “Manage sound devices”.
4. A list of available audio devices will appear. Look for your external audio device in the list. If it is listed but not selected as the default device, click on it and then click the “Set Default” button.
5. If your external audio device is not listed, click on the “Troubleshoot” button under the “Output” section. This will launch the Windows troubleshooter, which will attempt to detect and fix any audio device issues.
6. If the troubleshooter is unable to resolve the issue, try updating your audio device driver. Right-click on the Windows Start button and select “Device Manager” from the menu.
7. In Device Manager, expand the “Sound, video and game controllers” section. Right-click on your external audio device and select “Update driver” from the context menu. Follow the on-screen instructions to complete the driver update process.
Update Windows to the Latest Version
1. Press the Windows key on your keyboard and type “Windows Update” in the search bar. Select “Windows Update Settings” from the menu.
2. In the Windows Update settings, click on the “Check for updates” button. Windows will automatically search for and download any available updates for your operating system.
3. Once the updates are downloaded, click on the “Install” button to begin the installation process. Your computer may need to restart during this process, so make sure to save any unsaved work beforehand.
4. After the updates are installed and your computer has restarted, check if the “No Audio Output Device Installed” error is resolved. If not, proceed to the next step.
5. Go to the website of your computer manufacturer (e.g., Dell, HP) and search for the latest audio driver for your specific model. Download and install the driver according to the manufacturer’s instructions.
6. Restart your computer again and check if the audio is now working properly.
By updating Windows to the latest version and installing the latest audio driver, you should be able to resolve the “No Audio Output Device Installed” issue in Windows 10. If the problem persists, consult the manufacturer’s support or consider seeking professional troubleshooting assistance.
Check for Hardware Issues
- Disconnect and reconnect audio devices:
- Unplug any external speakers, headphones, or microphones from the computer.
- Check the connections and ensure they are securely plugged in.
- If using a USB audio device, try connecting it to a different USB port.
- Test with different audio devices:
- Try using a different set of headphones or speakers to see if the issue is with the audio device itself.
- Connect the alternative device to the computer and check if the sound works.
- Update audio drivers:
- Open Device Manager by pressing Win + X and selecting Device Manager from the menu.
- Expand the Sound, video, and game controllers category.
- Right-click on the audio device listed and select Update driver.
- Choose the option to automatically search for updated driver software.
- Follow the on-screen instructions to complete the driver update process.
- Enable audio services:
- Open Run by pressing Win + R.
- Type services.msc and press Enter.
- In the Services window, locate the Windows Audio service.
- Right-click on it and select Properties.
- Make sure the Startup type is set to Automatic.
- If the service is not running, click on the Start button to start it.
- Click Apply and OK to save the changes.
- Check audio settings:
- Right-click on the Volume icon in the taskbar and select Open Sound settings.
- Under the Output section, select the correct audio device from the dropdown menu.
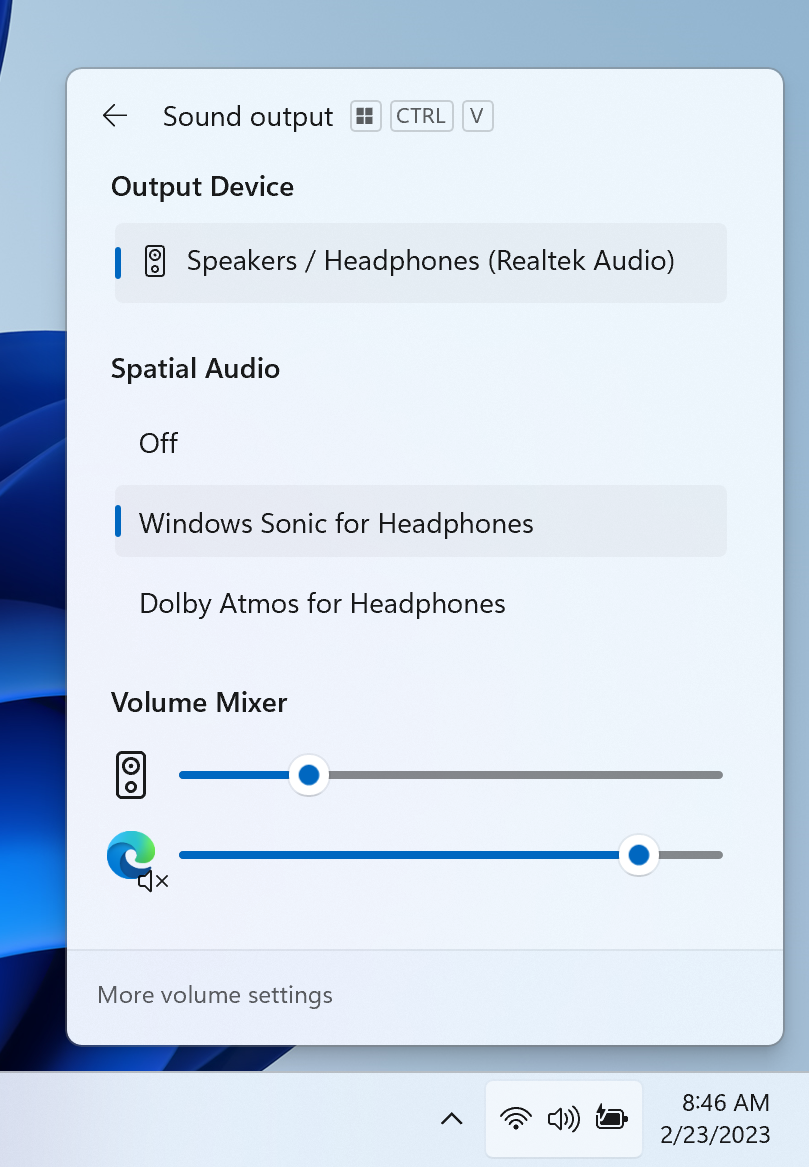
- Adjust the volume slider and ensure it is not muted.
Replace Defective Sound Card
To replace a defective sound card in Windows 10, follow these steps:
1. Shut down your computer and unplug any peripherals.
2. Open your computer case to access the internal components. This process may vary depending on your specific computer model, so refer to your manufacturer’s instructions if needed.
3. Locate the sound card, which is usually a small rectangular circuit board with audio ports. It may be labeled or have a distinctive color.
4. Carefully remove the sound card from its slot. If it’s secured with screws or clips, make sure to loosen or release them before pulling it out.
5. Insert the new sound card into the appropriate slot, aligning it with the connector pins. Apply gentle pressure until the card is fully seated.
6. Secure the sound card if necessary by tightening any screws or reattaching clips.
7. Close your computer case and reconnect any peripherals.
8. Turn on your computer and wait for it to boot up.
9. After booting, Windows 10 should detect the new sound card automatically. If not, you may need to install the appropriate device drivers.
10. Right-click on the Start menu icon and select “Device Manager” from the menu.
11. In the Device Manager window, locate the “Sound, video and game controllers” category and expand it.
12. Right-click on the sound card device and select “Update driver” from the context menu.
13. Follow the on-screen instructions to install the latest driver for your sound card.
14. Restart your computer to ensure the changes take effect.
FAQ
Why does my HP laptop say no audio output device installed?
Your HP laptop may say “no audio output device installed” because the audio driver is outdated or disabled. To fix this issue, you can check the device and driver status in Device Manager. Open Device Manager by searching for it in Windows, then double-click on “Sound, video and game controllers” to see if the audio device is disabled. If it is, enable it. If not, you may need to install an available driver update.
Why does my computer say no output devices found?
Your computer may say “no output devices found” because the audio drivers are corrupted or outdated. This error can also occur after a Windows update or due to a faulty audio jack. You can refer to our guide on fixing the “No Audio Output Device is Installed” problem for help.
Why is there no output sound on my Windows 10?
There may be no output sound on your Windows 10 because the audio devices might be muted or disabled. To check this, select and hold (or right-click) the Speakers icon on the taskbar, then choose Open Volume mixer. If you can’t find the Speakers icon, it may be in the overflow area.
How do I fix Windows 10 no audio output device is installed?
To fix the issue of “Windows 10 no audio output device is installed,” you can try troubleshooting sound problems by right-clicking the Speaker icon in the system tray. This will launch the Get Help app where you can follow the on-screen instructions to scan your system for audio issues and resolve them automatically.
