Having trouble with Office 365 Autodiscover in Outlook 2013? Look no further for a solution.
Identifying Symptoms and Verifying the Issue
Symptoms of Office 365 Autodiscover Not Working for Outlook 2013 may include issues with setting up or accessing email accounts, error messages during login, and integration problems with other Microsoft applications. To verify the issue, perform the following steps:
1. Check the email address and password: Ensure that the correct email address and password are being used to log in to Outlook 2013.
2. Test Autodiscover settings: Use the Test Email AutoConfiguration tool in Outlook to check if the Autodiscover settings are correctly configured. This tool can be accessed by holding the Ctrl key and right-clicking on the Outlook icon in the system tray.
3. Examine DNS records: Verify that the required DNS records, such as CNAME records, are correctly set up for Autodiscover. This can be done by checking the DNS settings of the domain name associated with the Office 365 account.
4. Check URL redirection: Ensure that URL redirection for Autodiscover is correctly configured on the web server. This can be done by examining the URL settings in the web application or web portal used to access Office 365.
5. Test connectivity to the Autodiscover service: Use PowerShell commands or online tools to test if the Autodiscover service is accessible from the network. This can help identify any network or firewall issues that may be blocking the connection.
If these steps do not resolve the issue, further troubleshooting may be required. Consult Microsoft support documentation or seek assistance from an IT professional familiar with Office 365 and Outlook 2013.
Understanding the Causes
There are several possible causes for Office 365 Autodiscover not working for Outlook 2013. One common issue is a misconfiguration in the DNS settings. Make sure that the Autodiscover CNAME record is correctly set up in the DNS zone for your domain. Additionally, check that the DNS records for your domain are correctly resolving to the correct IP addresses.
Another potential cause is an issue with the Exchange Server or Outlook itself. Ensure that the Exchange Server is running and that there are no errors or issues with it. You can also try restarting the Exchange Server to see if that resolves the problem.
Active Directory can also play a role in Autodiscover not working. Check that the Active Directory is functioning properly and that the necessary information is being correctly synchronized between the Active Directory and Exchange Server.
It’s also worth checking for any issues with the Outlook profile or user credentials. Try recreating the Outlook profile or resetting the user credentials to see if that resolves the issue.
If none of these steps solve the problem, it may be necessary to troubleshoot further using tools such as PowerShell or examining error messages in event logs.
Running Microsoft 365 Support and Recovery Assistant
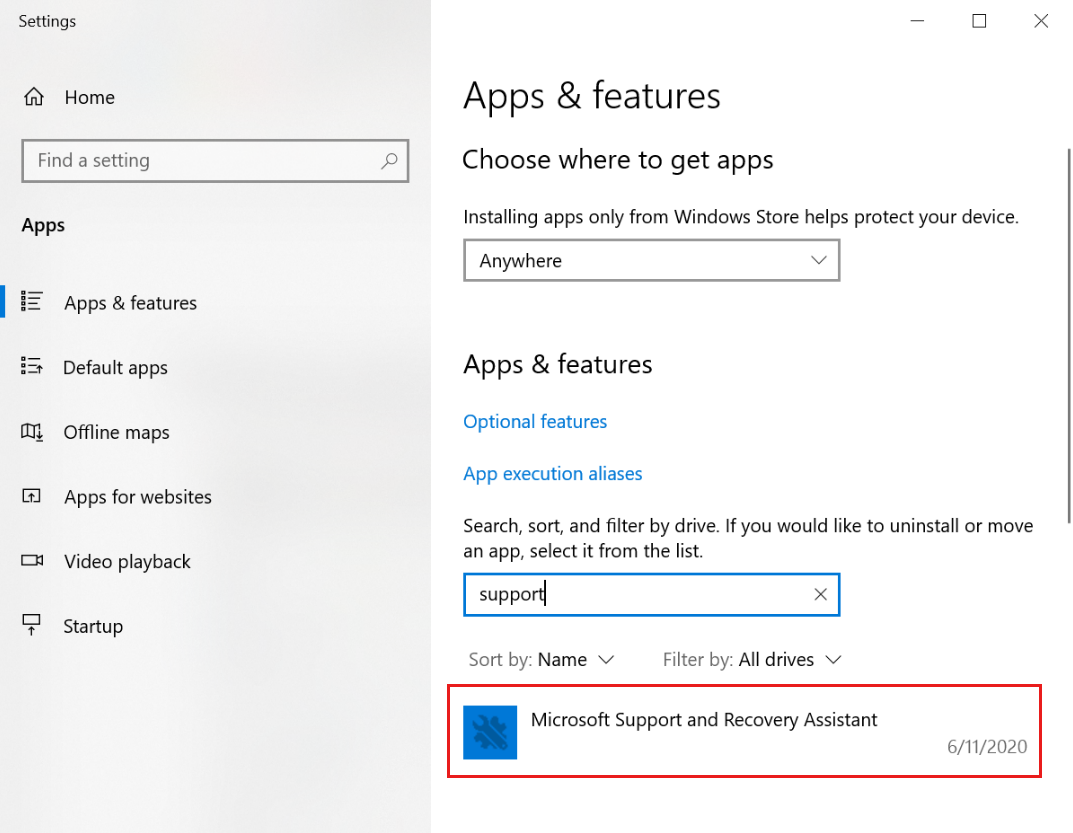
If you are experiencing issues with autodiscover not working for Outlook 2013 in Office 365, you can try running the Microsoft 365 Support and Recovery Assistant.
To do this, follow these steps:
1. Download the Microsoft 365 Support and Recovery Assistant from the official Microsoft website.
2. Install the program on your personal computer or tablet computer.
3. Launch the program and select “Outlook” from the list of applications.
4. Enter your login credentials when prompted.
5. Follow the on-screen instructions to troubleshoot the autodiscover issue.
6. The tool will automatically run diagnostics and attempt to fix the problem.
7. If the issue persists, the tool will provide you with detailed information on how to fix it manually or direct you to relevant resources.
By using the Microsoft 365 Support and Recovery Assistant, you can quickly and efficiently troubleshoot autodiscover issues in Outlook 2013. This tool is designed to simplify the troubleshooting process and provide you with step-by-step instructions to resolve the problem.
Configuration and Troubleshooting Steps
- Open the Command Prompt by pressing Win+R and typing cmd.
- Type nslookup -type=SRV _autodiscover._tcp.yourdomain.com and press Enter.
- If the command returns an error or doesn’t display any records, your DNS configuration may be incorrect.
- Contact your DNS provider or system administrator to verify and correct the Autodiscover DNS records.
Repair Method 2: Test Autodiscover Connectivity
- Open Internet Explorer and go to https://testconnectivity.microsoft.com.
- Click on the Office 365 tab.
- Select Outlook Autodiscover and click on Next.
- Enter your Office 365 email address and password.
- Click on Perform Test and wait for the results.
- If the test shows any errors or failures, review the details and follow the recommended troubleshooting steps.
Repair Method 3: Disable Outlook Proxy Settings
- Open Outlook 2013 and go to File > Options.
- Click on Advanced and scroll down to the Proxy Settings section.
- Uncheck the Use HTTP Proxy and Use Autodiscover options.
- Click OK to save the changes.
- Restart Outlook and check if Autodiscover is working correctly.
Repair Method 4: Repair Office 365 Installation
- Open Control Panel and go to Programs > Programs and Features.
- Select Microsoft Office 365 and click on Change.
- Choose the Repair option and follow the on-screen instructions to repair the installation.
- Restart your computer after the repair process is completed.
- Launch Outlook 2013 and check if Autodiscover is working properly.
End-User-Level Solutions
If you are experiencing issues with Office 365 Autodiscover not working for Outlook 2013, here are some solutions you can try:
1. Check your internet connection and make sure you are online.
2. Verify that your Outlook 2013 is up to date with the latest updates from Microsoft.
3. Restart your computer and try again.
4. Clear the cache and temporary files in your web browser.
5. Reset the Autodiscover settings in Outlook 2013 by following these steps:
– Go to File > Options > Mail.
– Click on “Exchange Autodiscover” > click “Clear” > click “Close”.
– Restart Outlook 2013 and it will automatically reconfigure the Autodiscover settings.
6. Check your DNS settings and make sure they are correctly configured for Office 365. You can use the Microsoft Remote Connectivity Analyzer tool to troubleshoot DNS issues.
7. Ensure that your Outlook profile is set up correctly and is pointing to the correct Exchange server.
8. If you are using a mobile device or tablet computer, make sure that it is connected to the internet and try again.
9. If you have a CNAME record for Autodiscover in your DNS, make sure it is set up correctly.
10. If you are still experiencing issues, you can try creating a new Outlook profile or repairing your Office 365 installation.
Remember to always backup your data before making any changes to your Outlook settings or configurations.
These solutions should help resolve the Autodiscover issue in Outlook 2013. If you continue to experience problems, it may be best to contact your IT administrator or Microsoft support for further assistance.
Ensuring Proper Setup of Autodiscover and Active Directory Attributes
| Issue | Solution |
|---|---|
| Autodiscover not functioning for Outlook 2013 | Ensure proper setup of Autodiscover and Active Directory attributes |
| Check DNS configuration | Verify that Autodiscover DNS records are correctly configured in the domain’s DNS settings |
| Confirm Autodiscover service availability | Ensure that the Autodiscover service is running and accessible |
| Check Active Directory attributes | Make sure that the necessary Active Directory attributes are populated correctly |
| Verify Autodiscover virtual directory settings | Check the Autodiscover virtual directory settings in IIS to ensure they are properly configured |
| Test Autodiscover functionality | Use the Microsoft Remote Connectivity Analyzer or Outlook’s Autodiscover Test to diagnose any issues |
| Consult Microsoft support | If the issue persists, contact Microsoft support for further assistance |
Upgrading and Using the Add New Account Wizard
To upgrade and use the Add New Account Wizard in Outlook 2013, follow these steps:
1. Open Outlook 2013 on your personal computer.
2. Click on the “File” tab in the top-left corner of the Outlook window.
3. In the left-hand menu, select “Add Account” to open the Add New Account Wizard.
4. In the Add New Account Wizard dialogue, enter your email address and click “Connect”.
5. Outlook will attempt to automatically configure your account settings. If it is unable to do so, you will be prompted to enter additional information.
6. Fill in the required fields, such as your password, server information, and user credentials.
7. If you are unsure about any of the required information, contact your system administrator or email provider for assistance.
8. Once all the necessary information is entered, click “Next” and follow any additional prompts to complete the setup process.
9. After the account is successfully configured, you will see a confirmation message.
10. Click “Finish” to close the Add New Account Wizard and start using your upgraded Outlook account.
FAQ
Is Outlook 2013 no longer working with Office 365?
Outlook 2013 is no longer compatible with Office 365 as Microsoft has discontinued support for Basic authentication in Exchange Online starting January 2023. This means that users running Outlook 2013 will no longer be able to sign in to their email.
Is Outlook 2013 still supported with Office 365?
Outlook 2013 is not supported with Office 365, and using it may result in performance or reliability issues.
Does Outlook 2013 use autodiscover?
Yes, Outlook 2013 does use autodiscover. The autodiscover service automatically configures user profile settings for Outlook 2013 and supported mobile phones.
How do I test autodiscover in Outlook 2013?
To test autodiscover in Outlook 2013, you can follow these steps: While Outlook is running, press and hold down the CTRL key, and then right-click the Outlook icon in the system tray or in the notification area in the lower right corner of the screen. From the menu, select Test E-mail AutoConfiguration.
