Windows 10 stuck on the loading screen? Here’s how to fix it.
Unplug USB Devices and Reboot
To fix the Windows 10 stuck loading screen issue, start by unplugging all USB devices connected to your computer. This includes devices such as USB flash drives, external hard drives, and printers. Once all USB devices are unplugged, reboot your computer.
Unplug USB Devices: Remove any USB devices connected to your computer, including flash drives, external hard drives, and printers.
Reboot: Restart your computer to refresh the system and potentially resolve the loading screen issue.
Unplugging USB devices and rebooting can help resolve the Windows 10 stuck loading screen problem by eliminating any potential conflicts or issues caused by these devices. This simple step can often fix the problem and allow your computer to boot up properly.
If the issue persists after following these steps, it may be necessary to explore other troubleshooting options or seek further assistance.
Start in Safe Mode
To start your Windows 10 computer in Safe Mode and resolve the issue of it being stuck on the loading screen, follow these steps:
1. Restart your computer. You can do this by clicking on the Start button, selecting the Power icon, and choosing Restart.
2. As your computer restarts, continuously press the F8 key until the Advanced Boot Options menu appears.
3. Use the arrow keys to navigate to “Safe Mode” and press Enter.
4. Windows will now start in Safe Mode, a diagnostic mode that loads only essential drivers and services.
5. Once in Safe Mode, you can troubleshoot the issue causing the stuck loading screen. This may involve running a virus scan, checking for disk errors, updating drivers, or performing a system restore.
6. To exit Safe Mode and return to normal Windows operation, simply restart your computer.
Perform Disk Surface and File System Checks
| Step | Description |
|---|---|
| Step 1 | Restart your computer and press F8 repeatedly during startup to enter the Advanced Boot Options menu. |
| Step 2 | Select “Repair your computer” and press Enter. |
| Step 3 | Choose your language preferences and click “Next”. |
| Step 4 | Click on “Troubleshoot” and then select “Advanced options”. |
| Step 5 | Choose “Command Prompt” from the list of options. |
| Step 6 | Type “chkdsk /f /r” and press Enter to perform a disk surface check and repair any errors. |
| Step 7 | Wait for the process to complete (this may take some time depending on the size of your hard drive). |
| Step 8 | Once the disk check is finished, type “exit” and press Enter to close the Command Prompt. |
| Step 9 | Restart your computer and check if the loading screen issue is resolved. |
| Step 10 | If the issue persists, repeat steps 1 to 5 and instead of choosing “Command Prompt”, select “Startup Repair” to perform a file system check and repair. |
| Step 11 | Follow the on-screen instructions to complete the file system check and repair process. |
| Step 12 | Once the repair is finished, restart your computer and the loading screen issue should be resolved. |
Repair System Issues
1. Boot into Safe Mode: Start by restarting your computer and repeatedly pressing the F8 key until the Advanced Boot Options menu appears. Select “Safe Mode” and press Enter. This will allow you to start Windows with minimal drivers and services, potentially bypassing the issue.
2. Use System Restore: If the problem started recently, you can use the System Restore feature to revert your computer back to a previous working state. Open the Start menu, type “System Restore,” and select the corresponding option. Follow the on-screen instructions to choose a restore point and restore your system.
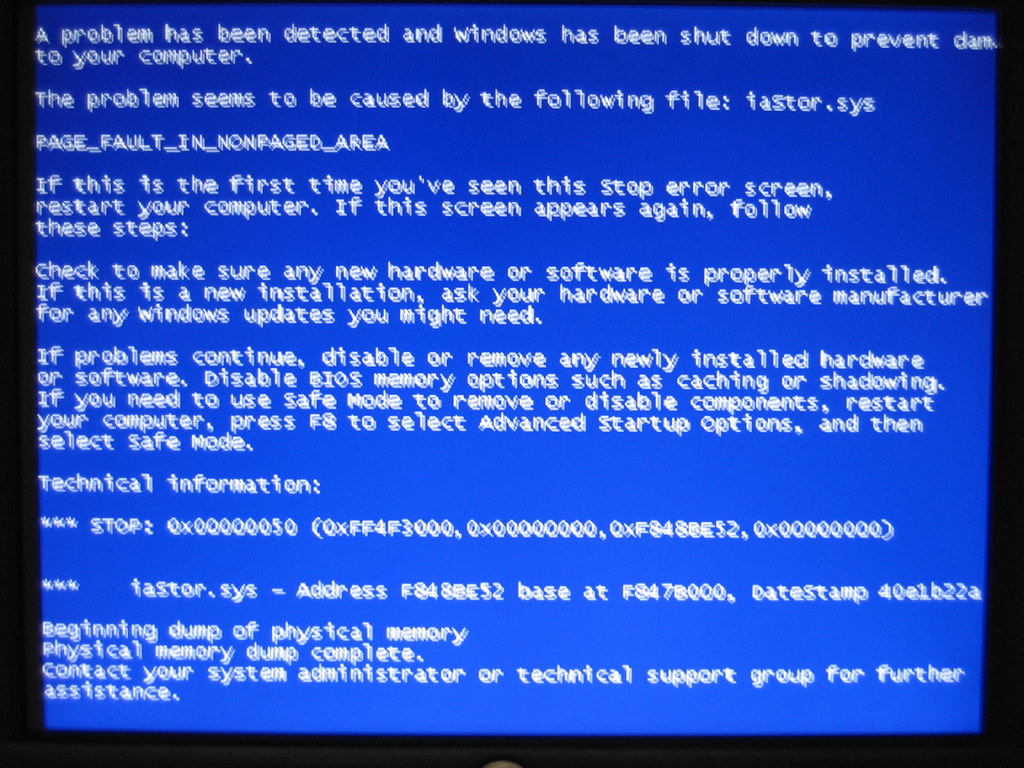
3. Run CHKDSK: Open Command Prompt as an administrator and type “chkdsk /f” followed by the drive letter of your Windows installation (usually C:). This will scan and fix any errors on your hard drive that may be causing the loading screen issue.
4. Update Device Drivers: Outdated or incompatible device drivers can cause system issues. Open the Device Manager by right-clicking the Start button and selecting “Device Manager.” Expand the categories and look for any devices with a yellow exclamation mark. Right-click on them and select “Update Driver.” If possible, download the latest drivers from the manufacturer’s website and install them.
5. Perform a Clean Boot: Open the System Configuration utility by typing “msconfig” in the Start menu search bar and selecting the corresponding result. In the General tab, check the “Selective startup” option and uncheck “Load startup items.” Go to the Services tab, check “Hide all Microsoft services,” and click “Disable all.” Finally, go to the Startup tab and click “Open Task Manager.” Disable any startup items you don’t need. Click OK and restart your computer.
Restore to a Previous System State
To restore your Windows 10 system to a previous state, follow these steps:
1. Start your computer and continuously press the appropriate key (usually F2, F10, or Del) to enter the BIOS settings.
2. Use the arrow keys to navigate to the “Boot” or “Boot Priority” section and set the boot disk to the Windows Preinstallation Environment or a USB flash drive with the Windows installation media.
3. Save the changes and exit the BIOS settings.
4. Insert the boot disk or USB flash drive into your computer and restart it.
5. Follow the on-screen instructions to boot into the Windows Preinstallation Environment.
6. Once in the Windows Preinstallation Environment, select “Repair your computer” or “Troubleshoot” option.
7. Choose “Advanced options” and then “System Restore.”
8. Select a restore point from the available list and click “Next.”
9. Review the restore point details and click “Finish” to start the restoration process.
10. Wait for the process to complete, and then restart your computer.
Clear and Replace CMOS Memory
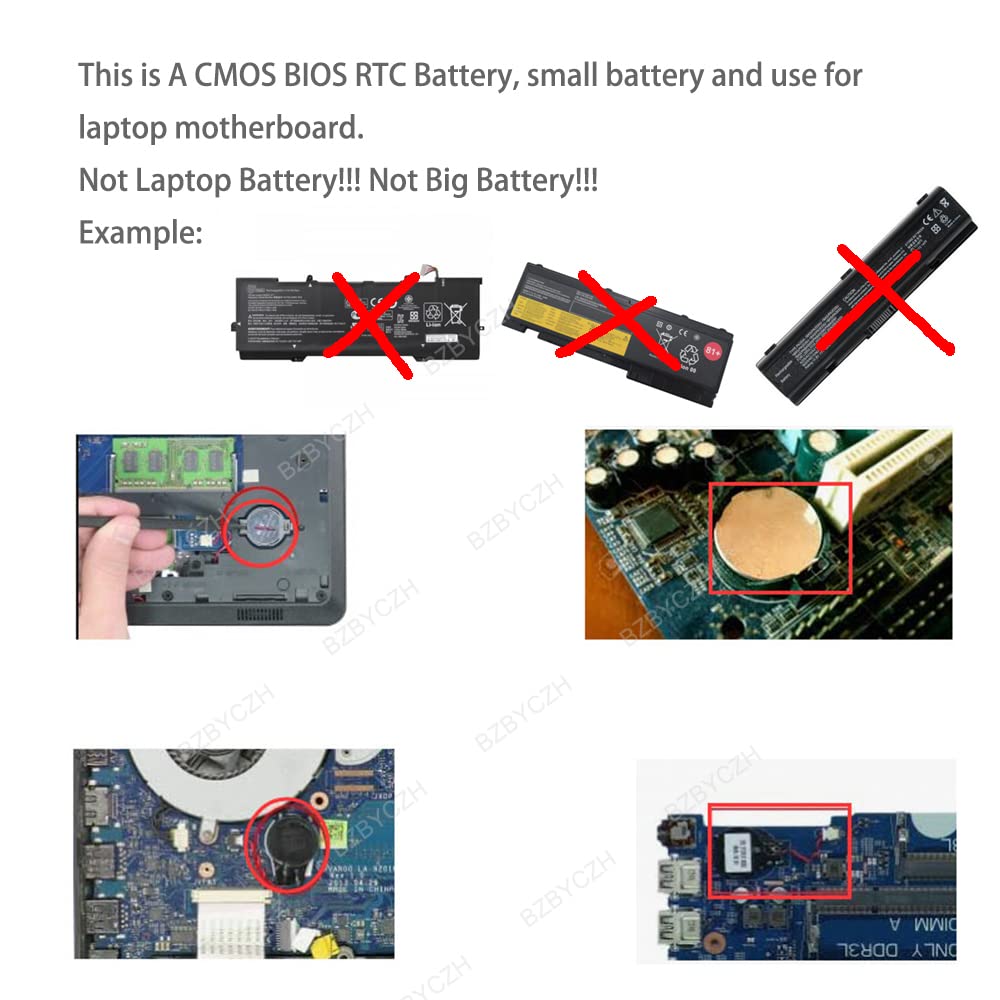
1. Shut down your computer completely and unplug it from the power source.
2. Open up your computer case to locate the CMOS battery. It is a small round battery usually found on the motherboard.
3. Carefully remove the CMOS battery from its socket. You may need to use a small flat-headed screwdriver or your fingernail to gently pry it out.
4. Wait for about 5 minutes to allow the residual charge to drain from the motherboard.
5. While waiting, you can take this opportunity to clean any dust or debris from inside your computer case using compressed air.
6. After the 5-minute wait, insert the CMOS battery back into its socket, making sure it is securely seated.
7. Close your computer case and plug it back into the power source.
8. Power on your computer and enter the BIOS setup by pressing the appropriate key during the boot process (usually displayed on the screen).
9. Once in the BIOS setup, navigate to the option that allows you to “Load Optimized Defaults” or “Reset BIOS Settings to Default.”
10. Save and exit the BIOS setup, then allow your computer to boot up normally.
Scan for Viruses in Safe Mode
In order to fix a Windows 10 stuck loading screen issue, you can try scanning for viruses in safe mode. Safe mode allows you to start your computer with only the essential drivers and services, which can help troubleshoot and identify any issues that may be causing the loading screen problem.
To scan for viruses in safe mode, follow these steps:
1. Restart your computer and repeatedly press the F8 key before the Windows logo appears. This will bring up the Advanced Boot Options menu.
2. Use the arrow keys to highlight “Safe Mode with Networking” and press Enter to select it. This will start your computer in safe mode and allow you to access the internet.
3. Once in safe mode, open your preferred antivirus software. If you don’t have one installed, you can download a reputable antivirus program from the internet.
4. Update your antivirus software to ensure it has the latest virus definitions.
5. Perform a full system scan using the antivirus software. This will scan your entire computer for any viruses or malware that may be causing the loading screen issue.
6. If any viruses or malware are detected, follow the instructions provided by your antivirus software to remove them from your computer.
7. Once the scan and removal process is complete, restart your computer normally and see if the loading screen issue has been resolved.
Scanning for viruses in safe mode can help identify and remove any malicious software that may be causing your computer to get stuck on the loading screen. It’s an important step in troubleshooting and resolving this issue.
Check and Update Drivers
- Ensure all drivers are up to date
- Check for outdated or incompatible drivers
- Visit the manufacturer’s website for each hardware component
- Download the latest drivers for your specific Windows 10 version

- Install the updated drivers one by one
- Restart your computer after each driver installation
- Use a reliable driver update software if manually updating seems overwhelming
Clean Reinstall or Roll Back Windows

If you’re experiencing a stuck loading screen on your Windows 10 computer, you may need to perform a clean reinstall or roll back your operating system. These steps can help resolve any issues causing the loading screen problem.
Clean Reinstall:
1. Back up your important files and data to an external storage device, such as an external hard drive or SD card.
2. Create a Windows 10 installation media using a DVD or USB drive.
3. Restart your computer and boot from the installation media.
4. Follow the on-screen instructions to reinstall Windows 10.
5. After the installation completes, restore your files and data from the backup.
Roll Back Windows:
1. Press the Windows key + I to open the Settings app.
2. Go to Update & Security and select Recovery.
3. Under the “Go back to the previous version of Windows 10” section, click on the Get Started button.
4. Follow the on-screen instructions to roll back to the previous version of Windows 10.
5. After the rollback completes, check if the loading screen issue is resolved.
FAQ
How do I fix Windows 10 stuck on restarting screen?
To fix a Windows 10 stuck on restarting screen, try a forced restart by holding down the power button for about 10 seconds until the system powers off. Then, turn it back on and see if it boots properly.
How do I fix Windows 10 not loading?
To fix Windows 10 not loading, you can try the following steps: unplug all USB devices, start in Windows Safe Mode, check your battery and charger, turn off Fast Boot, check other BIOS/UEFI settings, perform a malware scan, or boot to the Command Prompt interface.
How do I fix a stuck Windows boot?
To fix a stuck Windows boot, you can try the following steps:
1. Access Windows Recovery Environment (winRE).
2. Use the Startup Repair Tool.
3. Perform a System Restore.
4. Uninstall Quality and Features Updates.
5. Uninstall Windows Updates in Safe Mode.
6. Perform a System File Check.
7. Reset Your Computer and Reinstall Windows.
How do I fix a stuck loading screen in Windows 10?
To fix a stuck loading screen in Windows 10, you can try the following steps: unplug any USB dongles, run a disk surface test, enter Safe Mode and troubleshoot, perform a system repair, attempt a system restore, clear CMOS memory, check computer RAM for any issues.
