Is your Windows 10/11 Task Manager showing 100% disk usage? Discover effective solutions to fix this issue and optimize your system’s performance.
Understanding Disk Usage
![]()
Disk usage refers to the amount of storage space used on your computer’s hard drive. When your disk usage is at 100%, it can cause your system to slow down and become unresponsive. Here are some tips to help you fix this issue:
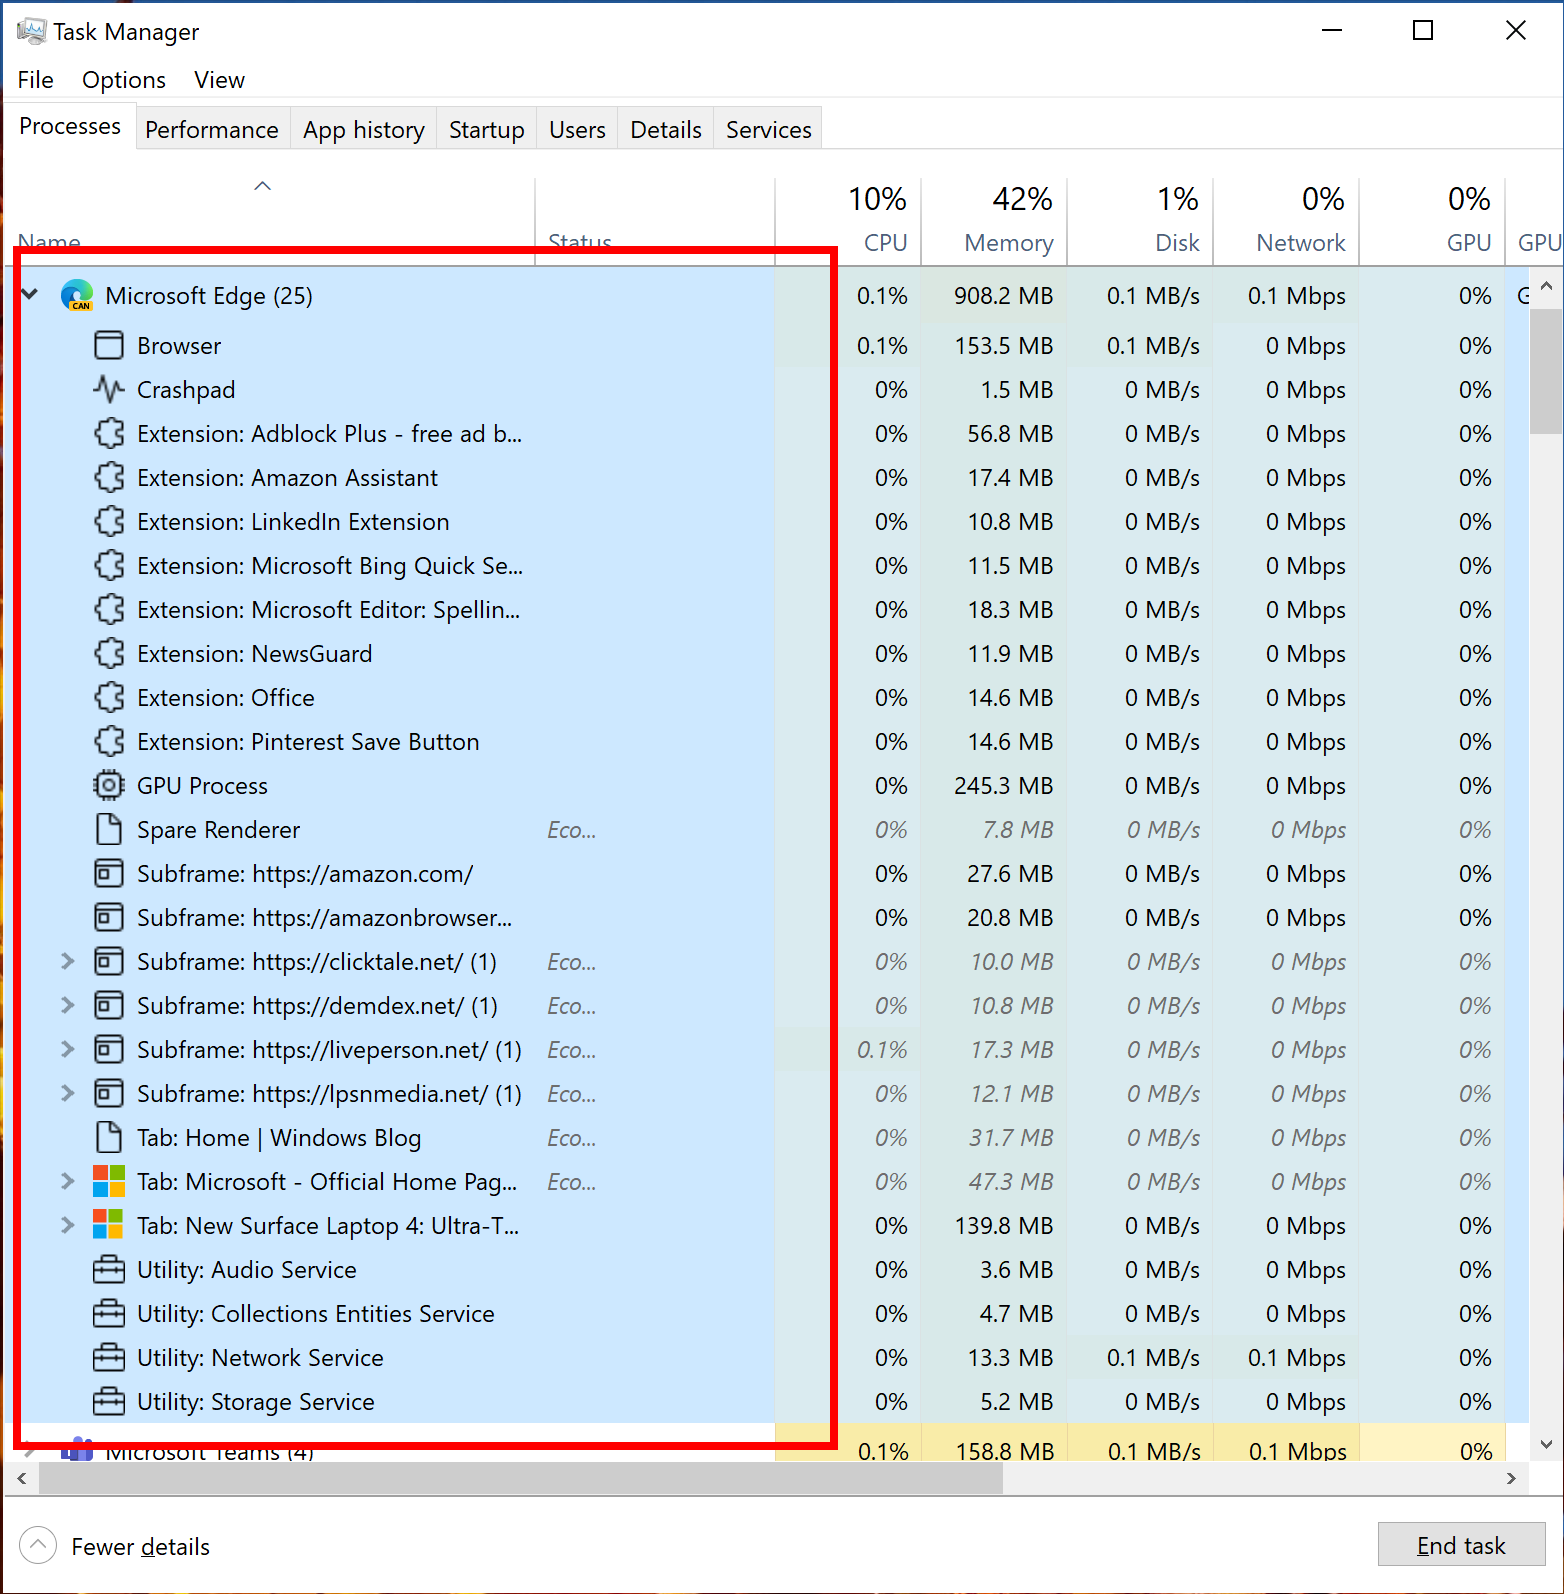
1. Check for resource-intensive processes: Open the Task Manager by pressing Ctrl + Shift + Esc and go to the “Processes” tab. Look for any processes that are using a large amount of disk resources. If you find any, you can try closing or uninstalling the corresponding applications.
2. Disable Windows Search: Windows Search can sometimes cause high disk usage. To disable it, open the Services Manager by pressing Win + R and typing “services.msc”. Scroll down and find “Windows Search” in the list of services. Right-click on it and select “Properties”. Change the startup type to “Disabled” and click “OK”.
3. Perform a disk cleanup: Windows has a built-in Disk Cleanup tool that can help you free up disk space. Press the Win + R keys, type “cleanmgr”, and press Enter. Select the drive you want to clean up and click “OK”. Check the boxes for the types of files you want to delete and click “OK” to start the cleanup process.
4. Check for malware: Malware infections can also cause high disk usage. Make sure you have an up-to-date antivirus software installed, such as Microsoft Defender Antivirus. Run a full scan of your system to check for any malware and remove it if found.
5. Update your system: Outdated software and operating systems can sometimes cause compatibility issues and high disk usage. Make sure you have the latest Windows updates installed. Go to Settings > Update & Security > Windows Update and click “Check for updates”.
How to Reduce Usage
If you’re experiencing 100% disk usage on your Windows 10 or 11 system, there are a few steps you can take to reduce usage and improve performance.
1. Check for malware or viruses: Run a thorough scan with your antivirus software, such as Microsoft Defender Antivirus, to ensure your system is not infected. Malware can cause high disk usage and slow down your computer.
2. Update Windows: Make sure your operating system is up to date by installing the latest Windows updates. These updates often include bug fixes and performance improvements that can help reduce disk usage.
3. Disable unnecessary startup programs: Open the Task Manager by pressing Ctrl + Shift + Esc and navigate to the “Startup” tab. Disable any programs that you don’t need to start automatically when you boot your computer. This can help reduce the number of background processes running and free up disk resources.
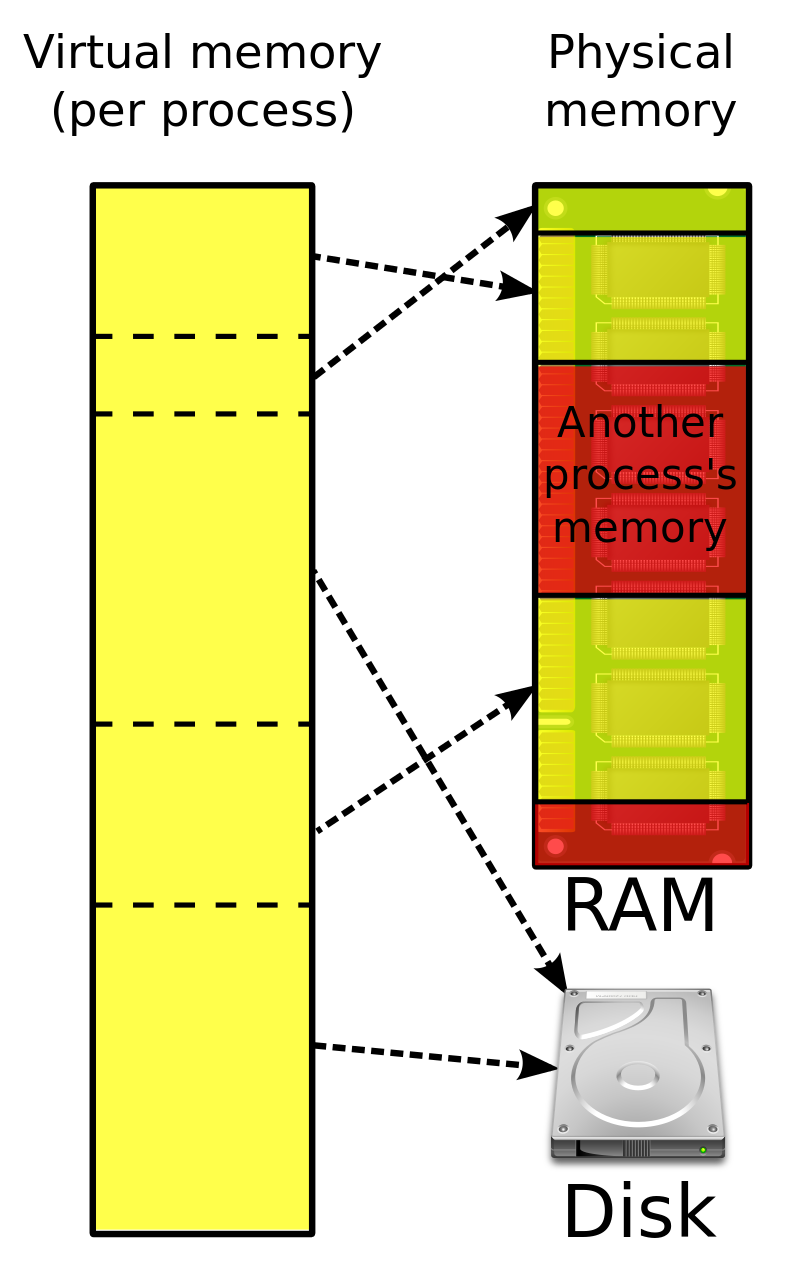
4. Optimize virtual memory settings: Virtual memory, also known as pagefile, is a space on your hard drive that your computer uses as additional memory. You can optimize its settings to reduce disk usage. Right-click on the “Start” menu, select “System,” then go to “Advanced system settings.” Under the “Performance” tab, click on “Settings,” go to the “Advanced” tab, and click on “Change” under the Virtual Memory section. Uncheck the “Automatically manage paging file size for all drives” option, select the drive where Windows is installed, and choose the “Custom size” option. Set the initial and maximum size values to the recommended values provided or adjust them based on your system’s needs.
5. Update device drivers: Outdated or incompatible device drivers can cause high disk usage. Visit the manufacturer’s website or use a reliable driver update tool to download and install the latest drivers for your hardware.
6. Check for memory leaks: Memory leaks can lead to excessive disk usage. To check for memory leaks, open the Task Manager and go to the “Processes” tab. Look for any processes that are using a large amount of memory and causing high disk usage. If you find any suspicious processes, try closing the associated application or restarting your computer.
Restart Your Device
1. Save any unsaved work and close all open applications.
2. Click on the “Start” menu in the bottom left corner of your screen.
3. From the menu that appears, click on the “Power” button.
4. A sub-menu will appear with options such as “Sleep,” “Shutdown,” and “Restart.” Click on the “Restart” option.
5. Your computer will now begin the reboot process. Wait for it to fully shut down and then turn back on.
6. After the device has restarted, check the Task Manager again to see if the disk usage has improved.
7. If the problem persists, you may need to try additional troubleshooting methods or seek technical support.
Updating Windows
To update Windows and potentially fix system 100% disk usage in Windows 10/11 Task Manager, follow these steps:
1. Open the Start menu and search for “Windows Update”.
2. Select “Windows Update settings” from the search results.
3. In the Windows Update settings window, click on “Check for updates” to see if there are any available updates for your system.
4. If updates are found, click on “Download” and wait for the updates to be downloaded and installed. This may take some time, so be patient.
5. After the updates are installed, restart your computer to apply the changes.
6. Once your computer has booted up again, open the Task Manager by pressing “Ctrl + Shift + Esc” on your keyboard.
7. In the Task Manager, click on the “Processes” tab and look for any processes or applications that are using a high amount of disk usage.
8. Right-click on any suspicious processes or applications and select “End task” to stop them.
9. If the high disk usage issue persists, you can try updating your device drivers. Open the Start menu and search for “Device Manager”.
10. In the Device Manager, expand the categories and look for any devices with a yellow exclamation mark. Right-click on those devices and select “Update driver”.
11. Follow the on-screen instructions to update the drivers for those devices.
12. After updating the drivers, restart your computer again to apply the changes.
Minimize Startup Applications
- Check for unnecessary startup applications: Go to the Task Manager and disable any applications that are set to launch at startup but are not essential.
- Use the Startup tab in Task Manager: Open the Task Manager, go to the Startup tab, and disable any unnecessary programs that are slowing down your system.
- Disable background applications: Some applications continue running in the background even when you close them. Use Task Manager to identify and disable these applications to free up system resources.
- Update device drivers: Outdated or incompatible device drivers can cause high disk usage. Update your drivers to the latest versions to fix this issue.
- Scan for malware: Malware or viruses can also contribute to high disk usage. Run a thorough scan using a reliable antivirus software to remove any malicious programs.
- Disable Windows Search service: The Windows Search service can use up a significant amount of system resources. Temporarily disable it to see if it improves disk usage.
- Optimize your virtual memory settings: Adjusting the virtual memory settings can help improve disk usage. Set the initial and maximum size of the virtual memory to recommended values or let Windows manage it automatically.
- Disable Superfetch and Prefetch: Superfetch and Prefetch are Windows features that can cause high disk usage. Disable them through the Services application in Windows.

- Perform a disk cleanup: Use the built-in Disk Cleanup tool to remove unnecessary files and free up disk space.
- Upgrade your hardware: If all else fails and you consistently experience high disk usage, consider upgrading your hardware, such as adding more RAM or switching to a solid-state drive (SSD).
Device Driver Updates
Updating device drivers can help resolve system disk usage issues in Windows 10/11 Task Manager. Outdated or incompatible drivers can cause high disk usage, leading to slow performance and unresponsiveness. To fix this problem, follow these steps:
1. Open the Device Manager: Right-click on the Windows Start button and select “Device Manager” from the context menu.
2. Expand the categories: In the Device Manager window, expand the categories and look for any devices with a yellow exclamation mark or question mark. These indicate outdated or problematic drivers.
3. Update drivers: Right-click on the device with the outdated driver and select “Update driver” from the context menu. Choose the option to search automatically for updated driver software. Windows will then search for and install the latest driver version.
4. Repeat for other devices: Repeat the above steps for any other devices with outdated drivers. Make sure to update all relevant drivers.
5. Restart your computer: After updating the drivers, restart your computer to apply the changes.
Updating device drivers can help optimize system performance, reduce disk usage, and improve overall stability. By keeping your drivers up to date, you ensure compatibility with the latest Windows updates and enhance the functioning of your hardware devices.
Malware Scanning
To fix system 100% disk usage in Windows 10/11 Task Manager, it’s essential to check for any malware infections. Malware can consume a significant amount of system resources, causing high disk usage and slowing down your computer.
Here’s how you can scan for malware and remove any detected threats:
1. Open Windows Security by clicking on the Windows Security icon in the taskbar or searching for it in the Start menu.
2. In Windows Security, click on “Virus & threat protection” in the left-hand menu.
3. Under “Quick scan,” click on the “Quick scan” button to start scanning your system for malware. This scan will check the most common areas where malware hides.
4. If any threats are detected, Windows Security will display a list of them. Click on “Start actions” to remove or quarantine the malware.
5. Once the quick scan is complete, it’s recommended to perform a full scan for a more thorough check. Click on “Scan options” under “Quick scan” and select “Full scan.” Then, click on the “Scan now” button to start the full scan.
6. During the full scan, Windows Security will scan all files and folders on your computer. This process may take a while, so be patient.
7. If any threats are found during the full scan, follow the instructions provided by Windows Security to remove or quarantine them.
8. After the scans are completed and any malware is removed, restart your computer to ensure all changes take effect.
Regularly scanning for malware is crucial to maintaining a secure and optimized system. Make sure to keep your antivirus software up to date and perform scans periodically to stay protected against new threats.
Clearing Junk Files
To clear junk files and fix system 100% disk usage in Windows 10/11 Task Manager, follow these steps:
1. Open the Task Manager by pressing Ctrl + Alt + Delete and selecting “Task Manager” from the menu.
2. Click on the “Processes” tab to see a list of running processes. Look for any processes that are using a high percentage of disk usage.
3. Right-click on the process and select “End Task” to stop the process and free up disk resources.
4. Next, open the “Disk” tab in Task Manager. Look for any processes that are using a high percentage of disk usage under the “Disk Activity” section.
5. Right-click on the process and select “End Task” to stop the process and free up disk resources.
6. Now, let’s clear junk files from your system. Press the Windows key + R to open the Run dialog box.
7. Type “%temp%” (without the quotes) and press Enter. This will open the Temp folder where temporary files are stored.
8. Select all the files and folders in the Temp folder and press Delete to remove them. Note that some files may be in use and cannot be deleted.
9. Next, open the Run dialog box again by pressing the Windows key + R.
10. Type “temp” (without the quotes) and press Enter. This will open another Temp folder.
11. Select all the files and folders in this Temp folder and press Delete to remove them.
12. Finally, open the Run dialog box once more and type “prefetch” (without the quotes) and press Enter. This will open the Prefetch folder.
13. Select all the files in the Prefetch folder and press Delete to remove them.
14. Restart your computer to complete the process.
Adjusting Power Settings
1. Open the Power Options menu by right-clicking on the Start button and selecting “Power Options.”
2. In the Power Options menu, you will see different power plans available. Select the “High performance” power plan. This plan provides maximum performance but uses more energy.
3. Click on “Change plan settings” next to the selected power plan.
4. In the next window, click on “Change advanced power settings.”
5. A new window will open with various power settings options. Expand the “Hard disk” option.
6. Under the “Hard disk” option, you will see two settings: “Turn off hard disk after” and “Hard disk sleep.” Set both of these settings to “Never” using the drop-down menus.
7. Click on “Apply” and then “OK” to save the changes.
By adjusting the power settings to prevent the hard disk from turning off or going to sleep, you can potentially resolve the high disk usage issue in Windows 10/11 Task Manager.
Performing Disk Error Checks
| Step | Description |
|---|---|
| Step 1 | Open Task Manager by right-clicking on the taskbar and selecting “Task Manager” from the menu. |
| Step 2 | In the Task Manager window, click on the “Processes” tab. |
| Step 3 | Look for any processes that are using a high percentage of the disk. If you find any, right-click on them and select “End Task” to stop the process. |
| Step 4 | Switch to the “Performance” tab in Task Manager. |
| Step 5 | Click on the “Open Resource Monitor” link at the bottom of the Task Manager window. |
| Step 6 | In the Resource Monitor window, click on the “Disk” tab. |
| Step 7 | Sort the processes by “Total (B/sec)” to see which processes are using the most disk bandwidth. |
| Step 8 | If you find any processes that are using a high amount of disk bandwidth, right-click on them and select “End Process” to stop the process. |
| Step 9 | Open the Command Prompt as an administrator by searching for “Command Prompt” in the Start menu, right-clicking on it, and selecting “Run as administrator”. |
| Step 10 | In the Command Prompt window, type the following command and press Enter: chkdsk C: /f (replace “C:” with the appropriate drive letter if you want to check a different drive). |
| Step 11 | Wait for the disk error check to complete. This may take some time depending on the size and health of your disk. |
| Step 12 | Restart your computer to apply any repairs that were made during the disk error check. |
Modifying Virtual Memory Settings
To modify virtual memory settings in Windows 10/11 Task Manager, follow these steps:
1. Open the Task Manager by pressing Ctrl + Shift + Esc on your keyboard or by right-clicking on the taskbar and selecting “Task Manager” from the menu.
2. Once the Task Manager is open, click on the “Performance” tab.
3. In the Performance tab, click on “Memory” in the left-hand menu.
4. Under the “Virtual Memory” section, click on the “Change” button.
5. Uncheck the box that says “Automatically manage paging file size for all drives.”
6. Select the drive where your operating system is installed (usually the C: drive) and choose the option “Custom size.”
7. Enter the initial size and maximum size for the virtual memory. The initial size should be at least the amount of RAM installed in your computer, and the maximum size can be higher if needed. You can find these values in the “Recommended” column or adjust them based on your specific needs.
8. Click on the “Set” button to apply the changes.
9. Finally, click on “OK” to save the new virtual memory settings.
Modifying the virtual memory settings can help fix issues related to high disk usage in Windows 10/11. By adjusting the size of the virtual memory, you can optimize the usage of your computer’s RAM and improve overall system performance.
Remember to restart your computer after making these changes for them to take effect.
If you continue to experience high disk usage or other performance issues, it may be helpful to consult additional troubleshooting resources or seek technical support.
Disabling Non-Essential Services
To fix system 100% disk usage in Windows 10/11 Task Manager, you can disable non-essential services. This can help improve the overall performance of your computer. Here’s how:
1. Open the Task Manager by pressing Ctrl + Shift + Esc on your keyboard.
2. In the Task Manager window, click on the “Processes” tab.
3. Look for any processes that are using a high amount of disk usage. These processes will be listed under the “Disk” column.
4. Right-click on the process and select “End task” to stop the process.
5. Repeat this process for any other processes that are using high disk usage.
6. Next, click on the “Services” tab in the Task Manager window.
7. In the Services tab, click on the “Open Services” button at the bottom.
8. This will open the Services window, where you can manage various services running on your computer.
9. Look for services that are not essential to your computer’s operation. Examples of non-essential services include unnecessary background processes or third-party applications.
10. Right-click on a non-essential service and select “Properties”.
11. In the Properties window, click on the “General” tab.
12. Under the “Startup type” section, select “Disabled” from the dropdown menu.
13. Click “Apply” and then “OK” to save the changes.
14. Repeat this process for any other non-essential services.
15. Once you have disabled the non-essential services, restart your computer for the changes to take effect.
FAQ
Is 100 disk usage bad?
Is 100 disk usage bad?
Yes, having 100% disk usage on your PC can lead to data loss, hinder the proper functioning of programs and critical system processes, and prevent you from saving files.
How do I fix disk usage 100?
To fix disk usage 100, you can try the following methods:
1. Disable Windows Search
2. Disable Superfetch
3. Change your virtual memory settings
4. Check for malware or viruses
5. Update your device drivers
6. Disable unnecessary startup programs
7. Reset virtual memory
8. Run a disk check
9. Disable Windows tips and notifications
10. Disable Background Intelligent Transfer Service (BITS)
11. Adjust your power settings
12. Upgrade your hardware if needed.
Why is my SSD running at 100?
Your SSD may be running at 100% due to Windows automatically encrypting it in the background or a program utilizing it excessively. Check if Windows encryption is activated and identify the program causing the high usage in Task Manager.
Why is system taking up 100% of my disk?
The system taking up 100% of your disk could be due to various reasons such as disk errors caused by malware, corruption, power issues, physical damage, or other factors. Promptly addressing disk errors is crucial to prevent data loss, and Windows 10 typically alerts you if it detects a problem with your hard disk.
