Getting a 403 Forbidden error? Here’s how to fix it.
Understanding the 403 Forbidden Error
If you’re encountering a 403 Forbidden error, it means that you don’t have access to a particular resource on a website. This error is usually caused by server-side configurations or permissions. Here’s a quick guide on how to fix it:
1. Clear your browser cache and cookies. Sometimes, outdated or corrupted data can cause the error. Clear your cache and cookies and try accessing the website again.
2. Check your URL. Make sure you’ve entered the correct URL and that it is formatted properly. Sometimes, a mistyped or incomplete URL can trigger a 403 error.
3. Check your file-system permissions. If you’re the website owner, ensure that the file or directory you’re trying to access has the correct file-system permissions. Incorrect permissions can restrict access and trigger the error.
4. Check your server configurations. The 403 error can also be caused by misconfigured server settings or .htaccess files. Ensure that these configurations are set up correctly, or contact your web hosting provider for assistance.
5. Check for IP restrictions or blocked IPs. Some websites may restrict access to certain IP addresses or block specific IPs altogether. If you suspect this may be the case, contact the website administrator or your Internet Service Provider (ISP) for further assistance.
6. Use a VPN or proxy. If the website is blocking access based on your IP address, you can try using a Virtual Private Network (VPN) or proxy server to bypass the restriction. These services can provide you with a different IP address and allow you to access the website.
7. Contact the website administrator. If none of the above solutions work, it’s possible that the website itself has restricted access to the resource you’re trying to reach. Reach out to the website administrator or support team for further assistance.
Common Causes of the Error
- Incorrect file permissions
- IP address blocking
- URL mistyped or invalid
Repair Steps:
- Check file permissions:
- Access the file or directory properties
- Ensure the correct permissions are set (e.g., 644 or 755)
- If necessary, change permissions using FTP or file manager
- Investigate IP address blocking:
- Check if your IP address is blocked by the server
- Contact the website administrator or hosting provider for assistance
- Verify the URL:
- Double-check the URL for any typos or errors
- If the URL is correct, ensure it is pointing to a valid page or resource
- If necessary, update the URL or contact the website owner for guidance
Refresh the Page and Verify the Address
To refresh the page, simply press the Ctrl and R keys simultaneously on your keyboard. This will reload the webpage and may resolve the error.
Next, check the address you are trying to access. Make sure there are no typos or extra characters in the URL. Double-check that you are using the correct protocol (HTTP or HTTPS) and that the domain name is spelled correctly.
If refreshing the page and verifying the address does not fix the issue, there may be other reasons for the 403 Forbidden error. These can include authentication requirements, server-side configuration issues, or restrictions set by the website or server.
In some cases, the error may be related to your web browser, cache, or cookies. Clearing your browser cache and cookies can sometimes resolve the issue. Instructions for clearing cache and cookies can vary depending on the browser you are using, so it is best to search for specific instructions for your browser.
If the problem persists, you may want to try accessing the website from a different browser or device to see if the error is specific to your current setup. Additionally, if you are using a virtual private network (VPN), try disabling it to see if that resolves the issue.
Clear Browser Cache and Cookies
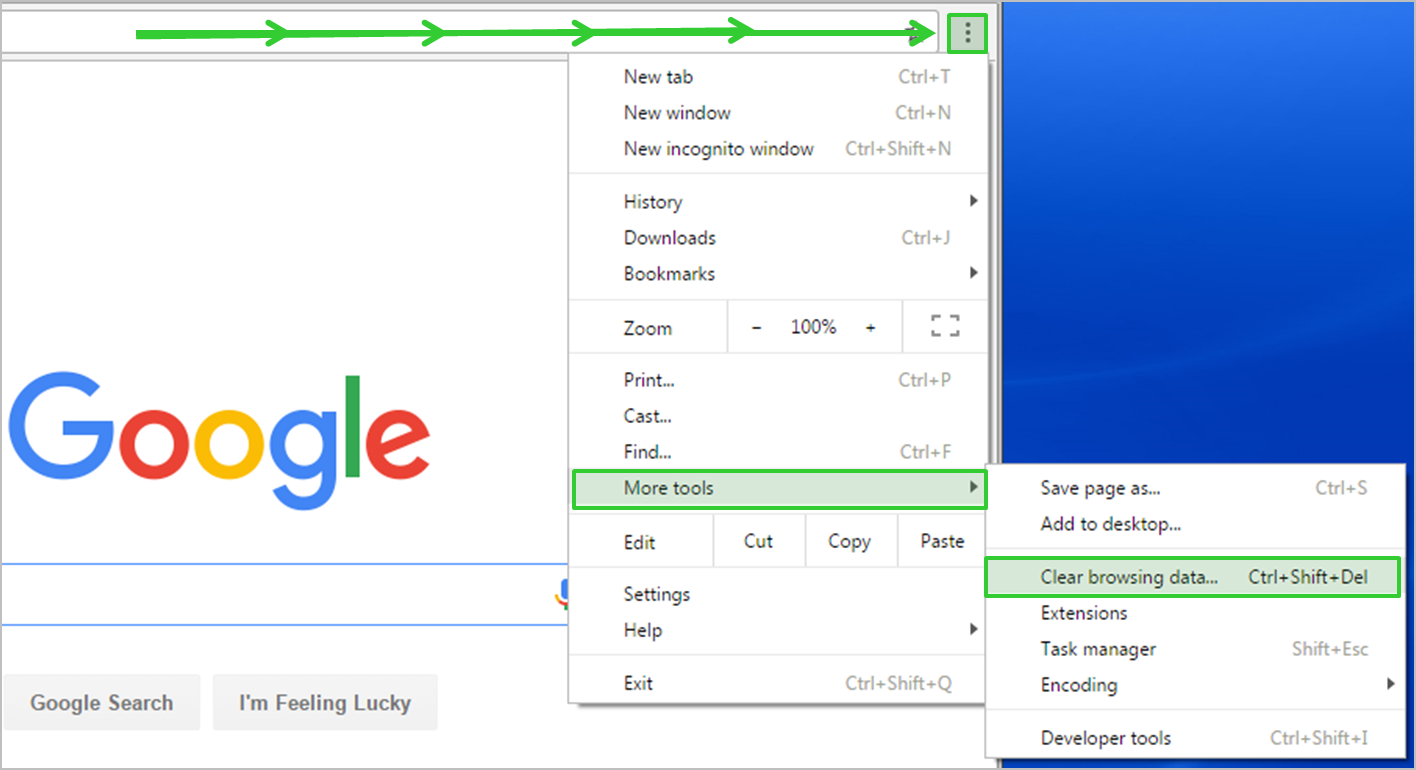
To fix the 403 Forbidden error, you may need to clear your browser cache and cookies. This error occurs when the server denies access to a particular web page or resource. Clearing your cache and cookies can help resolve this issue.
Here’s how you can clear your cache and cookies:
For Google Chrome:
1. Open Chrome and click on the three-dot menu in the top right corner.
2. Select “Settings” from the drop-down menu.
3. Scroll down and click on “Privacy and security” in the left sidebar.
4. Click on “Clear browsing data.”
5. In the pop-up window, choose the time range for which you want to clear the data (e.g., “Last hour” or “All time”).
6. Check the boxes for “Cookies and other site data” and “Cached images and files.”
7. Click on “Clear data” to confirm.
For other web browsers:
1. Open your browser and go to the settings or options menu.
2. Look for the “Privacy” or “Security” section.
3. Find the option to clear your browsing data or history.
4. Make sure to select “Cookies” and “Cache” or “Cached images and files.”
5. Click on the “Clear” or “Delete” button to complete the process.
By clearing your cache and cookies, you are essentially removing temporary files and login information stored by your browser. This can help resolve issues like the 403 Forbidden error, as it forces your browser to retrieve fresh copies of web pages from the server.
If clearing your cache and cookies doesn’t fix the issue, you may need to troubleshoot further or seek assistance from a technical expert.
Adjust File and Directory Permissions
| Permission | Symbol | Octal | Description |
|---|---|---|---|
| Read (r) | – | 4 | Allows reading/viewing the file or directory |
| Write (w) | – | 2 | Allows modifying or deleting the file or directory |
| Execute (x) | – | 1 | Allows executing or accessing the file or directory |
Restore or Edit the .htaccess File
If you’re receiving a 403 Forbidden error, it means that you don’t have permission to access a particular page or resource on a website. This error can be frustrating, but fortunately, it can often be fixed by restoring or editing the .htaccess file on your website.
To restore or edit the .htaccess file:
1. Access your website’s file manager or FTP client.
2. Locate the .htaccess file in the root directory of your website.
3. Make a backup copy of the .htaccess file before making any changes, just in case.
4. Open the .htaccess file in a text editor.
5. Check for any incorrect or conflicting rules that may be causing the 403 error.
6. If you recently made changes to the .htaccess file, try reverting those changes to see if it resolves the issue.
7. If you don’t see any obvious issues, you can try renaming or deleting the .htaccess file temporarily to see if that resolves the error. This will remove any custom rules or configurations, so use caution.
8. Save your changes and upload the modified .htaccess file back to your website.
Remember to clear your browser cache and cookies before testing the website again. Additionally, make sure you’re using a stable internet connection and try accessing the website from a different web browser or device to rule out any local issues.
If restoring or editing the .htaccess file doesn’t fix the 403 error, it’s possible that the issue lies elsewhere, such as with your server configuration or permissions. In such cases, it may be best to reach out to your web hosting provider or a professional developer for further assistance.
Deactivate Plugins and CDN Temporarily
1. Login to your website’s admin dashboard.
2. Go to the “Plugins” section and deactivate all plugins by clicking on the “Deactivate” option next to each plugin.
3. Check if the 403 error is still present. If it’s gone, you can conclude that one of the plugins was causing the issue. You can then reactivate them one by one to identify the specific plugin causing the problem.
4. If the error persists after deactivating the plugins, you should also temporarily disable your Content Delivery Network (CDN).
5. To do this, access your CDN provider’s dashboard and look for an option to disable or turn off the CDN service.
6. Once the CDN is disabled, check if the 403 error still occurs. If it’s resolved, it indicates that the CDN was causing the issue.
7. Remember to re-enable the plugins and CDN once you have identified and fixed the underlying problem.
By temporarily deactivating plugins and CDN, you can troubleshoot and resolve a 403 Forbidden error on your website.
Scan for Malware on Your Site
If you are receiving a 403 Forbidden error on your website, it could be a sign that your site has been infected with malware. To ensure the security of your site and fix this error, it is important to scan your site for malware.
To scan for malware on your site, follow these steps:
1. Install a reliable malware scanner: Choose a reputable malware scanner plugin or tool to scan your site. There are many options available, such as Sucuri, Wordfence, or MalCare.
2. Activate the scanner and run a scan: Once you have installed the malware scanner, activate it and run a full scan of your website. This will search for any malicious code or files that may be causing the 403 Forbidden error.
3. Review the scan results: After the scan is complete, review the results provided by the scanner. It will identify any malware or suspicious files found on your site.
4. Remove or quarantine infected files: If the scanner detects malware or suspicious files, it is important to take immediate action. Remove or quarantine any infected files according to the scanner’s instructions. This will help to eliminate the source of the malware and resolve the 403 Forbidden error.
5. Update your website and plugins: Outdated software and plugins can be vulnerable to malware attacks. Make sure to update your website’s core files, themes, and plugins to their latest versions. This will help to strengthen your site’s security and prevent future malware infections.
6. Strengthen your website security: Take additional steps to strengthen your website’s security. This may include implementing strong passwords, enabling two-factor authentication, regularly backing up your site, and using a web application firewall.
By scanning your site for malware and taking appropriate action, you can fix the 403 Forbidden error and ensure the security of your website.
Check and Update DNS Settings
| Check and Update DNS Settings | |
|---|---|
| Issue: | 403 Forbidden error |
| Possible Cause: | Incorrect DNS settings |
| How to Fix: | Check and update DNS settings |
Troubleshooting with AI Tools and Website Crawlers
When encountering a 403 Forbidden error, it can be frustrating and confusing. However, with the help of AI tools and website crawlers, you can easily troubleshoot and fix this issue. Here are some steps to help you resolve the problem:
1. Check for incorrect permissions: Ensure that the file or directory you are trying to access has the correct permissions set. Use an AI tool or website crawler to scan for any permission issues.
2. Verify the .htaccess file: The .htaccess file can sometimes cause a 403 error. Use a website crawler to check if there are any directives in the file that may be blocking access to the resource. Make sure the file is not blocking the IP address or user-agent.
3. Look for IP or user-agent blocking: Some websites block certain IP addresses or user-agents, leading to a 403 error. Use a website crawler to determine if your IP address or user-agent is being blocked, and take appropriate action to unblock it.
4. Check for server misconfigurations: Server misconfigurations can also cause a 403 error. Use a website crawler to scan for any misconfigurations in your server settings or .htaccess file.
5. Clear browser cache and cookies: Sometimes, an outdated cache or corrupted cookies can trigger a 403 error. Clear your browser cache and cookies, then try accessing the website again.
6. Disable plugins or extensions: Certain plugins or extensions in your browser might conflict with the website, resulting in a 403 error. Disable all plugins and extensions, then try accessing the website again.
7. Contact the website administrator: If none of the above steps resolve the issue, reach out to the website administrator for further assistance. Provide them with the specific error message you are receiving and any relevant information about the scenario.
Contact Your Hosting Provider for Assistance
Why should you contact your hosting provider?
Your hosting provider is responsible for managing the server where your website is hosted. They have the expertise and access to the necessary tools to troubleshoot and resolve the 403 Forbidden error. By reaching out to them, you can save time and ensure that the issue is addressed properly.
What can your hosting provider help with?
Your hosting provider can investigate the error logs to determine the reason behind the 403 Forbidden error. It could be due to incorrect file permissions, a misconfigured .htaccess file, or other issues related to server settings. They will provide you with specific instructions on how to fix the problem based on their findings.
How to contact your hosting provider?
To get in touch with your hosting provider, you can reach out to their support team via email, phone, or live chat. Provide them with detailed information about the error, including any error messages you see and the steps you were taking when the error occurred. This will help them in diagnosing the issue more effectively.
F.A.Qs
Why am I suddenly getting a 403 Forbidden error?
You are suddenly getting a 403 Forbidden error because your server believes you do not have the necessary permission to access the specific page. This error is commonly caused by problems with file permissions, hosting, or authentication.
Why is my internet saying forbidden?
Your internet is saying “forbidden” because the web page or resource you are trying to access is not allowed for you to access. This is indicated by the 403 error, which is the HTTP status code used to describe this type of error.
How do I fix forbidden I don’t have permission to access?
To fix the “forbidden, I don’t have permission to access” error, you can try the following steps:
1. Refresh the page and double-check the address.
2. Clear your browser cache.
3. Modify your file permissions.
4. Delete and restore the .htaccess file.
5. Deactivate and then reactivate your plugins.
6. Deactivate CDN temporarily.
7. Check if hotlink protection is misconfigured.
8. Disconnect from your VPN.
How do I fix forbidden messages?
To fix forbidden messages, you can try the following steps:
1. Echo back the question as a statement: To fix forbidden messages, you can take the following actions.
2. Use Hostinger AI Troubleshooter.
3. Clear the web browser cache and cookies.
4. Disable VPN temporarily.
5. Disable CDN temporarily.
6. Scan for malware.
7. Restore the .htaccess file.
8. Reset the site’s file permissions.
9. Disable WordPress plugins.
