Windows 10 High-DPI scaling issues can be frustrating, but I have discovered effective solutions to fix them.
Addressing Blurry Applications
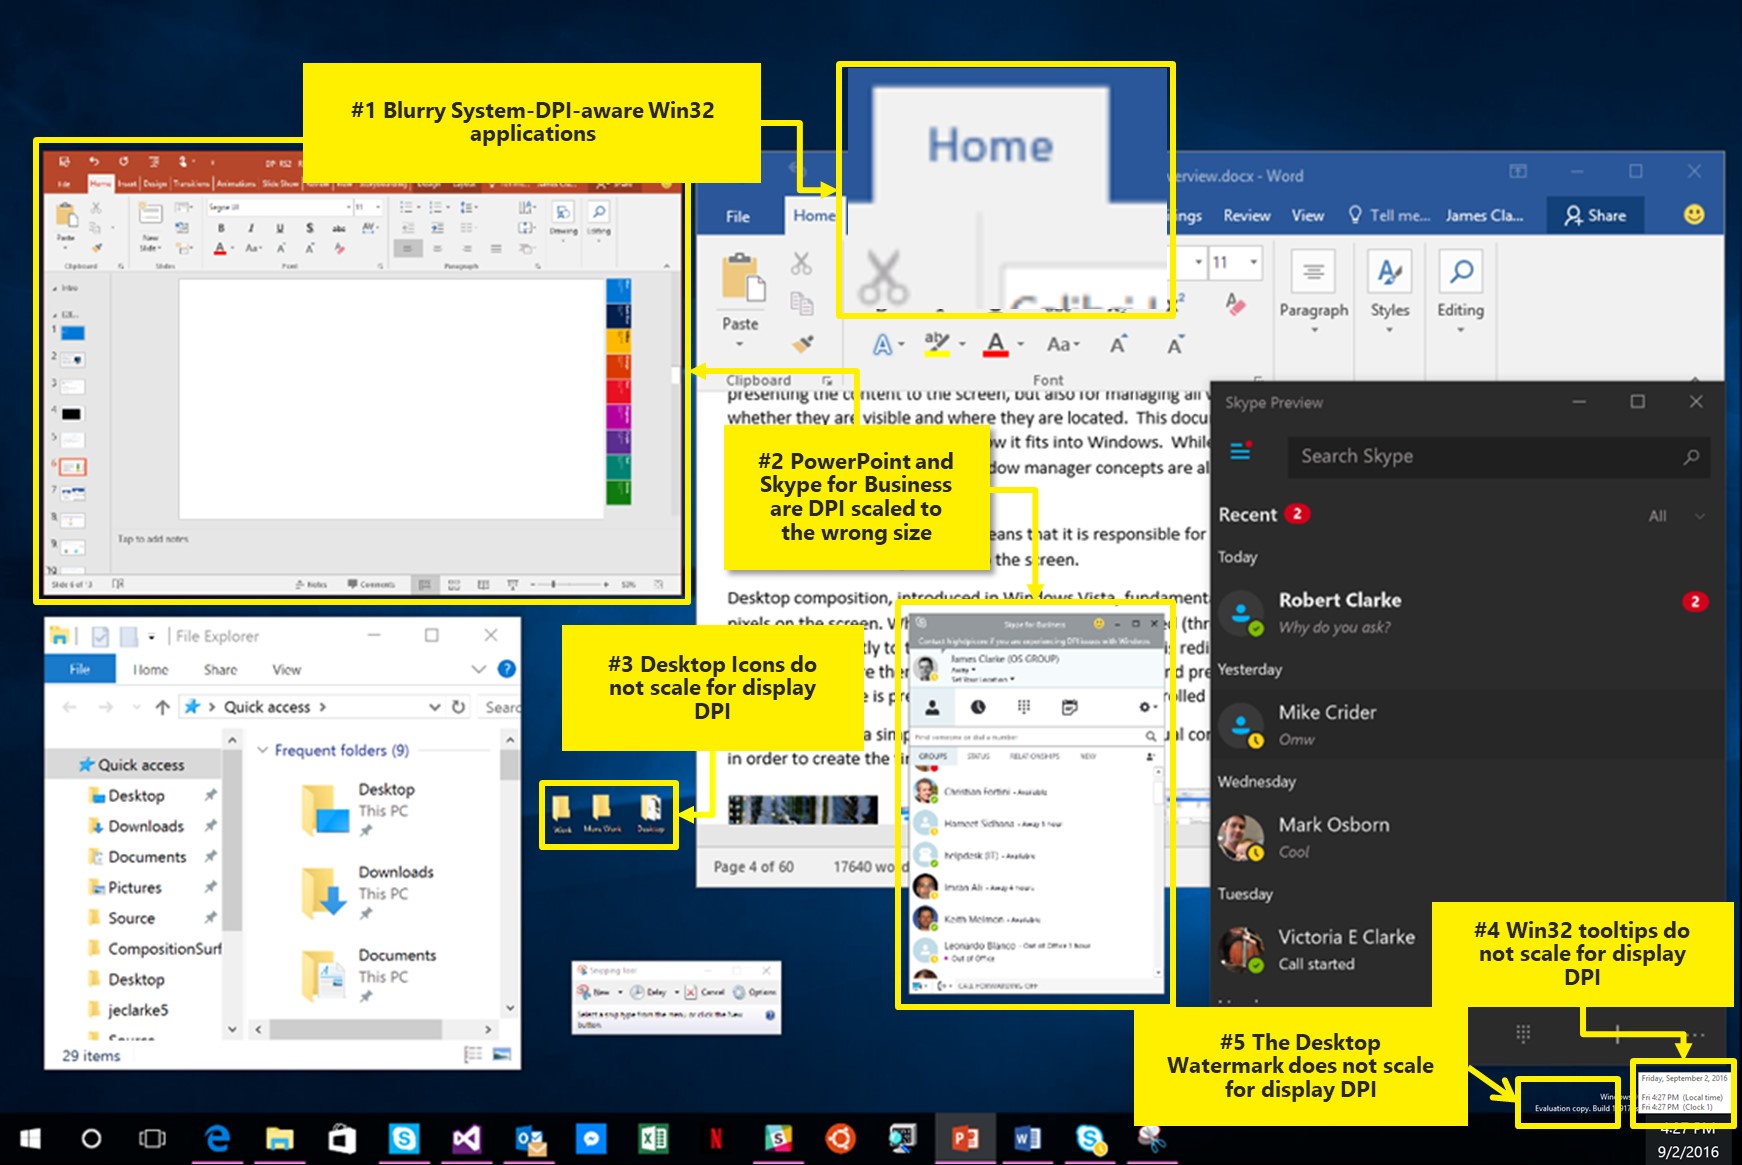
If you’re experiencing blurry applications on your Windows 10 computer, we’ve got some helpful tips to fix the problem.
First, try adjusting the DPI settings for the specific application. Right-click on the application’s shortcut or .exe file, go to Properties, and then navigate to the Compatibility tab. Check the “Override high DPI scaling behavior” box and select “System” from the drop-down menu. This will allow the application to scale properly on high-DPI displays.
If that doesn’t work, you can try disabling display scaling for the application altogether. Right-click on the application’s shortcut or .exe file, go to Properties, and then navigate to the Compatibility tab. Check the “Disable display scaling on high DPI settings” box. Keep in mind that this may make the application appear smaller on your screen.
Another option is to use the Windows 10 built-in compatibility mode. Right-click on the application’s shortcut or .exe file, go to Properties, and then navigate to the Compatibility tab. Check the “Run this program in compatibility mode for” box and select a previous version of Windows from the drop-down menu. This can help resolve compatibility issues that may be causing blurriness.
If you’re using a remote desktop connection, make sure you have the latest version of the Remote Desktop Services client installed. Microsoft has released updates to address high-DPI scaling issues in remote desktop sessions.
It’s also worth checking for any available patches or updates for your specific application. Developers often release updates to fix compatibility issues and improve scaling on high-DPI displays.
In some cases, the issue may be related to your computer’s graphics driver. Make sure you have the latest driver installed for your graphics card. Visit the manufacturer’s website to download and install the latest driver version.
Lastly, consider reaching out to the application’s developer or checking online forums and knowledge bases for any known issues or workarounds. Other users may have found solutions or workarounds that can help resolve the blurriness.
Individual App Scaling Adjustments
| Application | Scaling Adjustment | Instructions |
|---|---|---|
| Adobe Photoshop | Disable display scaling on high DPI settings | Right-click on the application’s executable file, go to Properties, navigate to the Compatibility tab, and check “Disable display scaling on high DPI settings.” |
| Google Chrome | Override high DPI scaling behavior | Right-click on the Chrome shortcut, go to Properties, navigate to the Compatibility tab, and check “Override high DPI scaling behavior” and select “Application” from the drop-down menu. |
| Microsoft Office Suite | Change DPI scaling settings | Open any Office application, go to File > Options > Advanced, scroll down to the Display section, and check the “Disable display scaling on high DPI settings” box. |
| Visual Studio Code | Set DPI awareness | Open the Command Palette (Ctrl+Shift+P), type “Preferences: Open Settings (JSON),” add the line ” “window.enableHighDpi”: true ” to the JSON file, and save. |
| VLC Media Player | Change DPI scaling compatibility | Right-click on the application’s executable file, go to Properties, navigate to the Compatibility tab, and check “Override high DPI scaling behavior” and select “System” from the drop-down menu. |
High DPI Display Adjustments
If you’re experiencing high-DPI scaling issues on your Windows 10 device, there are adjustments you can make to improve the display. Here are some steps you can take:
1. Adjust the DPI scaling settings:
– Right-click on the desktop and select “Display settings.”
– Under the “Scale and layout” section, adjust the “Change the size of text, apps, and other items” slider to your preference.
– Apply the changes and restart your computer to see the new scaling.
2. Enable high-DPI scaling for specific applications:
– Right-click on the application’s .exe file and select “Properties.”
– Go to the “Compatibility” tab and check the box next to “Override high DPI scaling behavior.”
– Select “Application” from the drop-down menu.
– Click “Apply” and then “OK” to save the changes.
3. Use the Windows 10 DPI Fix tool:
– Download and install the Windows 10 DPI Fix tool from a trusted source.
– Launch the tool and follow the on-screen instructions to adjust the DPI scaling for your display.
4. Update your graphics drivers:
– Visit the website of your graphics card manufacturer and download the latest drivers for your specific model.
– Install the drivers and restart your computer to apply the changes.
5. Use third-party software:
– There are various third-party applications available that can help with high-DPI scaling issues, such as DPIAware and XPExplorer.
– Research and choose a trusted application that suits your needs, and follow the instructions provided by the software.
Manual DPI Configuration and System Overrides
- Open the Windows Display Settings by right-clicking on the desktop and selecting Display settings.
- In the Display settings window, scroll down to Scale and layout section.
- Under Scale and layout, you will find the Change the size of text, apps, and other items option.
- Adjust the slider to your desired DPI (dots per inch) value. Higher values provide more detail but may result in smaller text and icons.
- Click Apply to save the changes.
- Restart your computer for the changes to take effect.
- If the manual DPI configuration does not resolve the issue, you can try using System Overrides.
- To access System Overrides, open the Windows Registry Editor by pressing Windows Key + R to open the Run dialog, type regedit, and press Enter.
- In the Registry Editor, navigate to the following key: HKEY_LOCAL_MACHINE\SOFTWARE\Microsoft\Windows\CurrentVersion\SideBySide.
- Right-click on the SideBySide key and select New, then DWORD (32-bit) Value.
- Name the new value as PreferExternalManifest.
- Double-click on the PreferExternalManifest value and set its Value data to 1.
- Click OK to save the changes.
- Restart your computer for the changes to take effect.
F.A.Q.
How do I fix the scaling on my screen Windows 10?
To fix the scaling on your Windows 10 screen, go to Start > Settings > System > Display. From there, you can adjust the size of your text and apps by selecting an option from the Scale drop-down menu. Additionally, you can change your screen resolution by using the drop-down menu next to Display resolution.
How do I fix DPI problems?
To fix DPI problems, you can go to Display settings and adjust the slider for each monitor. For earlier Windows systems, you can right-click on the application, select Properties, go to the Compatibility tab, and check the “Disable display scaling on high DPI settings” box.
How do I fix DPI in Windows 10?
To fix DPI in Windows 10, go to Settings > Display, select Advanced scaling settings, and turn on the toggle. Adjust the DPI settings for individual apps if needed, especially if certain programs display blurry text.
