Having trouble starting up your Windows 10? Here are some solutions to common startup issues.
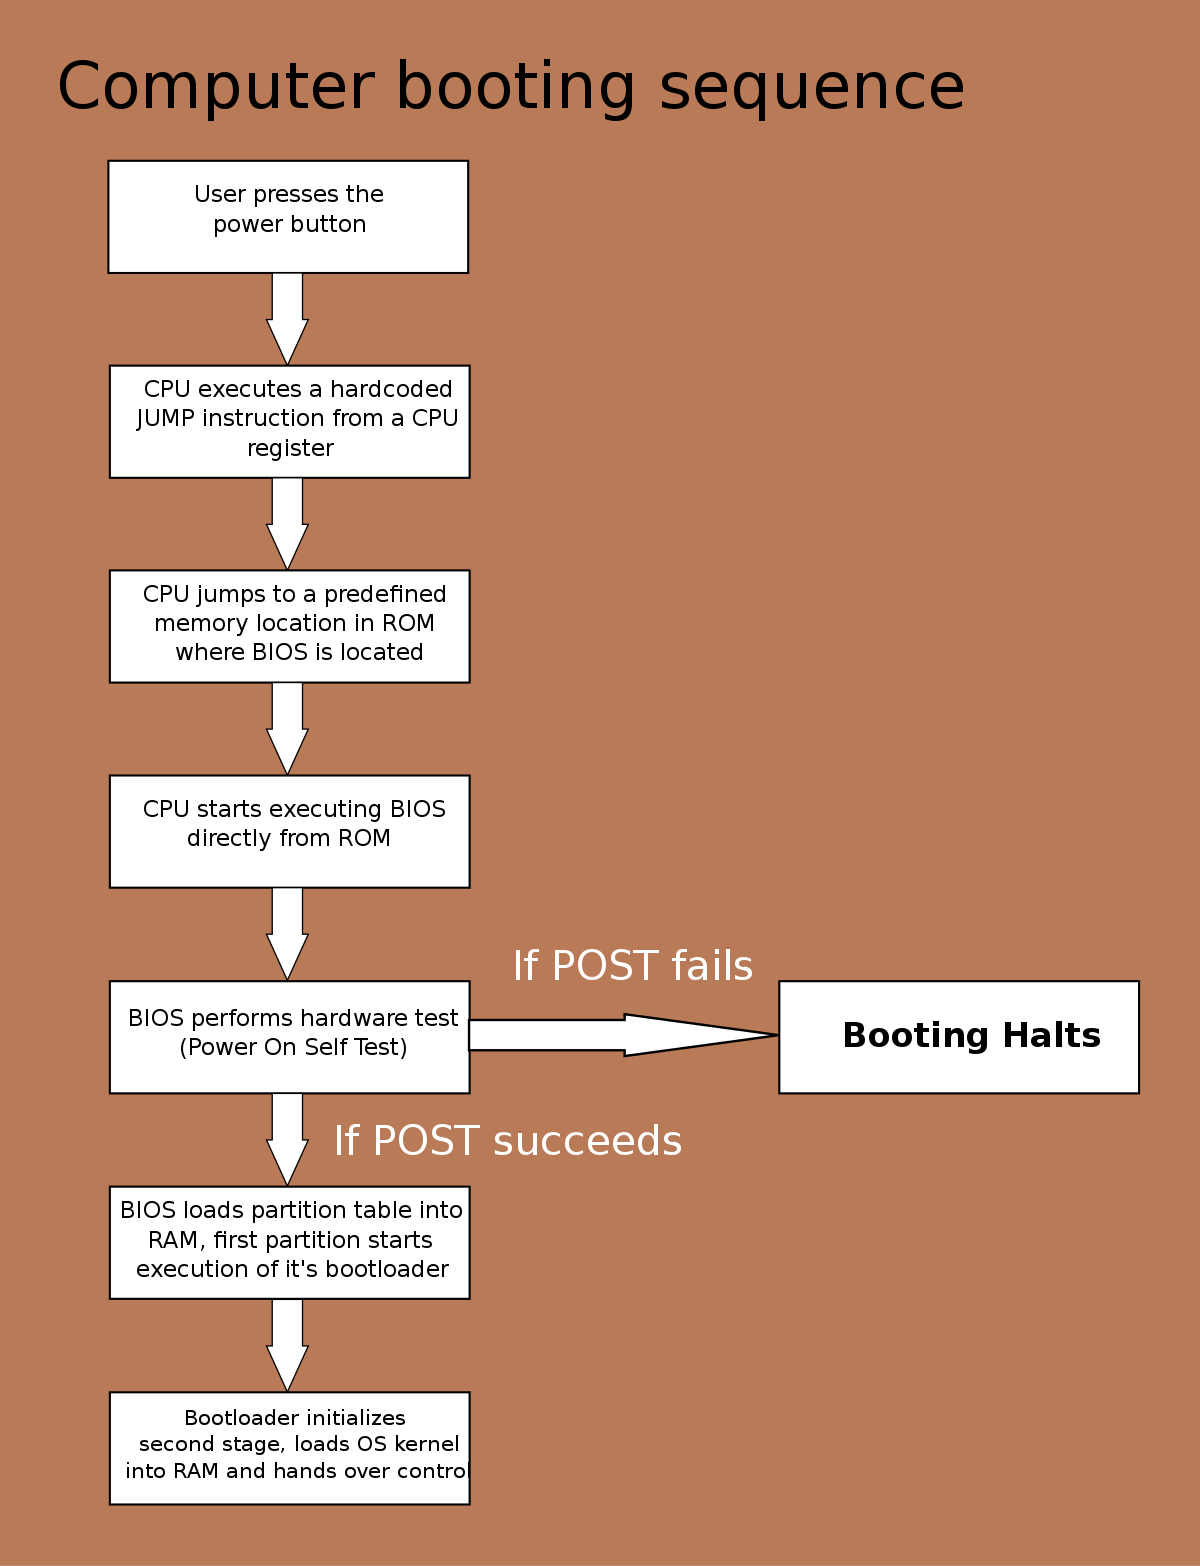
BIOS Phase Introduction
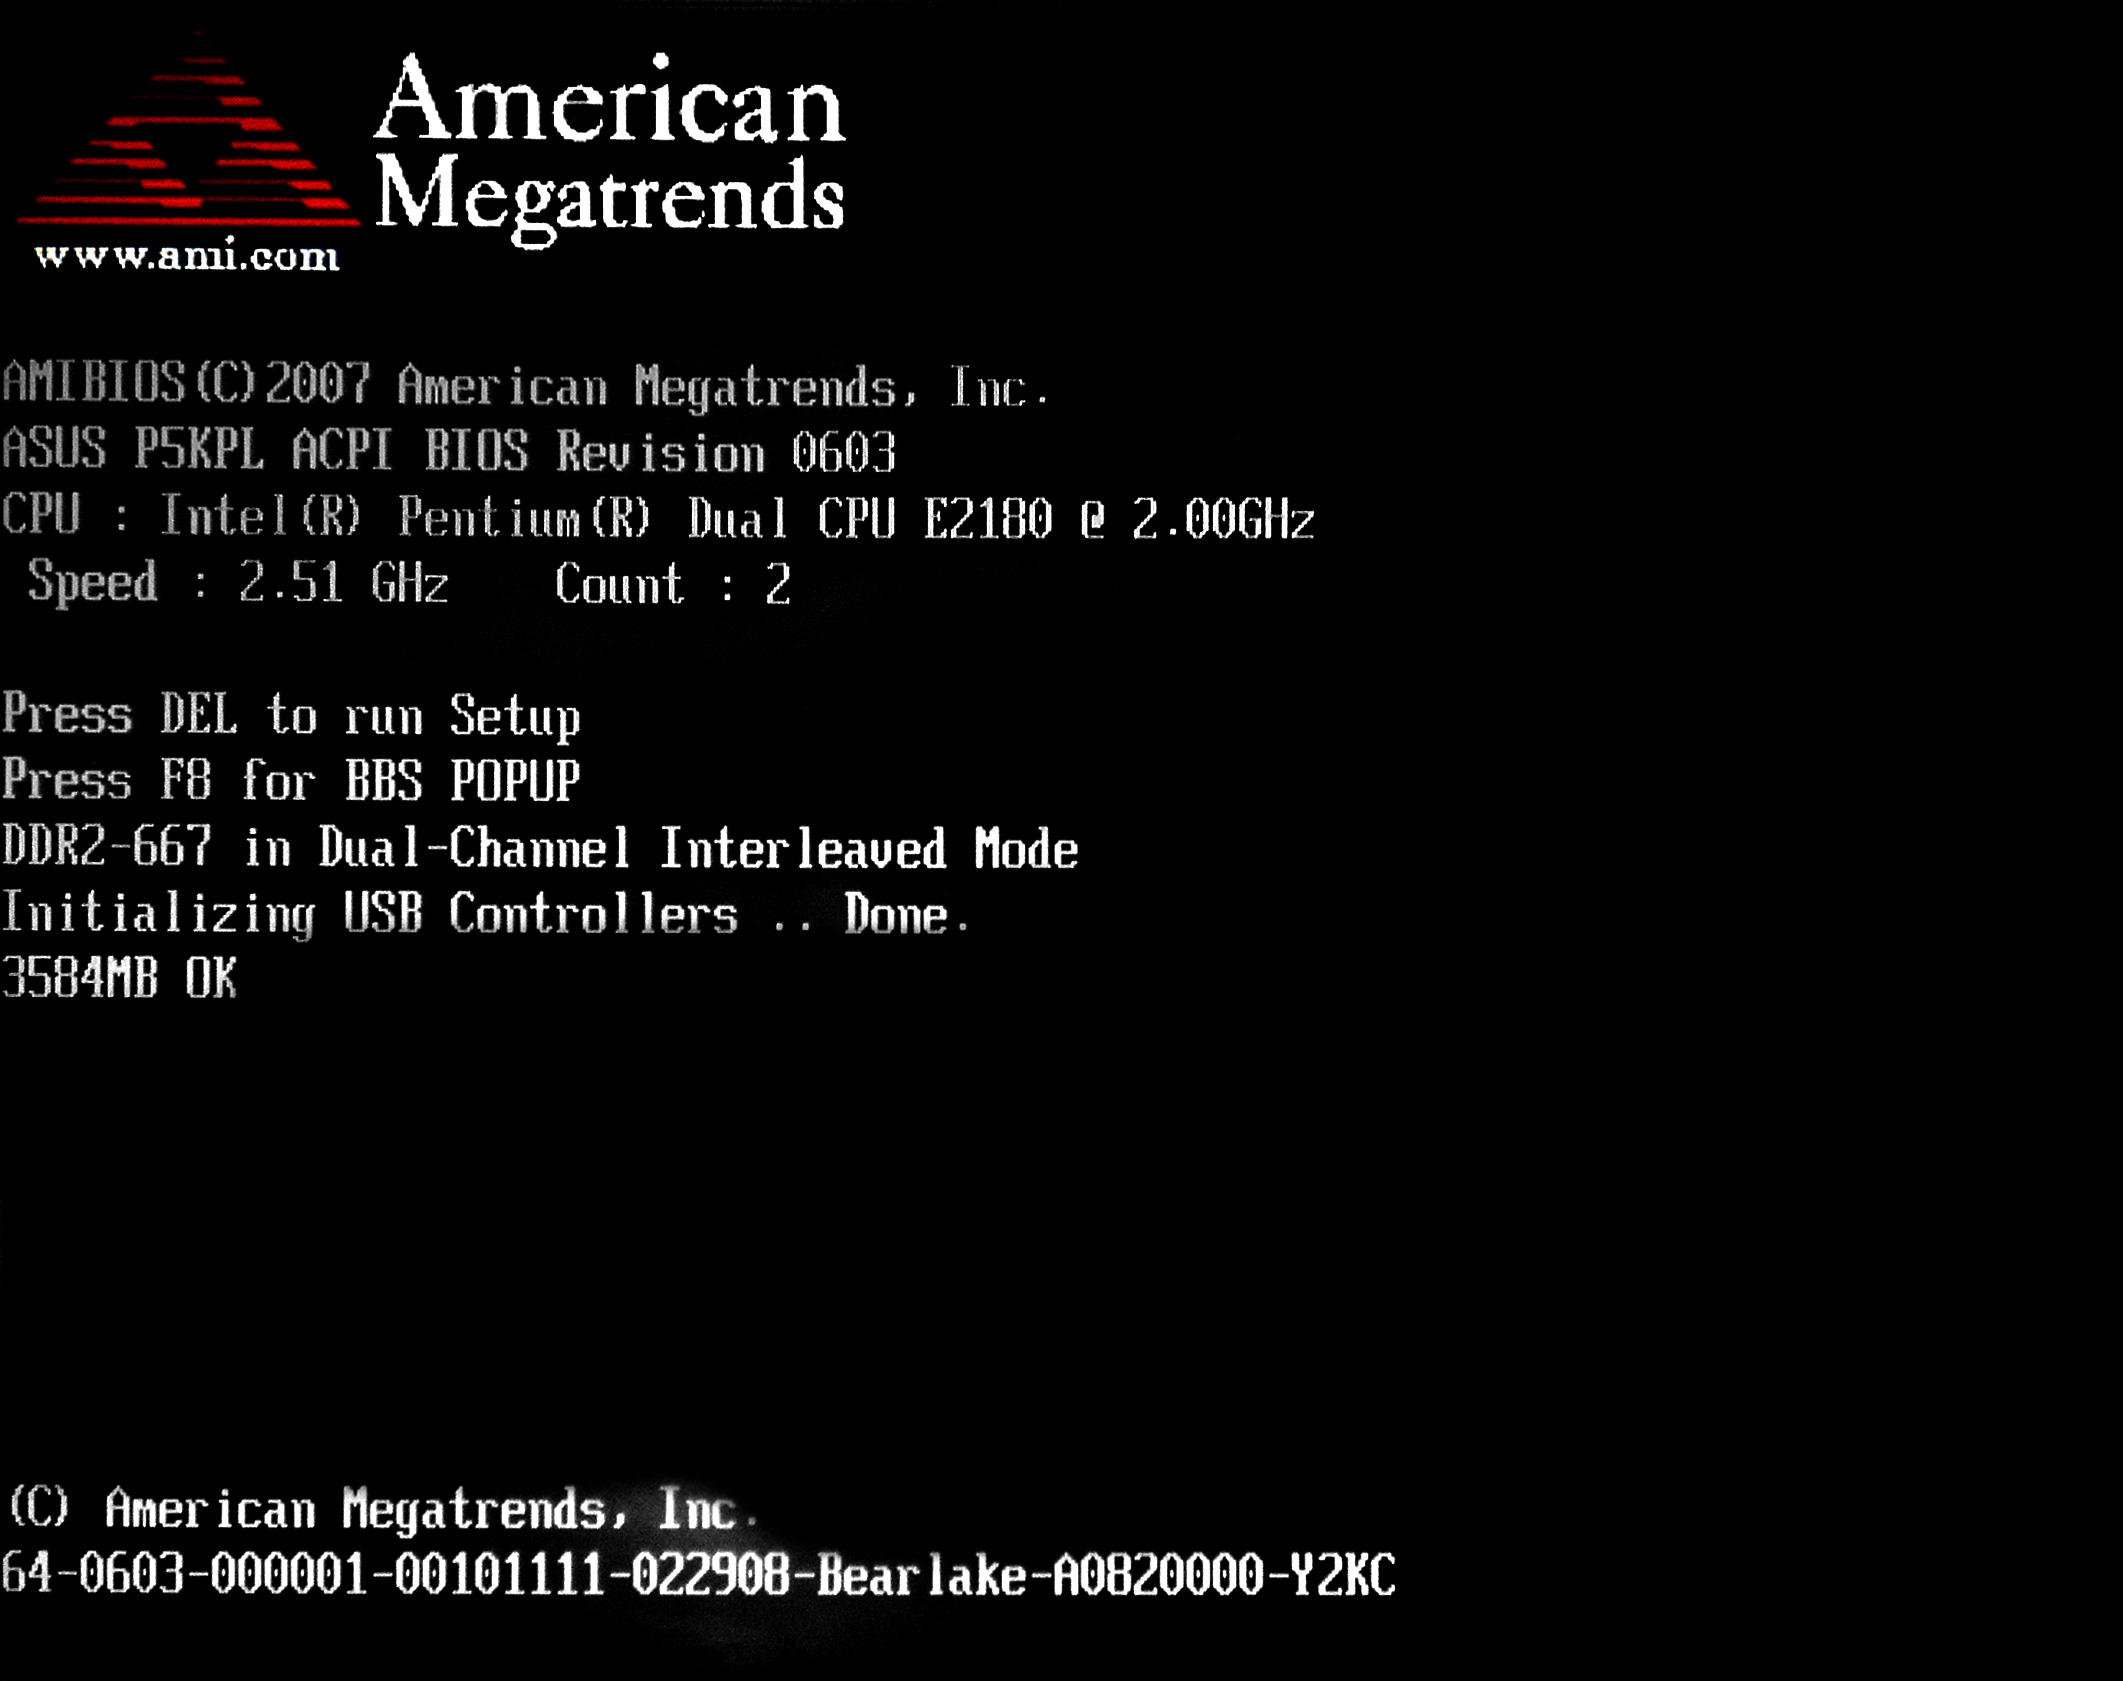
The BIOS phase is the first step in troubleshooting Windows 10 startup issues. During this phase, the computer’s firmware, or BIOS, initializes the hardware and prepares the system for booting.
To troubleshoot startup issues during the BIOS phase, follow these steps:
1. Check for any error messages or codes displayed on the screen during startup. These can provide valuable information about the cause of the issue.
2. Restart the computer and enter the BIOS setup by pressing the designated key (e.g., F2, Del, or Esc) during startup. Review the settings to ensure they are properly configured and compatible with your hardware.
3. Update the BIOS firmware to the latest version provided by the manufacturer. This can address known compatibility issues and improve system stability.
4. Check the boot order in the BIOS setup to ensure that the operating system is set as the first boot option. If necessary, rearrange the boot order to prioritize the correct device.
5. Reset the BIOS settings to their default values. This can help resolve any incorrect configurations that may be causing startup problems.
6. Test the hardware components by running diagnostics tools, such as CHKDSK or hardware diagnostic software provided by the manufacturer. This can help identify any faulty hardware that may be causing startup issues.
7. Disconnect any unnecessary peripherals, such as external hard drives or USB devices, and restart the computer. Sometimes, incompatible or malfunctioning peripherals can interfere with the startup process.
8. Ensure that the computer is not overheating by checking the fan and cleaning any dust or debris. Overheating can cause instability and startup problems.
Understanding Boot Loader Phase
The boot loader phase is a critical part of the Windows 10 startup process. It is responsible for loading the operating system into memory and preparing it for use. Understanding this phase can help troubleshoot startup issues and get your computer running smoothly again.
During the boot loader phase, the computer goes through several steps to initialize the operating system. This includes checking the boot sector of the hard disk drive, loading necessary device drivers, and configuring system settings.
If you encounter startup issues, there are a few steps you can take to troubleshoot the problem. First, try starting your computer in Safe Mode by pressing the F8 key during startup. This will load a minimal set of drivers and services, which can help identify and resolve any software conflicts.
If Safe Mode doesn’t work, you can try using the Command Prompt to run CHKDSK to scan and repair any errors on your hard disk drive. To do this, boot your computer from a Windows installation disc or USB drive and select the Repair your computer option.
Another possible solution is to check the Windows Registry for any errors or corruption. You can use the Command Prompt to run the sfc /scannow command, which will scan for and repair any system file issues.
In some cases, a problem with a specific device driver may be causing the startup issue. You can use the Device Manager to disable or uninstall any recently installed drivers that may be causing a conflict.
If all else fails, you may need to perform a system restore or reinstall Windows 10. Before doing this, it’s important to back up your important files and data.
Utilizing Startup Repair Tool
The Startup Repair Tool is a valuable resource for troubleshooting Windows 10 startup issues. To utilize this tool effectively, follow these steps:
1. Start by booting your computer from a Windows 10 installation media or recovery drive. You can create one using a USB drive or DVD.
2. Once the installation media or recovery drive is inserted, restart your computer and press the appropriate key (usually F12 or Esc) to access the boot menu. Select the media or drive to boot from it.
3. After the Windows Setup screen appears, select your language preferences and click “Next.” Then click on “Repair your computer” at the bottom left corner.
4. In the next screen, choose “Troubleshoot” and then “Advanced options.”
5. Under the Advanced options, select “Startup Repair” and wait for the tool to diagnose and fix any issues with your startup.
6. The tool will automatically scan your startup files, system files, and registry for errors and attempt to repair them. This process may take some time, so be patient.
7. Once the repair is complete, restart your computer to see if the startup issues have been resolved.
Remember, the Startup Repair Tool can fix common startup issues such as corrupted system files, missing boot sector, or incompatible device drivers. However, it may not be able to resolve more complex issues related to hardware failures or malware infections.
If the tool fails to fix the problem, you may need to seek further assistance from a professional or consider other troubleshooting methods such as using the Command Prompt, checking hardware connections, or performing a clean reinstall of Windows 10.
Disabling Automatic Restart Feature
To disable the automatic restart feature in Windows 10, follow these steps:
1. Press the Windows key and type “Advanced system settings” in the search bar. Click on the “View advanced system settings” option that appears.
2. In the System Properties window, click on the “Settings” button under the “Startup and Recovery” section.
3. In the Startup and Recovery window, uncheck the box next to “Automatically restart” under the System failure section.
4. Click on “OK” to save the changes.
By disabling the automatic restart feature, you can prevent Windows 10 from automatically restarting after encountering a critical error, such as the Blue Screen of Death (BSOD). This allows you to see any error messages or codes displayed on the screen, which can be helpful in troubleshooting startup issues.
Remember to restart your computer after making these changes for the new settings to take effect.
If you continue to experience startup issues, it may be necessary to further investigate the underlying cause. This could involve checking for hardware failures, updating device drivers, running antivirus scans, or repairing corrupted system files.
It’s also a good idea to regularly backup your important files to prevent data loss in case of system failures.
If you’re not familiar with the technical aspects of troubleshooting Windows 10 startup issues, it may be helpful to seek assistance from a qualified technician or consult Microsoft’s official documentation for more detailed instructions.
Running CHKDSK and SFC Commands
![]()
To start, open the Command Prompt as an administrator by pressing the Windows key + X and selecting “Command Prompt (Admin)” from the menu.
To run the CHKDSK command, type “chkdsk /f” and press Enter. This will check your hard drive for errors and attempt to fix them. You may be prompted to schedule the scan to run on the next restart if the drive is in use.
Next, you can run the SFC (System File Checker) command to scan for and repair corrupted system files. In the Command Prompt, type “sfc /scannow” and press Enter. This process may take some time to complete.
If the CHKDSK and SFC commands do not resolve the startup issues, it may be worth considering other troubleshooting steps such as checking for hardware issues, updating device drivers, or performing a system restore.
Booting to Safe Mode Strategies
Booting to Safe Mode can be an effective strategy for troubleshooting Windows 10 startup issues. Safe Mode allows you to start your computer with only the essential drivers and services, which can help identify and resolve any conflicts or errors that may be causing problems.
To boot to Safe Mode in Windows 10, follow these steps:
1. Press the Windows key + R to open the Run dialog box.
2. Type “msconfig” and press Enter to open the System Configuration utility.
3. In the System Configuration window, go to the “Boot” tab.
4. Under the “Boot options” section, check the box next to “Safe boot” and select the desired Safe Mode option (such as Minimal or Networking).
5. Click Apply and then OK.
6. When prompted, click Restart to restart your computer in Safe Mode.
Once your computer boots into Safe Mode, you can troubleshoot startup issues by following these tips:
1. Uninstall recently installed programs or updates that may be causing conflicts. To do this, go to Control Panel > Programs > Uninstall a program and remove any suspicious or recently installed software.
2. Check for malware or viruses using an antivirus program. Run a full system scan to detect and remove any malicious software that may be causing startup issues.
3. Update device drivers. Outdated or incompatible drivers can cause startup problems. Use Device Manager to check for driver updates and install them if available.
4. Restore Windows Registry. If you suspect that a corrupted registry is causing the startup issue, you can use System Restore or a third-party registry cleaner to restore the registry to a previous working state.
5. Check for hardware issues. Disconnect any external devices and peripherals, then restart your computer. If the startup issue is resolved, it may indicate a problem with one of the connected devices.
Remember to create a backup of your important files before attempting any troubleshooting steps, as some actions may result in data loss.
Repairing Boot Codes and MBR
If you’re experiencing startup issues with your Windows 10 computer, it could be due to problems with the boot codes or the Master Boot Record (MBR). These issues can prevent your computer from starting up properly and may even result in the dreaded Blue Screen of Death.
To troubleshoot and repair these problems, follow these steps:
1. Boot your computer using a Windows 10 installation media. This can be a USB drive or a DVD.
2. Once the installation media is loaded, choose your language preferences and click on “Repair your computer.”
3. Select “Troubleshoot” from the options, then choose “Advanced options.”
4. From the Advanced options menu, select “Command Prompt.”
5. In the Command Prompt, type “bootrec /fixmbr” and press Enter. This command repairs the Master Boot Record.
6. Next, type “bootrec /fixboot” and press Enter. This command repairs the boot sector of your system partition.
7. Finally, type “bootrec /rebuildbcd” and press Enter. This command rebuilds the Boot Configuration Data (BCD) store.
8. After executing these commands, restart your computer and see if the startup issues have been resolved.
By following these steps, you can repair boot codes and the MBR, fixing common Windows 10 startup issues. Remember to always backup your important files before making any changes to your computer’s boot configuration.
If the problem persists, it may be related to other hardware or software issues, and it’s recommended to seek further assistance or consult a professional technician.
Fixing BCD Errors and Rebuilding BCD
If you’re experiencing startup issues with your Windows 10 computer, it may be due to BCD errors or a corrupt BCD (Boot Configuration Data) file. Luckily, you can fix these problems and rebuild the BCD by following these steps:
1. Start by booting your computer using a Windows 10 installation media.
2. Once you’re at the Windows Setup screen, press Shift + F10 to open a command prompt.
3. In the command prompt, type bootrec /fixmbr and press Enter. This command will fix the Master Boot Record (MBR) on your computer.
4. Next, type bootrec /scanos and press Enter. This command will scan all your computer’s disks for Windows installations.
5. If any Windows installations are detected, type bootrec /rebuildbcd and press Enter. This command will rebuild the BCD file using the detected Windows installations.
6. Follow the on-screen instructions to complete the process.
7. Once the BCD has been successfully rebuilt, type exit and press Enter to close the command prompt.
8. Finally, restart your computer and check if the startup issues have been resolved.
Addressing Corrupted System Files
Corrupted system files can lead to various startup issues in Windows 10. To troubleshoot and fix this problem, follow these steps:
1. Restart your computer: Sometimes, a simple restart can resolve minor issues with corrupted system files.
2. Run System File Checker (SFC) scan: This built-in Windows tool scans for and repairs corrupted system files. Open the Command Prompt as an administrator and type “sfc /scannow“. Wait for the scan to complete and follow any prompts to fix the corrupted files.
3. Use the Deployment Image Servicing and Management (DISM) tool: DISM can repair system image files and resolve issues with corrupted files. Open the Command Prompt as an administrator and type “dism /online /cleanup-image /restorehealth“. Wait for the process to finish, and then restart your computer.
4. Perform a clean boot: A clean boot starts Windows with minimal drivers and startup programs, which can help identify and resolve issues caused by third-party software. Open the System Configuration tool by pressing Windows + R and typing “msconfig“. In the General tab, select “Selective startup” and uncheck “Load startup items”. Click on the Services tab, check “Hide all Microsoft services”, and then click “Disable all”. Finally, click on the Startup tab and click “Open Task Manager”. In Task Manager, disable all startup items. Restart your computer and check if the startup issues persist.
5. Repair Windows using installation media: If the above steps don’t resolve the issue, you can use the Windows installation media to repair your Windows 10 installation. Insert the installation media, restart your computer, and boot from the installation media. Choose your language preferences and click “Next”. Click on “Repair your computer”, select the operating system, and choose “Startup Repair” or “System Restore” depending on your specific issue.
Remember to back up your important files before attempting any troubleshooting steps to prevent data loss.
Deleting Problematic Files
- Delete corrupted or damaged files that may be causing startup issues.
- Remove any unnecessary or unwanted files that could be interfering with the startup process.
- Erase temporary files that may be taking up valuable system resources and causing slowdowns.
- Delete malware or virus-infected files that could be compromising the stability of your Windows 10 startup.
Advanced Repair Options and Backup Tips
| Advanced Repair Options and Backup Tips | |
|---|---|
| Advanced Repair Options |
|
| Backup Tips |
|
F.A.Qs
Why is my Windows 10 not booting up?
Your Windows 10 may not be booting up due to various reasons. To troubleshoot the issue, you can try booting in Safe Mode, use Windows Recovery, or create a Windows 10 recovery drive. Additionally, check your laptop’s battery and charger to ensure they are functioning properly. It is important to test one element at a time and use the correct power adapter.
Why is my Windows 10 start not working?
Your Windows 10 start may not be working due to system bugs or defects. To resolve this issue, try checking for Windows Updates and upgrading your system to the latest version. Microsoft regularly releases updates to improve the Windows 10 operating system.
What do you do if the computer does not boot up after turning on?
If the computer does not boot up after turning on, you can try the following steps:
– Use a different power source.
– Ensure the monitor connection is secure.
– Disconnect any external devices.
– Listen for any error beeps.
– Start the computer in safe mode.
– Restore the computer to previous settings.
– Check for unresponsive applications.
– Unplug any USB devices.
How do I fix Windows 10 startup problem?
To fix a Windows 10 startup problem, you can try the following steps:
– Start by navigating to the Install Windows screen and select Next > Repair your computer.
– On the Choose an option screen, choose Troubleshoot.
– From the Advanced options screen, select Startup Repair.
– Once the Startup Repair is completed, shut down your PC and then turn it back on to check if Windows can now boot properly.
