Having trouble with Windows 10 updates not installing after a restart? Let’s delve into the potential causes and solutions.
Verify Update Status
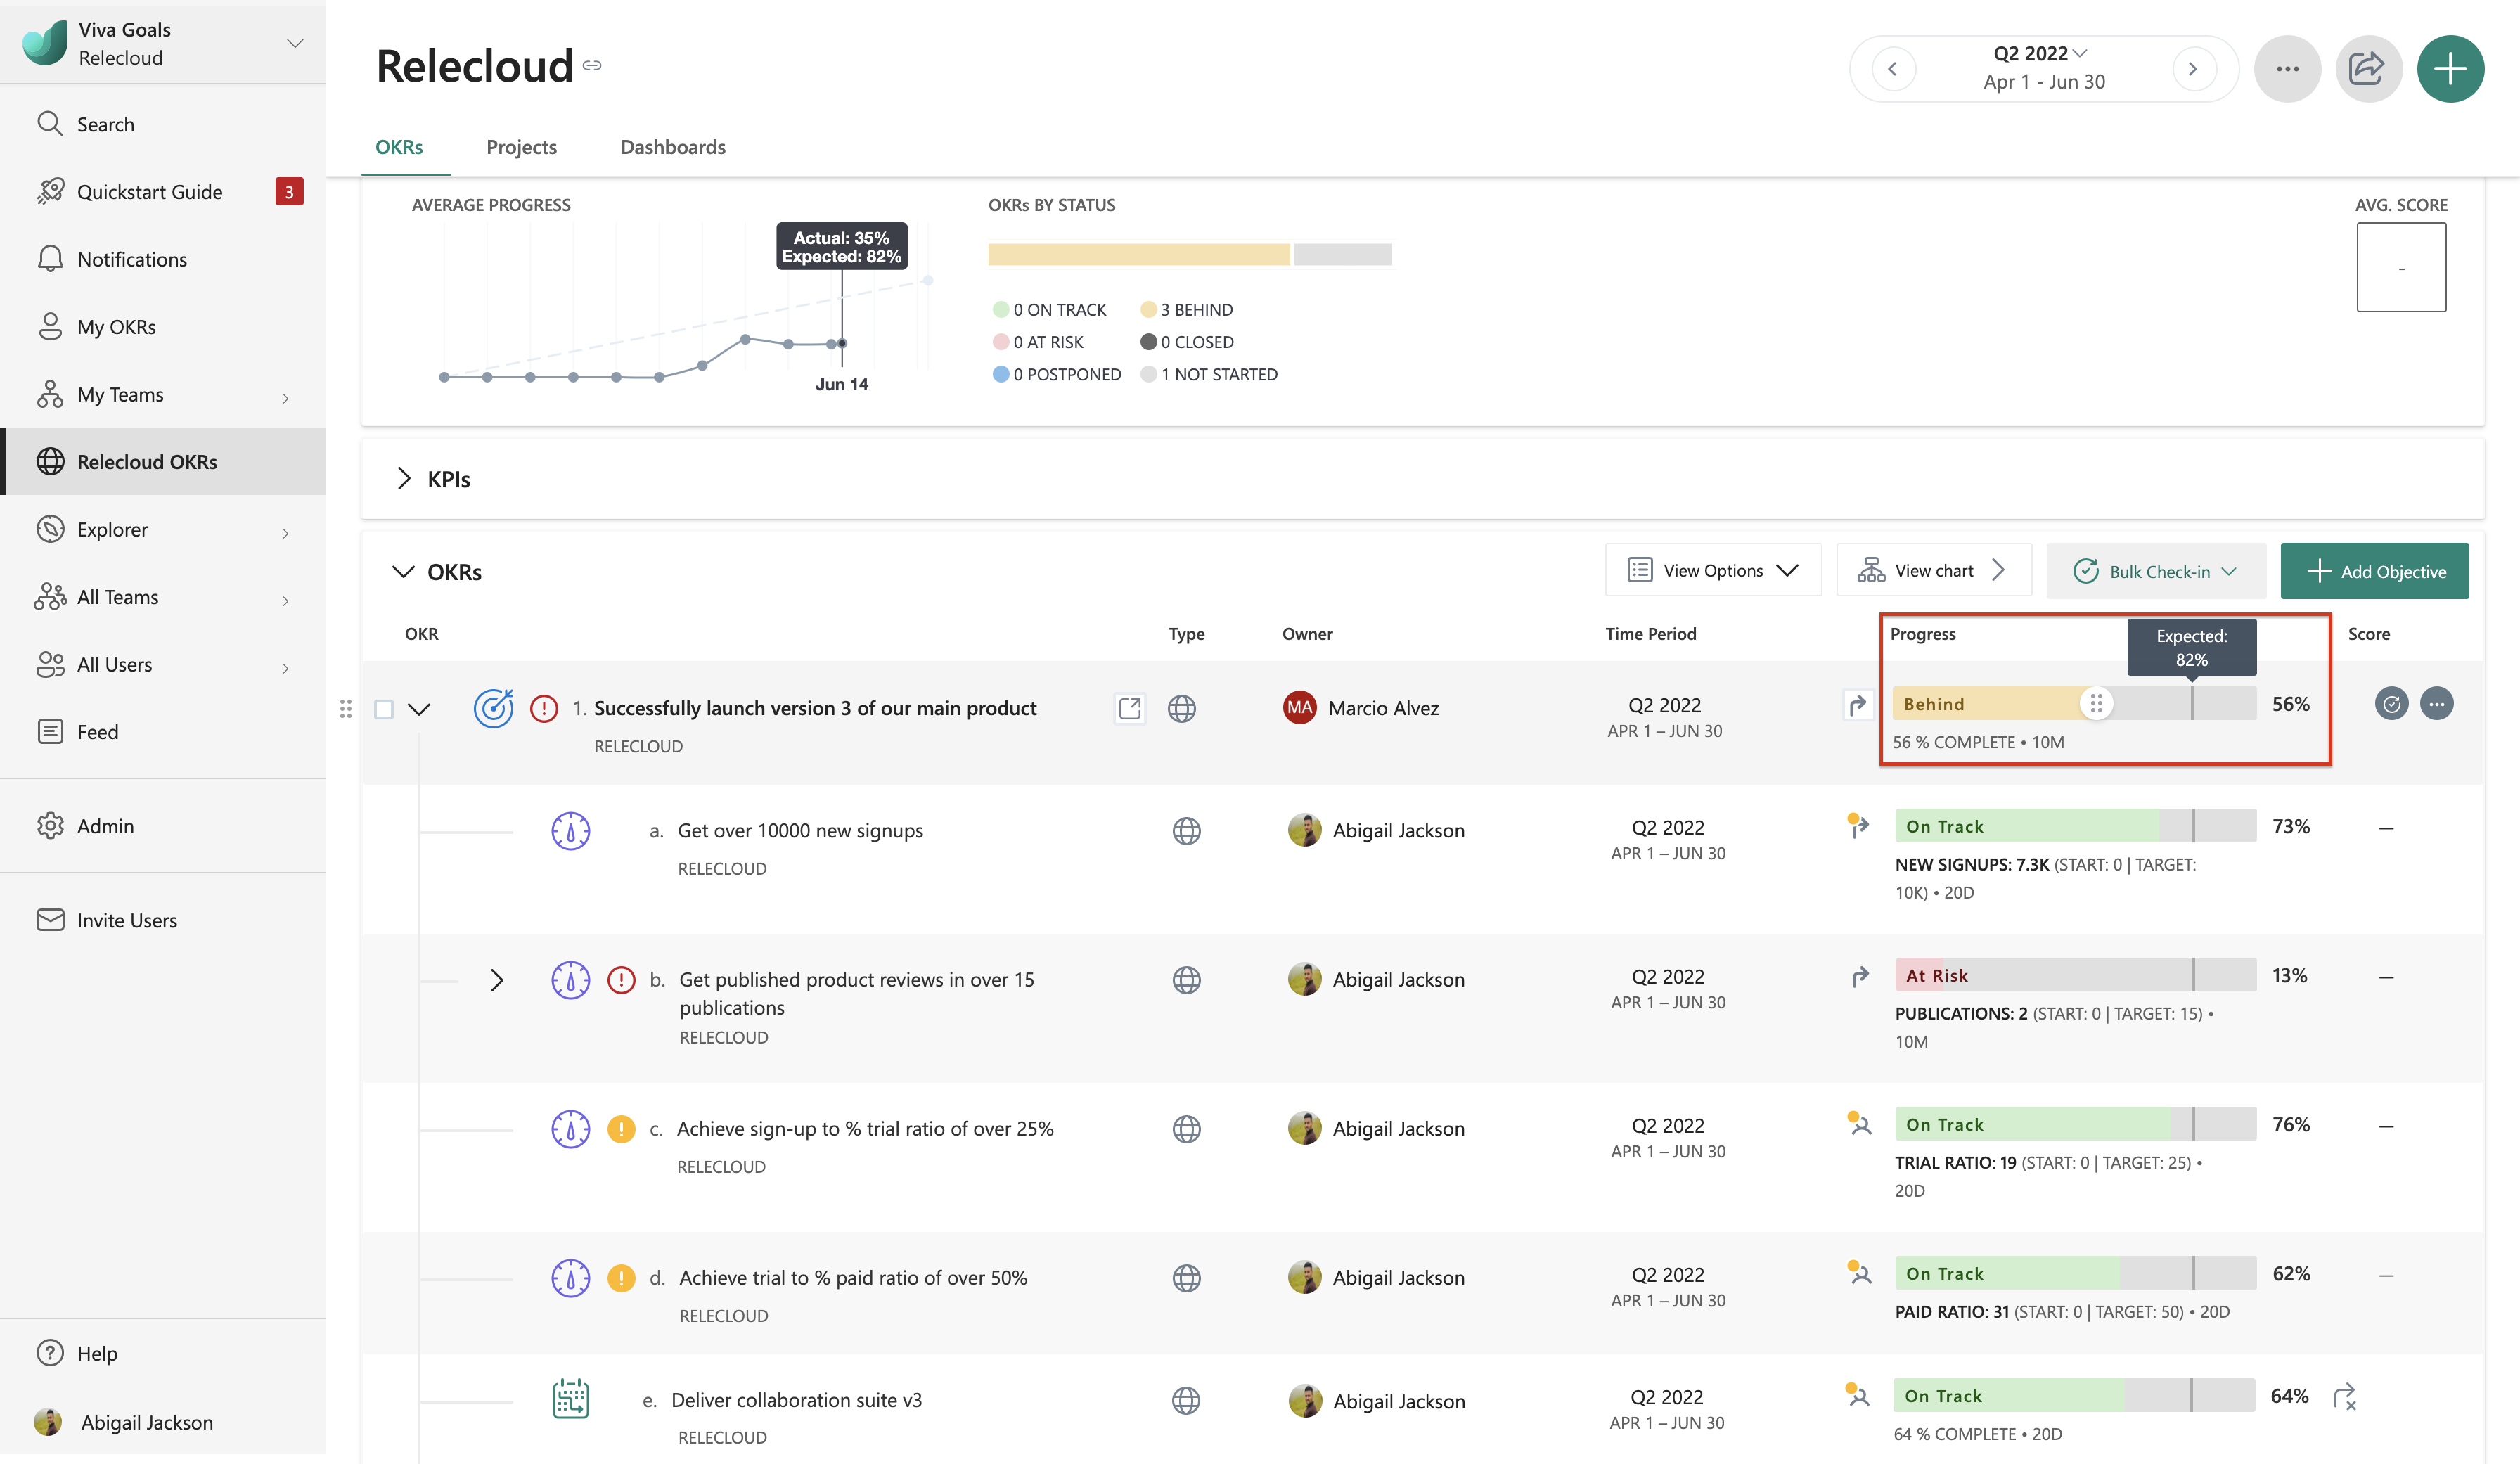
To verify the update status after restarting your Windows 10 computer, follow these steps:
1. Press the Windows key on your keyboard or click on the Start menu button.
2. Type “Windows Update” and click on Windows Update settings in the search results.
3. In the Windows Update settings window, click on View update history to see the list of installed and failed updates.
4. If you see any failed updates, it’s possible that there was an issue during the installation process. To troubleshoot this, click on Troubleshoot in the Windows Update settings window.
5. In the Troubleshoot window, click on Windows Update and then click on Run the troubleshooter. This will scan your computer for any issues related to Windows Update and try to fix them.
6. If the troubleshooter doesn’t resolve the issue, you can try restarting your computer in Safe Mode. To do this, press and hold the Shift key while clicking on the Restart button in the Start menu.
7. Once your computer restarts in Safe Mode, repeat steps 1-3 to check the update history again. If the updates still aren’t installing, it may be necessary to uninstall any recently installed software or drivers that could be causing conflicts.
8. To uninstall software or drivers, go to the Control Panel and click on Uninstall a program (or Programs and Features depending on your version of Windows). From there, you can select the software or driver you want to remove and click on Uninstall.
9. After uninstalling any conflicting software or drivers, restart your computer normally and try installing the updates again.
10. If you continue to experience issues with Windows 10 updates not installing after restarting, it may be necessary to seek additional support from Microsoft or a professional computer technician.
Restart Your Computer
If you’re facing issues with Windows 10 updates not installing after a restart, there are a few steps you can take to resolve the problem.
First, try restarting your computer once again. Sometimes, a simple restart can fix update installation issues. Make sure to save any open documents and close all applications before restarting.
If restarting doesn’t solve the problem, you can try a “clean boot” to eliminate any potential software conflicts. To do this, follow these steps:
1. Press the Windows key + R to open the Run dialog box.
2. Type “msconfig” and press Enter.
3. In the System Configuration window, go to the Services tab.
4. Check the “Hide all Microsoft services” box and click on “Disable all.”
5. Next, go to the Startup tab and click on “Open Task Manager.”
6. In the Task Manager window, disable all the startup items by right-clicking on them and selecting “Disable.”
7. Close the Task Manager and go back to the System Configuration window.
8. Click on “Apply” and then “OK.”
9. Restart your computer and try installing the Windows 10 updates again.
If the updates still fail to install, you can try resetting the Windows Update components. Here’s how:
1. Press the Windows key + X and select “Command Prompt (Admin)” from the menu.
2. In the Command Prompt window, type the following commands (press Enter after each one):
net stop wuauserv
net stop cryptSvc
net stop bits
net stop msiserver
3. After stopping the services, type the following commands to rename the SoftwareDistribution and Catroot2 folders (press Enter after each one):
ren C:\Windows\SoftwareDistribution SoftwareDistribution.old
ren C:\Windows\System32\catroot2 Catroot2.old
4. Finally, restart the services by typing the following commands (press Enter after each one):
net start wuauserv
net start cryptSvc
net start bits
net start msiserver
After completing these steps, try installing the Windows 10 updates again. If the issue persists, you may need to seek further assistance or consider contacting Microsoft support for troubleshooting help specific to your situation.
Manual Windows Update Check
![]()
If you are experiencing issues with Windows 10 updates not installing after a restart, you may need to manually check for updates. This can help ensure that your system is up to date with the latest patches and fixes. To manually check for Windows updates, follow these steps:
1. Press the Windows key on your keyboard or click on the Start button in the bottom left corner of your screen.
2. Type “Windows Update” in the search bar and click on the “Windows Update settings” option that appears.
3. In the Windows Update settings window, click on the “Check for updates” button.
4. Windows will now search for any available updates for your system. If there are updates available, they will be listed in the window.
5. Click on the “Install now” button to start installing the updates. You may need to enter your administrator password or confirm the installation.
6. Windows will begin downloading and installing the updates. This process may take some time, so be patient.
7. Once the updates are installed, you may be prompted to restart your computer. If so, click on the “Restart now” button to complete the installation.
By manually checking for updates, you can ensure that your Windows 10 system is up to date and running smoothly. If you continue to experience issues with updates not installing, you may need to troubleshoot further or seek assistance from a professional.
Utilize Windows Update Troubleshooter
If you’re experiencing issues with Windows 10 updates not installing after a restart, you can try using the Windows Update Troubleshooter to resolve the problem. The troubleshooter is a built-in tool in Windows 10 that can help diagnose and fix common update-related issues.
To utilize the Windows Update Troubleshooter, follow these steps:
1. Press the Windows key + I on your keyboard to open the Settings app.
2. Click on “Update & Security.”
3. In the left sidebar, select “Troubleshoot.”
4. Scroll down and click on “Additional troubleshooters.”
5. Locate and click on “Windows Update” under the “Get up and running” section.
6. Click on “Run the troubleshooter.”
7. The troubleshooter will now scan your system for any issues related to Windows Update and attempt to fix them automatically.
8. Follow the on-screen instructions if any further actions are required.
Once the troubleshooter completes its task, restart your computer and check if the issue with Windows 10 updates not installing after a restart has been resolved.
Reboot in Safe Mode
If you’re having trouble installing Windows 10 updates after a restart, you may need to reboot your computer in Safe Mode. Safe Mode is a troubleshooting mode that starts your computer with only the essential drivers and services necessary for it to run. This can help resolve any issues that may be preventing the updates from installing properly.
To reboot in Safe Mode on Windows 10, follow these steps:
1. Press the Windows key + R to open the Run dialog box.
2. Type “msconfig” (without the quotes) and press Enter.
3. In the System Configuration window, go to the Boot tab.
4. Under the Boot options section, check the box next to “Safe boot” and select either “Minimal” or “Network” depending on your needs.
5. Click Apply and then OK.
6. You will be prompted to restart your computer. Choose to restart now.
Once your computer restarts in Safe Mode, try installing the updates again. Safe Mode eliminates any potential conflicts that may be causing the installation issue, allowing the updates to proceed smoothly.
After the updates have been successfully installed, you can exit Safe Mode by following the same steps above but unchecking the “Safe boot” option.
Remember to restart your computer normally after exiting Safe Mode to ensure all the necessary drivers and services are loaded.
Rebooting in Safe Mode can be a helpful troubleshooting step when Windows 10 updates are not installing after a restart. Give it a try if you’re experiencing issues, and hopefully, it will resolve the problem.
Perform System Restore
Performing a System Restore can help resolve the issue of Windows 10 updates not installing after a restart. Here’s how you can do it:
1. Press the Windows key on your keyboard and type “Control Panel.” Press Enter to open the Control Panel.
2. In the Control Panel, search for and click on “Recovery.”
3. In the Recovery window, click on “Open System Restore.”
4. A new window will open, prompting you to choose a restore point. Select a restore point that predates the issue you’re experiencing with Windows updates not installing.
5. Click on “Next” and then “Finish” to start the System Restore process.
6. Your computer will restart, and the System Restore process will begin. This may take some time, so be patient.
7. Once the System Restore is complete, your computer will restart again. Check if the issue with Windows 10 updates not installing after a restart has been resolved.
Performing a System Restore allows you to revert your computer’s settings to a previous state, effectively undoing any recent changes that may have caused the problem. It’s important to note that any changes made after the selected restore point will be lost, so it’s recommended to back up any important files before proceeding.
If the System Restore does not resolve the issue, you may need to consider other troubleshooting steps or seek further assistance.
Clear Windows Update Cache
If you’re experiencing issues with Windows 10 updates not installing after a restart, one potential solution is to clear the Windows Update cache. The cache stores temporary files related to updates, and clearing it can help resolve update installation problems.
To clear the Windows Update cache, follow these steps:
1. Press the Windows key + R to open the Run dialog box.
2. Type “services.msc” and press Enter to open the Services window.
3. Scroll down and locate the “Windows Update” service.
4. Right-click on the “Windows Update” service and select “Stop” to temporarily disable it.
5. Open File Explorer and navigate to the “C:\Windows\SoftwareDistribution” folder.
6. Select all the files and folders within the SoftwareDistribution folder and press the Delete key.
7. Confirm the deletion when prompted.
8. Go back to the Services window, right-click on the “Windows Update” service, and select “Start” to re-enable it.
9. Restart your computer.
After following these steps, the Windows Update cache should be cleared, and you can try installing the updates again. This process can help resolve issues where updates fail to install or get stuck during the installation process.
Remember to regularly check for updates and keep your operating system up to date to ensure you have the latest security patches and bug fixes.
If clearing the Windows Update cache doesn’t resolve the issue, you may need to explore other troubleshooting steps or seek further assistance.
Conduct Full Virus Scan
To troubleshoot the issue of Windows 10 updates not installing after a restart, it is important to conduct a full virus scan. Viruses or malware on your computer can interfere with the installation process and cause updates to fail.
To perform a full virus scan on your Windows 10 computer, follow these steps:
1. Open your preferred antivirus software. If you don’t have one installed, consider using a reputable antivirus program such as Windows Defender which comes pre-installed with Windows 10.
2. Look for the option to run a full scan or a comprehensive scan. This scan will thoroughly examine all files and folders on your computer, including system files, to detect and remove any viruses or malware present.
3. Start the scan and allow it to complete. The duration of the scan may vary depending on the size of your hard drive and the number of files it needs to scan.
4. If the scan detects any viruses or malware, follow the recommended actions provided by your antivirus software to remove or quarantine the threats.
5. After the virus scan is complete and any threats have been dealt with, restart your computer.
6. Once your computer has restarted, attempt to install the Windows 10 updates again. Hopefully, the virus scan and removal process should have resolved any issues that were preventing the updates from installing.
It is crucial to keep your computer protected from viruses and malware to ensure smooth and secure operation. Regularly conducting full virus scans can help identify and eliminate any potential threats that may be affecting your system.
Execute System File Checker
If you’re experiencing issues with Windows 10 updates not installing after a restart, you can try using the System File Checker tool to fix any corrupted system files.
To execute the System File Checker:
1. Press the Windows key + X on your keyboard to open the Power User menu.
2. From the menu, select “Command Prompt (Admin)” or “Windows PowerShell (Admin).”
3. In the Command Prompt or PowerShell window that appears, type “sfc /scannow” and press Enter.
4. The System File Checker will now scan for and repair any corrupted system files it finds.
5. Wait for the scan to complete, which may take some time.
6. Once the scan is finished, restart your computer and check if the Windows 10 updates can now be installed successfully.
Using the System File Checker can help resolve issues related to corrupted system files, which may be preventing the installation of updates. It’s a built-in tool in Windows that can help ensure the stability and performance of your operating system.
If you continue to experience problems with Windows 10 updates, it may be worth considering other troubleshooting steps or seeking assistance from technical support.
Refresh Windows Update Services
If you’re experiencing issues with Windows 10 updates not installing after a restart, one possible solution is to refresh the Windows Update services. This can help resolve any underlying issues that may be preventing the updates from installing correctly.
To refresh the Windows Update services, follow these steps:
1. Press the Windows key + R to open the Run dialog box.
2. Type services.msc and press Enter to open the Services window.
3. Scroll down and locate the following services:
– Windows Update
– Cryptographic Services
– Background Intelligent Transfer Service (BITS)
4. Right-click on each of these services and select Stop to stop them.
5. After stopping the services, navigate to the following folder:
– C:\Windows\SoftwareDistribution
6. Delete all the contents of this folder. Note that you may need administrative privileges to perform this action.
7. Once the contents have been deleted, go back to the Services window and right-click on each of the services mentioned earlier.
8. Select Start to restart the services.
9. Restart your computer and try installing the Windows updates again.
Refreshing the Windows Update services can help resolve issues related to corrupted update files or services that are not functioning properly. It essentially resets the Windows Update components, allowing them to start fresh and hopefully resolve any installation issues.
If refreshing the services does not solve the problem, you may need to consider other troubleshooting steps or seek further assistance from Microsoft support or a professional technician.
Increase System Drive Space

If you’re experiencing issues with Windows 10 updates not installing after a restart, it could be due to insufficient system drive space. To resolve this problem, follow these steps:
1. Check your system drive space: Open File Explorer and right-click on your system drive (usually C:). Select “Properties” and check the available free space. If it’s below 10-15% of the total drive capacity, you need to free up some space.
2. Remove unnecessary files: Use the built-in Disk Cleanup tool to delete temporary files, system files, and other unnecessary data. To access the tool, press the Windows key + R, type “cleanmgr” (without quotes), and hit Enter. Select your system drive, then check the file types you want to delete and click “OK” to start the cleanup process.
3. Uninstall unnecessary programs: Open the Control Panel and go to “Programs” or “Programs and Features.” Review the list of installed programs and uninstall any that you no longer need. This will free up additional space on your system drive.
4. Move files to an external drive or cloud storage: If you have large files or folders that you don’t need to access frequently, consider moving them to an external drive or cloud storage. This will help free up space on your system drive without permanently deleting the files.
5. Disable hibernation: If you don’t use the hibernation feature, you can disable it to gain some extra space. Open Command Prompt as an administrator, then type “powercfg -h off” (without quotes) and press Enter. This will disable hibernation and delete the hiberfil.sys file, which can take up a significant amount of space.
6. Clear the Windows Update cache: Sometimes, the Windows Update cache can become corrupted, causing issues with updates. To clear the cache, open Command Prompt as an administrator, then type “net stop wuauserv” and press Enter. Next, type “net stop bits” and press Enter. Finally, type “net start wuauserv” and press Enter to restart the Windows Update service.
Disable Third-party Antivirus
If you are experiencing issues with Windows 10 updates not installing after a restart, it may be due to a third-party antivirus software conflicting with the update process. Disabling the antivirus temporarily can help resolve this issue.
To disable a third-party antivirus on your Windows 10 computer, follow these steps:
1. Open the antivirus software on your computer. Look for its icon in the system tray or search for it in the Start menu.
2. Once you have located the antivirus software, right-click on its icon to open a context menu.
3. In the context menu, look for an option like “Disable” or “Turn off.” Click on this option to disable the antivirus temporarily.
4. If prompted, select the duration for which you want to disable the antivirus. Choose an appropriate time frame, such as “Disable for 1 hour” or “Disable until restart.”
5. After disabling the antivirus, restart your computer.
6. Once the computer has restarted, try installing the Windows 10 updates again.
Remember to re-enable your antivirus software after the updates have been successfully installed. Keeping your antivirus software active is important to ensure the security of your computer.
If disabling the third-party antivirus does not resolve the issue, you may need to consider uninstalling the antivirus software completely. Consult the antivirus software’s documentation or website for instructions on how to uninstall it from your computer.
By temporarily disabling or uninstalling the third-party antivirus software, you can troubleshoot and resolve issues with Windows 10 updates not installing after a restart.
Delete Software Distribution Folder
To resolve the issue of Windows 10 updates not installing after restart, you may need to delete the Software Distribution folder. This folder is responsible for storing temporary files related to Windows updates, and deleting it can help resolve update installation issues.
Here are the steps to delete the Software Distribution folder:
1. Press the Windows key + R to open the Run dialog box.
2. Type “services.msc” and press Enter to open the Services window.
3. In the Services window, scroll down and locate “Windows Update”.
4. Right-click on “Windows Update” and select “Stop” to temporarily disable the Windows Update service.
5. Minimize the Services window and open File Explorer.
6. In File Explorer, navigate to the following path: C:\Windows\SoftwareDistribution.
7. Select all the files and folders inside the SoftwareDistribution folder and press Shift + Delete to permanently delete them.
8. Close File Explorer and maximize the Services window.
9. Right-click on “Windows Update” again and select “Start” to restart the Windows Update service.
10. Restart your computer and try installing the Windows updates again.
Deleting the Software Distribution folder can help clear any corrupt or stuck files that may be preventing the updates from installing properly. After following these steps, your Windows 10 updates should start installing successfully after a restart.
Consider Full Windows Reset
If you’re experiencing issues with Windows 10 updates not installing after a restart, a full Windows reset may be a solution worth considering. This process can help resolve any underlying issues that may be preventing the updates from installing correctly.
Before proceeding with a full Windows reset, it’s important to note that this action will remove all installed applications and personal files from your computer. Therefore, it’s crucial to back up any important data before proceeding.
To perform a full Windows reset:
1. Press the Windows key + I to open the Settings app.
2. Click on “Update & Security.”
3. In the left-hand menu, select “Recovery.”
4. Under the “Reset this PC” section, click on the “Get started” button.
5. You will be presented with two options: “Keep my files” and “Remove everything.” Choose the option that best suits your needs.
6. Follow the on-screen instructions to complete the reset process.
After the reset is complete, your computer will be restored to its factory settings. This means that you will need to reinstall any applications and restore your personal files from the backup you created earlier.
In some cases, a full Windows reset may be the most effective solution for resolving issues with Windows 10 updates not installing after a restart.
F.A.Qs
Why does my computer keep failing to install updates?
Your computer may keep failing to install updates due to compatibility issues with your hardware or software configurations. The latest Windows updates may not be compatible with certain drivers, applications, or system components, leading to conflicts and causing the update process to fail.
Why is my PC not updating after restarting?
Your PC may not be updating after restarting because there could be missing or corrupted system components or unwanted/unused files retained in your computer. Running System Maintenance could be a solution to resolve this issue.
