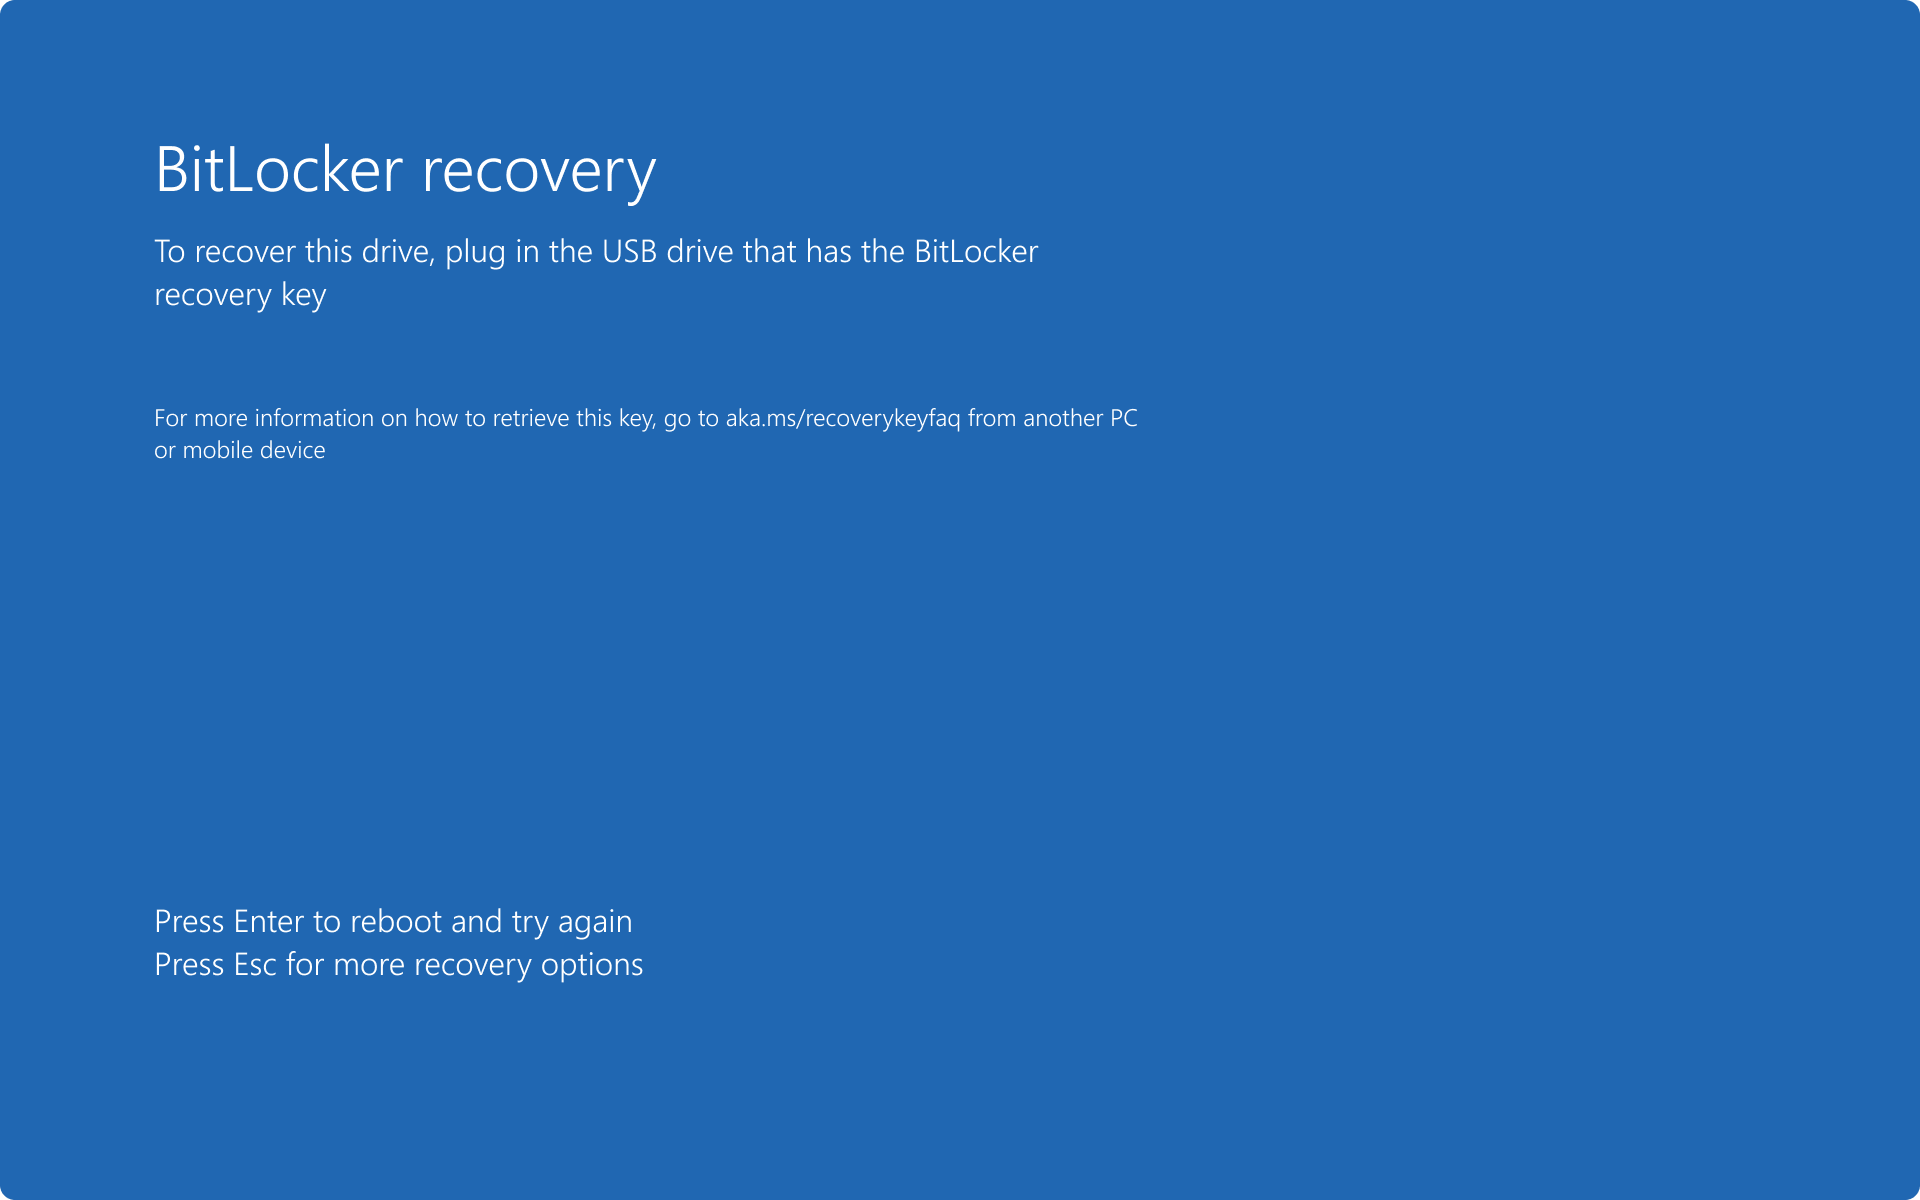
Are you struggling to solve the BitLocker recovery key prompt on your Windows 10/11 device? Look no further.
Understanding Why It Keeps Asking For A Recovery Key
If your Windows 10/11 keeps asking for a recovery key, there are a few possible reasons behind this prompt. One common cause is a change in your system’s UEFI/BIOS settings. Make sure to check your UEFI/BIOS settings to ensure BitLocker is enabled and configured correctly. Another potential reason could be the use of Thunderbolt or docking stations connected via USB-C. These devices can sometimes trigger the recovery key prompt due to their interaction with the system’s firmware and Trusted Platform Module (TPM).
If you encounter the recovery key prompt during the booting process, it may be related to an Option ROM or Preboot Execution Environment (PXE) issue. Try disabling any unnecessary Option ROMs in your UEFI/BIOS settings and ensure PXE is not enabled.
In some cases, the recovery key prompt could be caused by a malfunctioning USB device or a loose USB connection. Check all USB devices connected to your computer and ensure they are securely plugged in.
If you are using a Microsoft Windows operating system, you can also try the following troubleshooting steps:
1. Open the Control Panel and navigate to “BitLocker Drive Encryption.”
2. Click on “Manage BitLocker.”
3. Select the drive that is prompting for the recovery key.
4. Click on “Turn Off BitLocker.”
5. Once the decryption process is complete, you can re-enable BitLocker if desired.
Additionally, if you have a personal identification number (PIN) set up for BitLocker, try using the Esc key to bypass the recovery key prompt during startup.
Symptoms and Causes
Symptoms of the BitLocker recovery key prompt issue on Windows 10/11 may include a sudden appearance of a recovery key request during booting or when trying to access encrypted data. This prompt can be frustrating and may cause inconvenience for users.
The causes of this issue can vary, but some common triggers include changes in hardware configurations such as Thunderbolt interfaces, docking stations, or USB-C connections. Issues with the Trusted Platform Module (TPM) or firmware settings can also lead to the recovery key prompt. In some cases, problems with the operating system, firmware, or even the computer keyboard can be the underlying cause.
If you encounter the BitLocker recovery key prompt on Windows 10/11, there are a few steps you can take to troubleshoot and resolve the issue. First, try restarting your computer and see if the prompt disappears. If not, you can try checking the TPM settings in the Control Panel (Windows) and ensure it’s properly enabled.
Another helpful step is to verify the hardware connections. Ensure that all cables and devices, such as Thunderbolt interfaces or docking stations, are securely connected to your computer. Additionally, updating your firmware to the latest version can sometimes resolve compatibility issues that may trigger the recovery key prompt.
If these steps don’t solve the issue, you can try using the BitLocker recovery key to unlock your encrypted drive. This key is usually stored as a text file in your Microsoft account or can be retrieved from your organization’s IT department if you’re using a work device.
In some cases, you may need to disable BitLocker temporarily and then re-enable it to fix the recovery key prompt. However, note that this will require decrypting and re-encrypting your data, so make sure to back up your important files before proceeding.
Comprehensive Resolution Strategies
1. Check for Hardware Issues:
– Ensure that your Thunderbolt interface or docking station is properly connected and functioning.
– Verify that the Option ROM for your hardware is up to date.
– Make sure that the Preboot Execution Environment (PXE) is enabled in your BIOS settings.
2. Keyboard and Input:
– Check if any buttons on your computer keyboard or external keyboard are stuck or not functioning properly.
– Press the Esc key to exit any prompts or dialog boxes that may be causing the recovery key prompt.
3. Software Settings:
– Open the Control Panel in Microsoft Windows and navigate to “BitLocker Drive Encryption.”
– Verify that the correct personal identification number (PIN) or password is entered when prompted.
– Ensure that encryption is enabled for the correct drive or partition.
4. Troubleshooting Steps:
– Use the Command-line interface (CLI) to manually unlock the encrypted drive using the BitLocker recovery key.
– Try accessing your encrypted drive using Microsoft Outlook or other media player software to rule out any compatibility issues.
– Check if the drive or partition is set to read-only mode in the BIOS or operating system settings.
5. Hardware and Firmware Updates:
– Update the firmware and drivers for your PCI Express components, including the motherboard and Dell hardware.
– Make sure that your external storage devices are compatible with BitLocker encryption.
Utilizing Command Prompt to Unlock
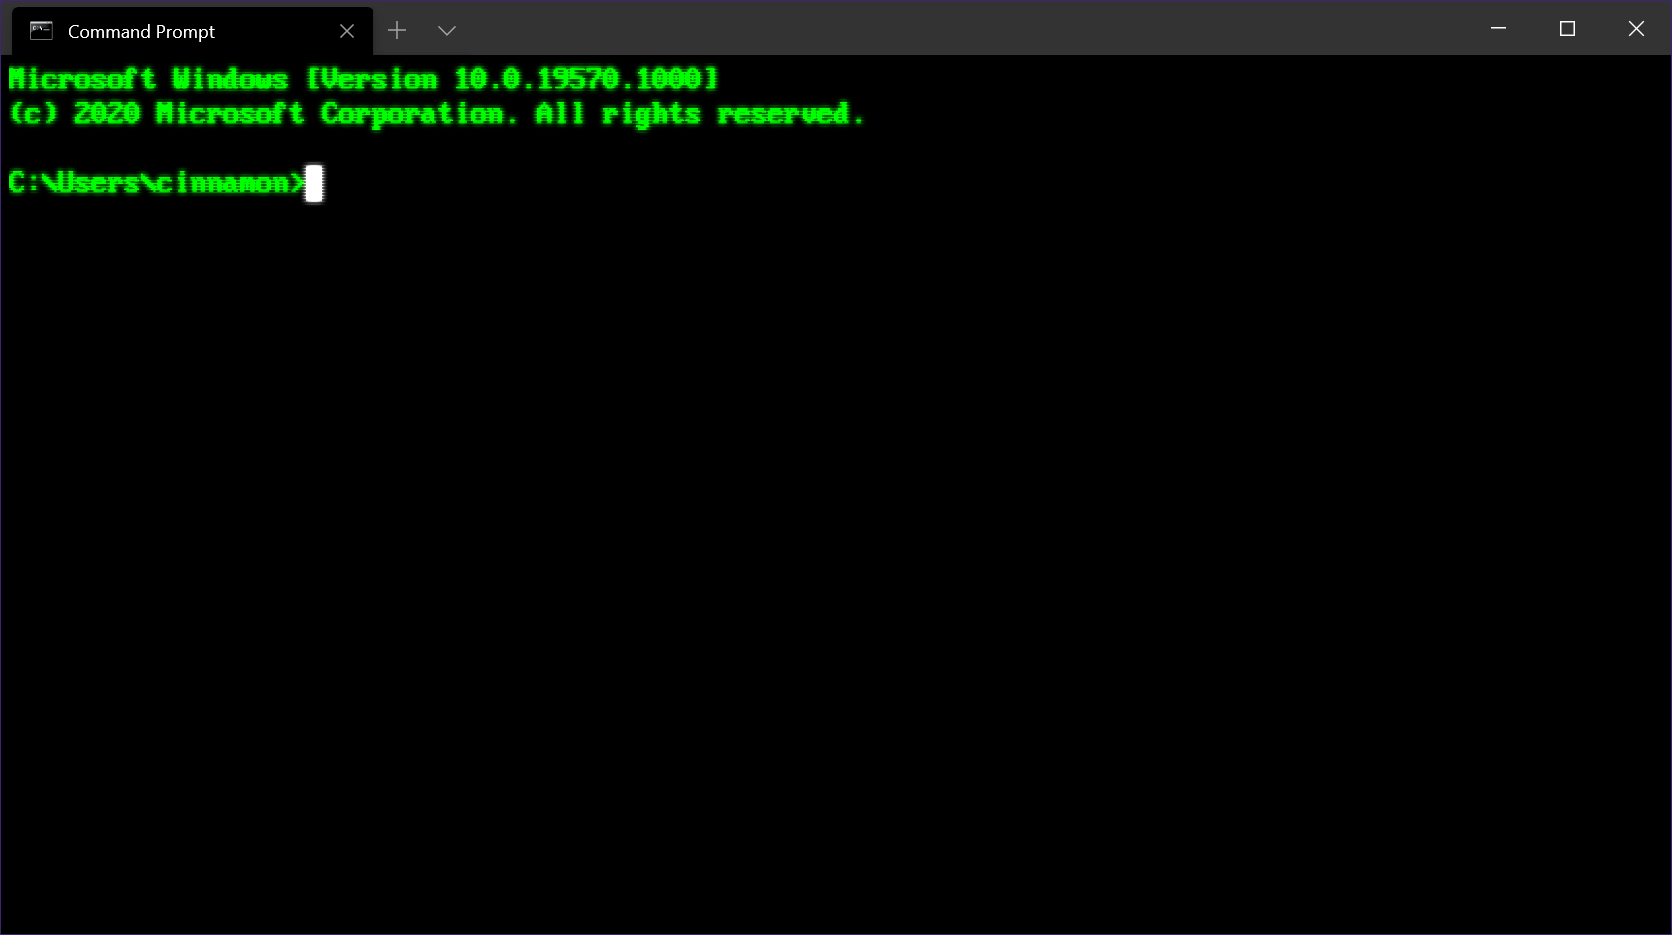
To utilize Command Prompt to unlock the BitLocker recovery key prompt on Windows 10/11, follow these steps:
1. Press the Windows key + X on your keyboard to open the Power User menu.
2. Select “Command Prompt (Admin)” from the list. If you’re using Windows 10, you may see “Command Prompt (Admin)” as “Windows PowerShell (Admin).”
3. In the Command Prompt window, type manage-bde -unlock D: -RecoveryPassword YOUR_RECOVERY_KEY and press Enter. Replace “D:” with the drive letter where BitLocker is enabled and “YOUR_RECOVERY_KEY” with the actual recovery key provided to you.
4. If the recovery key is correct, BitLocker will be unlocked, and you can access your encrypted drive’s content.
Remember to replace “D:” and “YOUR_RECOVERY_KEY” with your specific information. This method can help you regain access to your BitLocker-encrypted drive without using the BitLocker recovery key prompt.
If you encounter any issues or need further assistance, feel free to consult the official Microsoft documentation or seek help from the Windows community.
Suspend Protection Temporarily
To temporarily suspend protection on BitLocker in Windows 10/11, follow these steps:
1. Open the Control Panel by pressing the Windows key and typing “Control Panel.” Select it from the search results.
2. In the Control Panel, navigate to “System and Security” and click on “BitLocker Drive Encryption.”
3. Under the “BitLocker Drive Encryption” window, locate the drive that you want to suspend protection for and click on “Suspend Protection” next to it.
4. A confirmation dialog box will appear. Click “Yes” to suspend the protection temporarily.
5. Once protection is suspended, you can perform any necessary tasks on the drive without the need for a recovery key prompt.
6. To resume protection, go back to the “BitLocker Drive Encryption” window and click on “Resume Protection” next to the suspended drive.
Remember, suspending protection should only be done temporarily and for specific reasons. It is important to resume protection as soon as you are done with the tasks that required it to maintain the security of your data.
Note: This method may vary slightly depending on your version of Windows.
Adjusting BIOS and Secure Boot Settings
To adjust BIOS and Secure Boot settings on Windows 10/11 and solve the BitLocker Recovery Key prompt, follow these steps:
1. Restart your computer and press the designated key (usually Del, F2, or F10) to enter the BIOS setup.
2. Navigate to the “Security” or “Boot” tab using the arrow keys.
3. Locate the “Secure Boot” option and set it to “Disabled” to allow changes to the boot mode.
4. Look for the “Boot Mode” or “Boot Priority” option and change it from “UEFI” to “Legacy” or vice versa, depending on your system.
5. Save the changes by pressing the designated key (usually F10) and exit the BIOS setup.
6. Restart your computer and let it boot into Windows.
7. Open the Control Panel by searching for it in the Start menu.
8. In the Control Panel, click on “System and Security” and then “BitLocker Drive Encryption.”
9. Click on “Turn off BitLocker” for all the encrypted drives on your system.
10. Follow the prompts to decrypt the drives and disable BitLocker.
11. Once BitLocker is disabled, you can re-enable it if desired by following the same steps.
By adjusting the BIOS and Secure Boot settings and disabling BitLocker, you should no longer encounter the Recovery Key prompt on Windows 10/11.
Updating BIOS and Windows OS
Updating the BIOS and Windows OS can often resolve the BitLocker Recovery Key prompt issue on Windows 10/11. To update the BIOS, follow these steps:
1. Visit the manufacturer’s website (e.g., Dell) and navigate to the support section.
2. Search for your specific model (e.g., Latitude) and locate the BIOS update for your system.
3. Download the BIOS update file and save it to a USB flash drive.
4. Restart your computer and press the designated key (e.g., F2) to access the BIOS setup.
5. In the BIOS setup, navigate to the “Update” or “Flash BIOS” option.
6. Select the BIOS update file from the USB flash drive and follow the on-screen instructions to complete the update.
To update Windows OS, follow these steps:
1. Press the Windows key + I to open the Settings menu.
2. Click on “Update & Security” and then select “Windows Update” from the left pane.
3. Click on “Check for updates” and wait for Windows to search for available updates.
4. If updates are found, click on “Download” and let Windows install the updates.
5. Restart your computer if prompted to complete the installation.
Updating both the BIOS and Windows OS can help ensure compatibility and stability, potentially resolving the BitLocker Recovery Key prompt issue.
Managing Boot Options: Legacy and Secure Boot
To manage boot options on your Windows 10/11 system, you may need to adjust settings related to Legacy and Secure Boot. These settings determine how your computer starts up and can impact the BitLocker recovery key prompt. Here’s how to manage these options:
1. Access the BIOS/UEFI Settings: Restart your computer and enter the BIOS/UEFI settings by pressing the Del or F2 key (the exact key may vary depending on your system). Look for an option like “Boot” or “Boot Options” in the menu.
2. Legacy Boot: If you are using an older operating system or have legacy hardware, you may need to enable Legacy Boot. This option allows your system to boot from older devices, such as traditional hard drives. Look for an option like “Legacy Boot” or “Compatibility Support Module (CSM)” and enable it if necessary.
3. Secure Boot: Secure Boot is a feature that ensures only trusted software is loaded during the boot process, providing enhanced security. If you are encountering BitLocker recovery key prompts, disabling Secure Boot may help. Look for an option like “Secure Boot” and disable it if needed.
4. Save and Exit: Once you have made the necessary changes, save your settings and exit the BIOS/UEFI settings. Your computer will then restart with the modified boot options.
Remember that altering these settings may have consequences for your system’s security and compatibility. Only make changes if you are familiar with the potential risks and are confident in the adjustments you are making.
By managing Legacy and Secure Boot options, you can troubleshoot the BitLocker recovery key prompt on your Windows 10/11 system.
Configuring BitLocker Settings: Auto-Unlock and Encryption
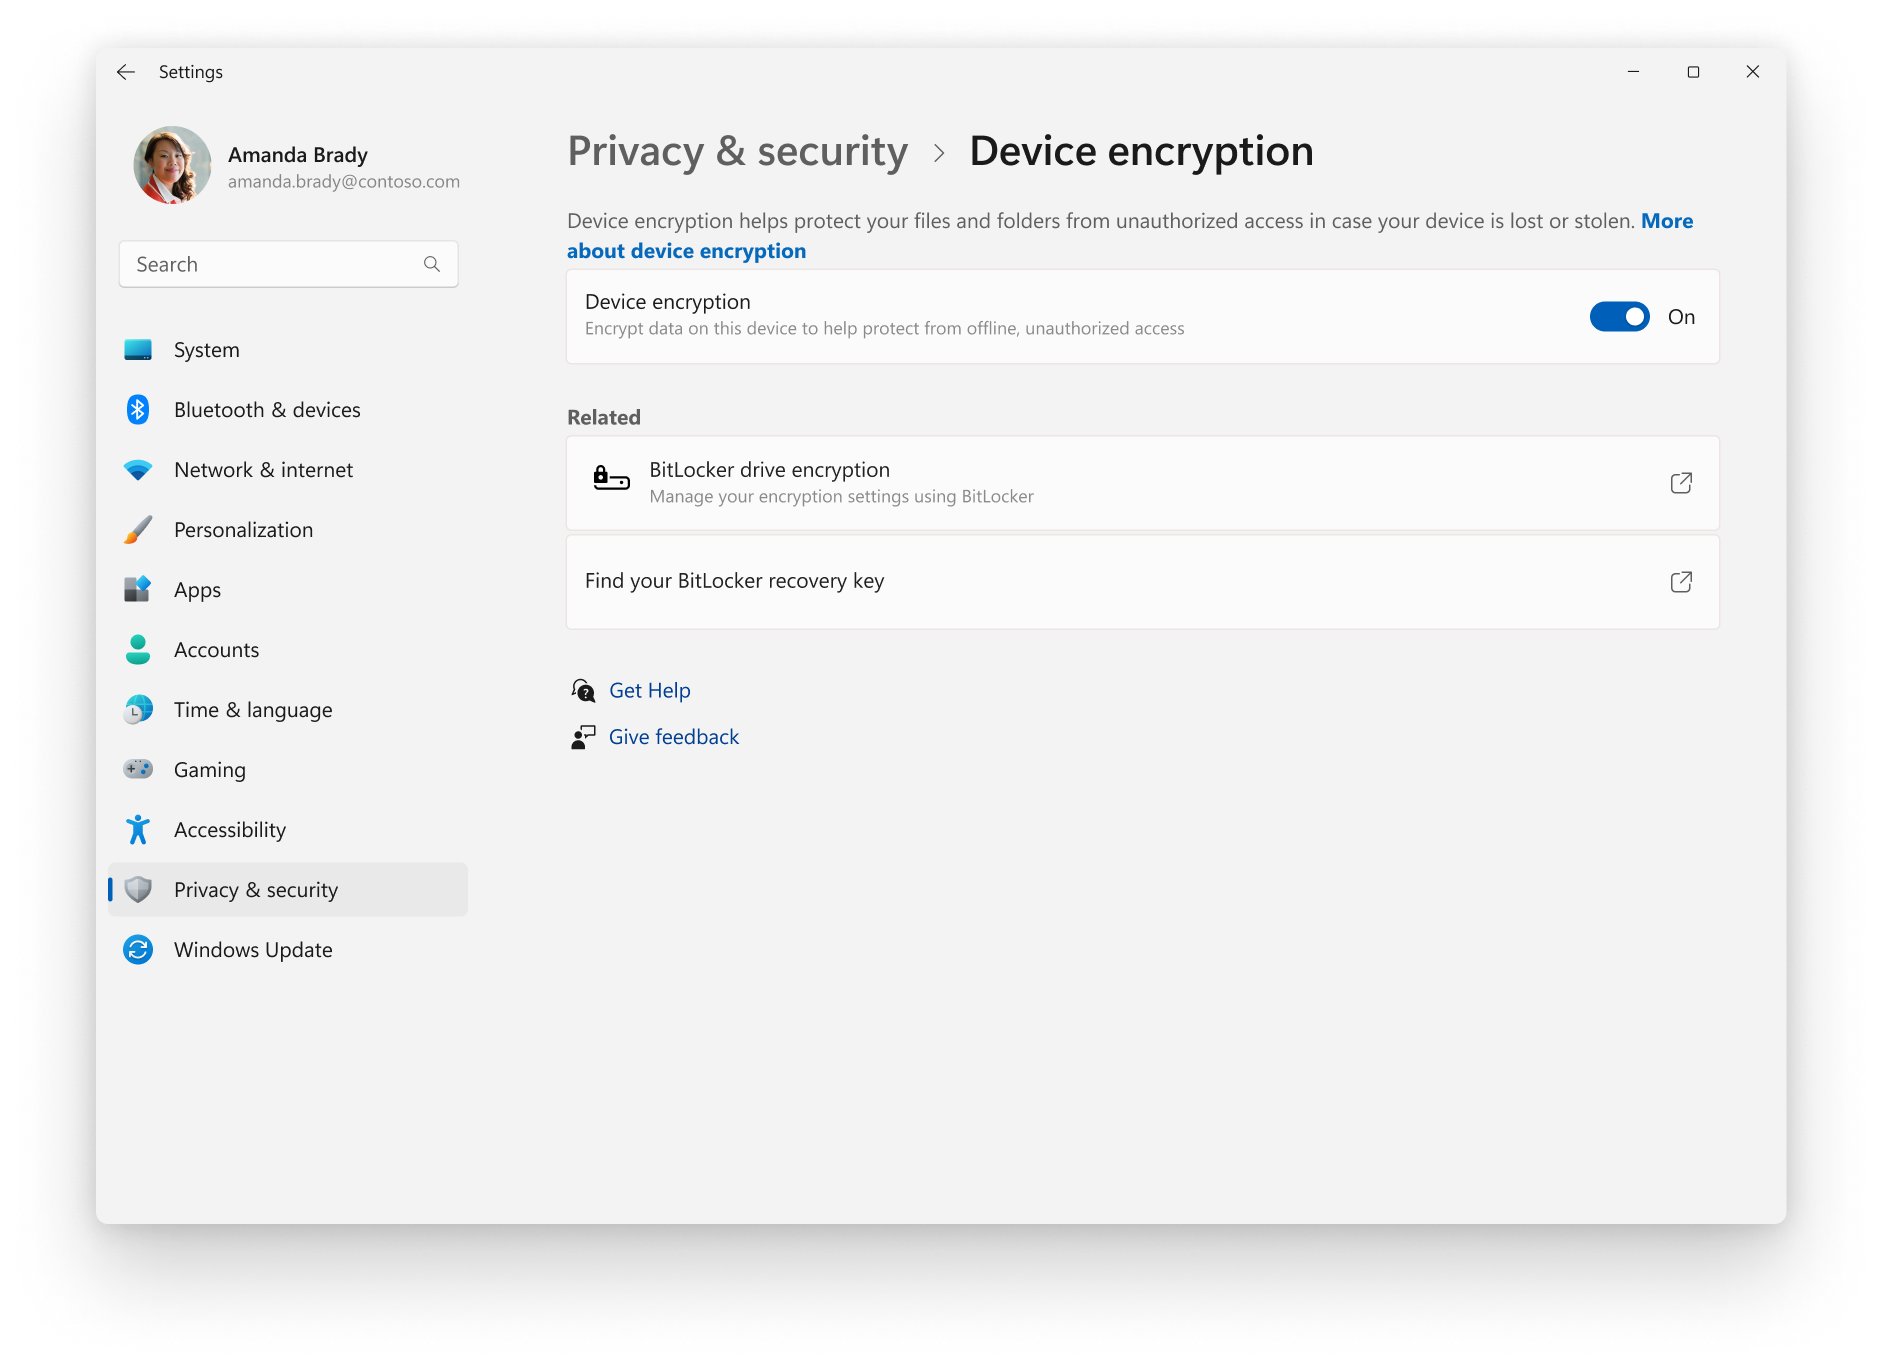
To configure BitLocker settings for auto-unlock and encryption on Windows 10/11, follow these steps:
1. Press the Windows key + R to open the Run dialog box.
2. Type “control” and press Enter to open the Control Panel.
3. In the Control Panel, click on “System and Security” and then on “BitLocker Drive Encryption.”
4. In the BitLocker settings window, locate the drive you want to configure and click on “Turn on BitLocker.”
5. Select “Automatically unlock this drive on this computer” to enable auto-unlock for the drive.
6. If you have a TPM chip, select “Allow BitLocker without a compatible TPM” to configure BitLocker without a TPM.
7. Choose how you want to unlock the drive, either by using a password or a smart card.
8. Enter the password or insert the smart card when prompted.
9. Choose where you want to save the recovery key, either to your Microsoft account, a USB drive, or to a file.
10. Click “Next” and then “Start encrypting” to begin the encryption process.
11. Wait for the encryption process to complete, which may take some time depending on the size of the drive.
12. Once the encryption is finished, you can access the drive without entering the recovery key every time you start your computer.
Remember to keep the recovery key in a safe place in case you need it for recovery or troubleshooting purposes.
Correcting Issues by Reinstalling Updates or Hardware
If you’re experiencing a BitLocker recovery key prompt on Windows 10/11, there are a few steps you can take to try and resolve the issue. First, you can try reinstalling the updates or hardware that may be causing the problem.
To reinstall updates, follow these steps:
1. Open the Control Panel.
2. Click on Programs and then Programs and Features.
3. In the left panel, click on View installed updates.
4. Locate the updates that may be causing the issue and right-click on them.
5. Choose Uninstall to remove the updates.
6. Restart your computer and check if the BitLocker recovery key prompt is resolved.
If reinstalling updates didn’t solve the problem, you can try reinstalling the hardware drivers. Here’s how:
1. Open the Control Panel.
2. Click on Device Manager.
3. Expand the categories and locate the hardware that may be causing the issue (such as the hard disk drive or motherboard).
4. Right-click on the hardware and select Uninstall device.
5. Restart your computer and Windows will automatically reinstall the drivers for the hardware.
By reinstalling updates or hardware drivers, you may be able to resolve the BitLocker recovery key prompt issue on your Windows 10/11 computer.
Data Recovery from Encrypted OS Drive
![]()
If you are facing the BitLocker recovery key prompt on your Windows 10/11 encrypted OS drive, here is a concise guide to help you solve it.
1. Start by connecting your encrypted OS drive to your computer. This can be done using a Thunderbolt interface, docking station, or any other suitable method.
2. Once the drive is connected, press the power button on your computer to turn it on.
3. When the computer starts booting up, you may see a prompt asking for the BitLocker recovery key. This usually happens if there has been a hardware change or if the drive is connected to a different computer.
4. To solve this issue, go to the Control Panel in Windows. You can do this by clicking on the Start Menu and searching for “Control Panel”.
5. In the Control Panel, navigate to “System and Security” and then click on “BitLocker Drive Encryption”.
6. Here, you will see a list of all the drives connected to your computer. Locate the encrypted OS drive and click on “Manage BitLocker”.
7. In the BitLocker management window, click on “Unlock Drive”.
8. A new window will appear asking for the recovery key. Enter the recovery key and click on “Unlock”.
9. If you do not have the recovery key, you can try other methods to recover it. One option is to use Microsoft Outlook to search for emails containing the recovery key. Another option is to check if the recovery key is stored in your Microsoft account or on a USB dongle.
10. If none of these methods work, you can try using a data recovery software specifically designed for BitLocker-encrypted drives. These software programs can help you recover your data even if you don’t have the recovery key.
11. Once you have successfully unlocked the drive, you can access your data as usual.
Reformatting and Reinstalling Windows OS
To reformat and reinstall the Windows OS on your Windows 10/11 computer and solve the BitLocker Recovery Key prompt, follow these steps:
1. Start by backing up any important files or data on your computer to external storage.
2. Insert your Windows installation media (USB or DVD) into your computer and restart it.
3. During the startup process, press the Boot Menu key (usually F12 or Esc) to access the boot menu. Select the option to boot from your installation media.
4. Once the Windows setup screen appears, choose your language preferences and click “Next.”
5. On the next screen, click “Install now” to begin the installation process.
6. Follow the on-screen instructions to accept the license terms and choose the installation type. Select the option to perform a custom installation.
7. On the next screen, you’ll see a list of available drives. Select the drive where Windows is currently installed and click “Delete.” This will remove the existing partitions on the drive.
8. After deleting the partitions, select the unallocated space and click “New.” Windows will create a new partition for the installation.
9. Select the newly created partition and click “Next” to start the installation process.
10. Follow the remaining on-screen instructions to complete the installation. This may include setting up your username and password, choosing a network, and customizing your settings.
11. Once the installation is complete, remove the installation media and restart your computer.
12. After the computer restarts, you’ll need to reinstall any necessary drivers and software.
13. If you had enabled BitLocker encryption on your previous Windows installation, you’ll need to enter the BitLocker Recovery Key to access your encrypted data. You can find this key in your Microsoft account or on a recovery key file.
14. To enter the BitLocker Recovery Key, go to the Control Panel and navigate to “System and Security” > “BitLocker Drive Encryption.” Click “Enter recovery key” and follow the on-screen instructions to unlock your encrypted drive.
FAQs
Why is BitLocker asking for a recovery key every time?
BitLocker is asking for a recovery key every time because it is a security measure triggered when a new device is detected in the boot list or when an external storage device is connected. This is a normal behavior to ensure the protection of your data. By default, boot support for USB-C/TBT and Preboot for TBT are enabled, which can cause this issue.
Why is my laptop asking for the BitLocker key every boot?
Your laptop is asking for the BitLocker key every boot because the BitLocker encryption is enabled and set to require the key for authentication.
How do I stop my computer from asking for a recovery key?
To stop your computer from asking for a recovery key, you can try the following methods:
1. Suspend BitLocker protection.
2. Remove the protectors from the boot drive.
3. Enable secure boot.
4. Update your BIOS.
5. Disable secure boot.
6. Use legacy boot.
7. Turn off the auto-unlock option.
8. Update your Windows operating system.
How do I get past BitLocker without recovery key?
To get past BitLocker without a recovery key, it is necessary to format the encrypted drive to remove the encryption or rely on third-party tools like Passware Kit, Elcomsoft Forensic Disk Decryptor, or Elcomsoft Distributed Password Recovery.
