Are you looking to reimage your Windows 10 hard drive?
Understanding Reimaging
Reimaging is a process that involves restoring a computer’s hard drive to its original factory settings. This can be useful in situations where your Windows 10 operating system is experiencing issues or has become infected with malware.
To reimage your Windows 10 hard drive, you will need a USB flash drive or a boot disk containing a Windows Setup file. This will allow you to boot your computer from the USB or disk and initiate the reimaging process.
During the reimaging process, all data on your hard drive will be erased, so it’s important to back up any important files before proceeding. Reimaging will also reinstall the operating system, drivers, and software that were originally installed on your computer.
To start the reimaging process, follow these steps:
1. Insert the USB flash drive or boot disk into your computer.
2. Restart your computer and enter the boot menu by pressing the appropriate function key or key combination during startup.
3. Select the USB or disk as the boot device.
4. Follow the on-screen prompts to initiate the reimaging process.
5. Once the process is complete, your computer will restart and you will need to go through the initial setup process again.
Preparing for Reimaging: Checking System Compatibility and Backup
To prepare for reimaging your Windows 10 hard drive, it’s important to check system compatibility and create a backup. These steps will help ensure a smooth and successful reimage process.
First, check the system compatibility to ensure that your hardware meets the requirements for Windows 10. This includes checking the minimum processor speed, RAM, and hard drive space needed. You can find these specifications on the Microsoft website or in the Windows documentation.
Next, create a backup of your important files and data. This will protect your information in case anything goes wrong during the reimage process. Use a reliable backup software or manually copy your files to an external hard drive or cloud storage.
Once you’ve completed these steps, you can proceed with reimagining your Windows 10 hard drive.
Steps to Reimage Your Computer
- Backup your important files: Before reimagining your computer, it is crucial to backup all your important files and data to prevent any potential loss.
- Create a recovery drive: Prepare a USB drive with a recovery image that you can use to reinstall Windows 10.
- Access the Advanced Startup options: Restart your computer and access the Advanced Startup options by pressing a specific key (such as F8 or F12 depending on your device) during the boot process.
- Select Troubleshoot: From the Advanced Startup options menu, select the Troubleshoot option to proceed.
- Choose Reset this PC: In the Troubleshoot menu, select the Reset this PC option to begin the reimaging process.
- Select Keep my files: Choose the option to keep your personal files while reinstalling Windows 10.
- Follow the on-screen instructions: Proceed with the instructions provided on the screen to complete the reimaging process.
- Reinstall your applications: After the reimaging process is complete, reinstall your essential applications and software.
- Restore your backed-up files: Finally, restore your important files from the backup you created earlier.
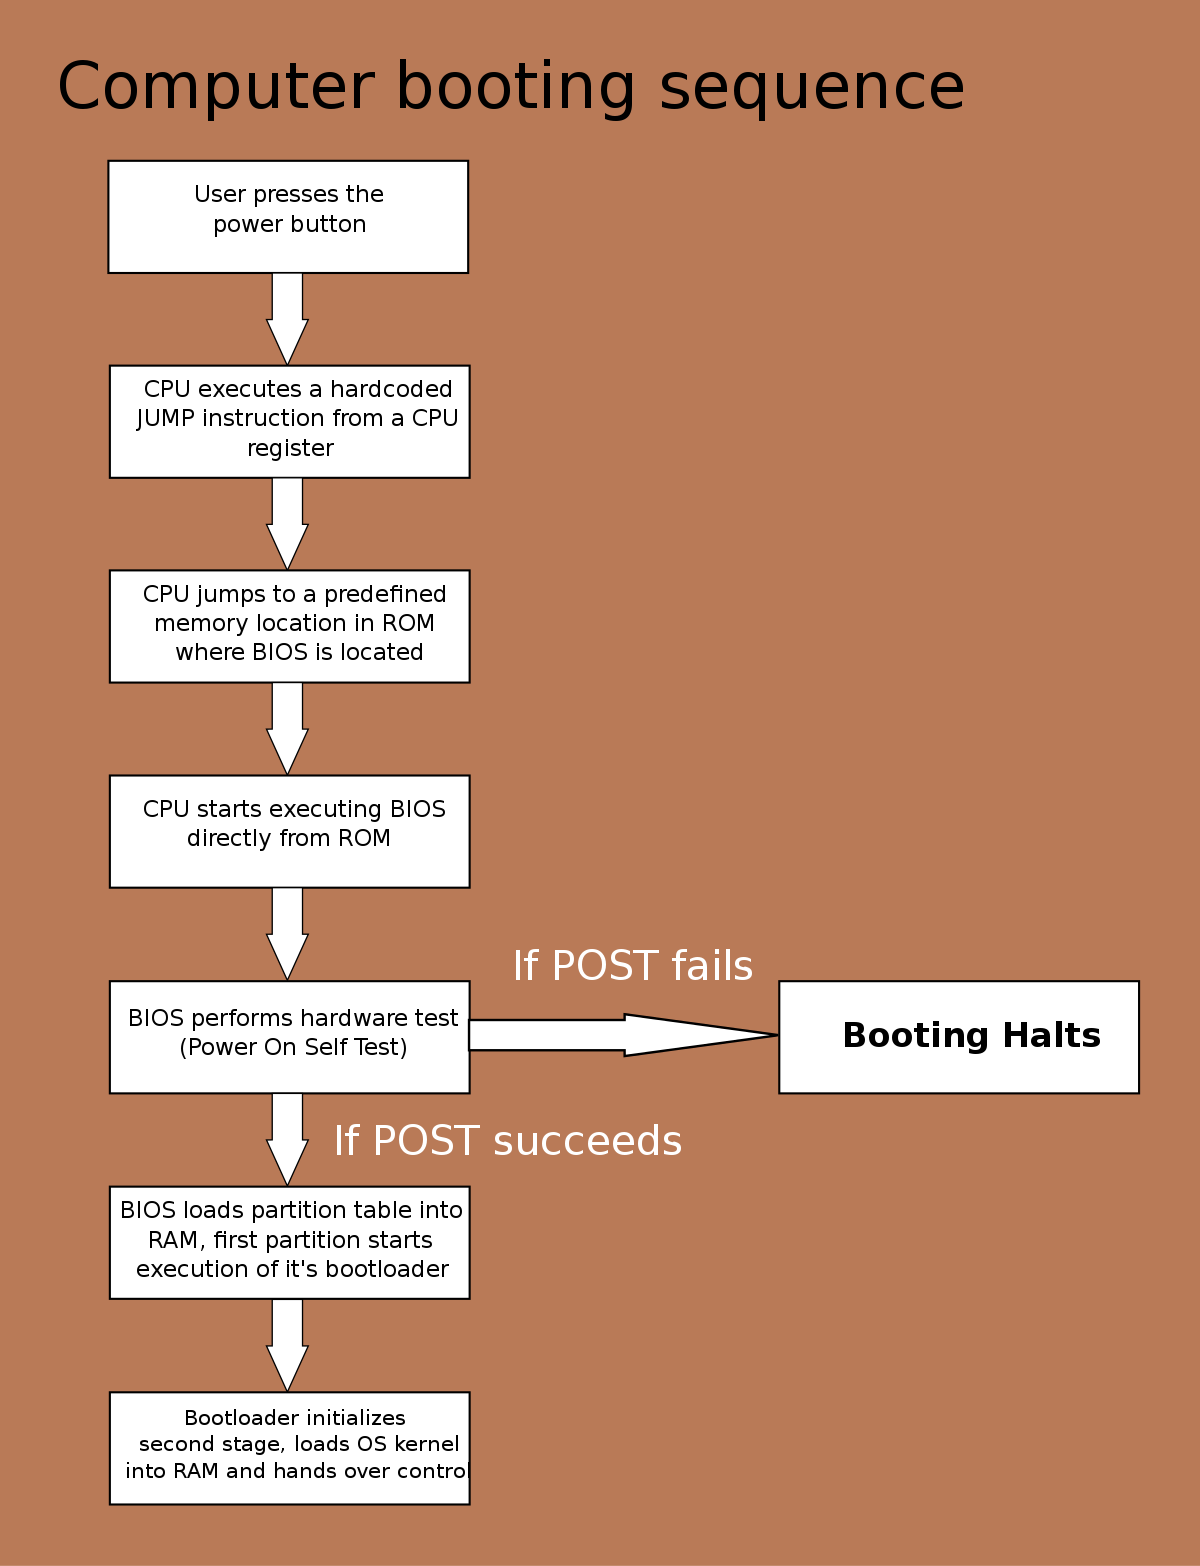
Addressing Boot Issues Before Reimaging
![]()
Before reimagining your Windows 10 hard drive, it’s important to address any boot issues that may be causing problems. Boot issues can prevent your computer from starting up properly and can be caused by various factors such as malware infections, faulty device drivers, or disk formatting errors.
To address boot issues before reimagining your hard drive, you can try the following steps:
1. Start with a System Restore: Use the System Restore feature to revert your computer back to a previous working state. This can help fix any software-related issues that may be causing boot problems.
2. Check for malware: Scan your computer for malware, spyware, or ransomware infections. These malicious programs can interfere with the boot process and cause your computer to malfunction.
3. Update device drivers: Use Device Manager to check for outdated or faulty device drivers. Update them to the latest versions to ensure compatibility and stability.
4. Boot into Safe Mode: Restart your computer and repeatedly press the F8 key to access the Advanced Boot Options menu. From there, select Safe Mode to start Windows with minimal drivers and services. This can help troubleshoot boot issues caused by conflicting software or drivers.
5. Use Windows Setup: If the above steps don’t resolve the boot issues, you can use the Windows Setup disc or USB drive to repair your computer. Follow the on-screen instructions to access the repair options.
By addressing boot issues before reimagining your Windows 10 hard drive, you can increase the chances of a successful reimage and ensure a smooth experience with your computer.
Reinstalling Drivers and Applications Post-Reimage
After reimagining your Windows 10 hard drive, you will need to reinstall drivers and applications to ensure that your computer is fully functional. This process can be done by following a few simple steps.
Step 1: Begin by downloading the necessary device drivers from the manufacturer’s website or using a reliable driver update tool. Make sure to download the correct drivers for your specific hardware components.
Step 2: To reinstall applications, locate the installation files or download them from the official websites. If you have previously backed up your applications, you can restore them from your backup.
Step 3: Open the Device Manager by pressing the Windows key + X, then selecting “Device Manager” from the menu. Expand the categories and right-click on each device that needs a driver reinstall. Select “Update Driver Software” and follow the on-screen instructions to install the drivers.
Step 4: After reinstalling the drivers, open the downloaded application files and follow the installation wizard to reinstall the applications.
Step 5: Once the drivers and applications are installed, restart your computer to ensure that all changes take effect.
Installing Essential Security Software
When reimagining your Windows 10 hard drive, it is crucial to install essential security software to protect your device from potential threats. This software will help safeguard your personal information and prevent any unauthorized access to your system.
First, ensure that you have a reliable antivirus program installed on your computer. This will help detect and remove any malware, viruses, or spyware that may be present on your hard drive. Look for a reputable antivirus software and follow the installation instructions provided by the manufacturer.
Next, consider installing a firewall to add an extra layer of protection to your system. A firewall monitors incoming and outgoing network traffic and can help block unauthorized access to your computer. Enable the firewall settings on your Windows 10 operating system or install a third-party firewall program for enhanced security.
Additionally, it is recommended to install an anti-spyware program to protect your privacy. Spyware can track your online activities and collect sensitive information without your knowledge. Install an anti-spyware software and regularly scan your system for any potential threats.
Remember to keep your security software updated to ensure optimal protection. Regularly check for updates and install them as soon as they are available. These updates often include important patches and fixes that address vulnerabilities in the software.
Restoring Your Data After Reimaging
| Step | Description |
|---|---|
| 1 | Make sure you have a backup of your data before reimagining your Windows 10 hard drive. This will ensure that you don’t lose any important files or documents. |
| 2 | After reimagining, reinstall any essential software programs that you need for your work or personal use. |
| 3 | Connect any external storage devices, such as USB drives or external hard drives, that contain your backed-up data. |
| 4 | Navigate to the backup location and copy the files and folders you want to restore. |
| 5 | Paste the copied files and folders to their respective locations on your reimagined Windows 10 hard drive. |
| 6 | Double-check that all your restored data is in the correct locations and functioning properly. |
| 7 | Once you have verified the successful restoration of your data, you can safely disconnect the external storage devices. |
| 8 | Consider setting up automatic backup solutions to prevent data loss in the future. |
F.A.Qs
What is the difference between reformat and reimage?
The difference between reformatting and reimagining is that reformatting deletes all files on your computer, while reimagining retains the pre-installed software.
What does it mean to reimage a hard drive?
To reimage a hard drive means to install a new operating system on a computer by completely wiping the existing data and then installing a fresh operating system.
How do I reimage my computer Windows 10?
To reimage your computer on Windows 10, go to the Windows logo and search for ‘Reset This PC’. Then, click on the ‘Recovery’ tab and under ‘Reset this PC’, click on ‘Get Started’.
How do I reimage my hard drive?
To reimage your hard drive, go to settings, click “Update & Security,” and select “Recovery” from the left menu. Then, click “Get started,” followed by “Remove everything.” Proceed with the further process, click “Next,” and finally, click “Reset.” Wait for a few minutes until the preparation is completed 100%.
