Having a computer monitor black screen can be frustrating. In this article, we will explore troubleshooting tips to help you resolve this issue efficiently.
Power Check
When troubleshooting a computer monitor black screen issue, one of the first things to check is the power. Make sure that the monitor is properly connected to a power source and that the power cable is securely plugged in. If the monitor has an AC adapter, ensure that it is also properly connected and functioning.
If the power check doesn’t solve the problem, try these additional troubleshooting steps:
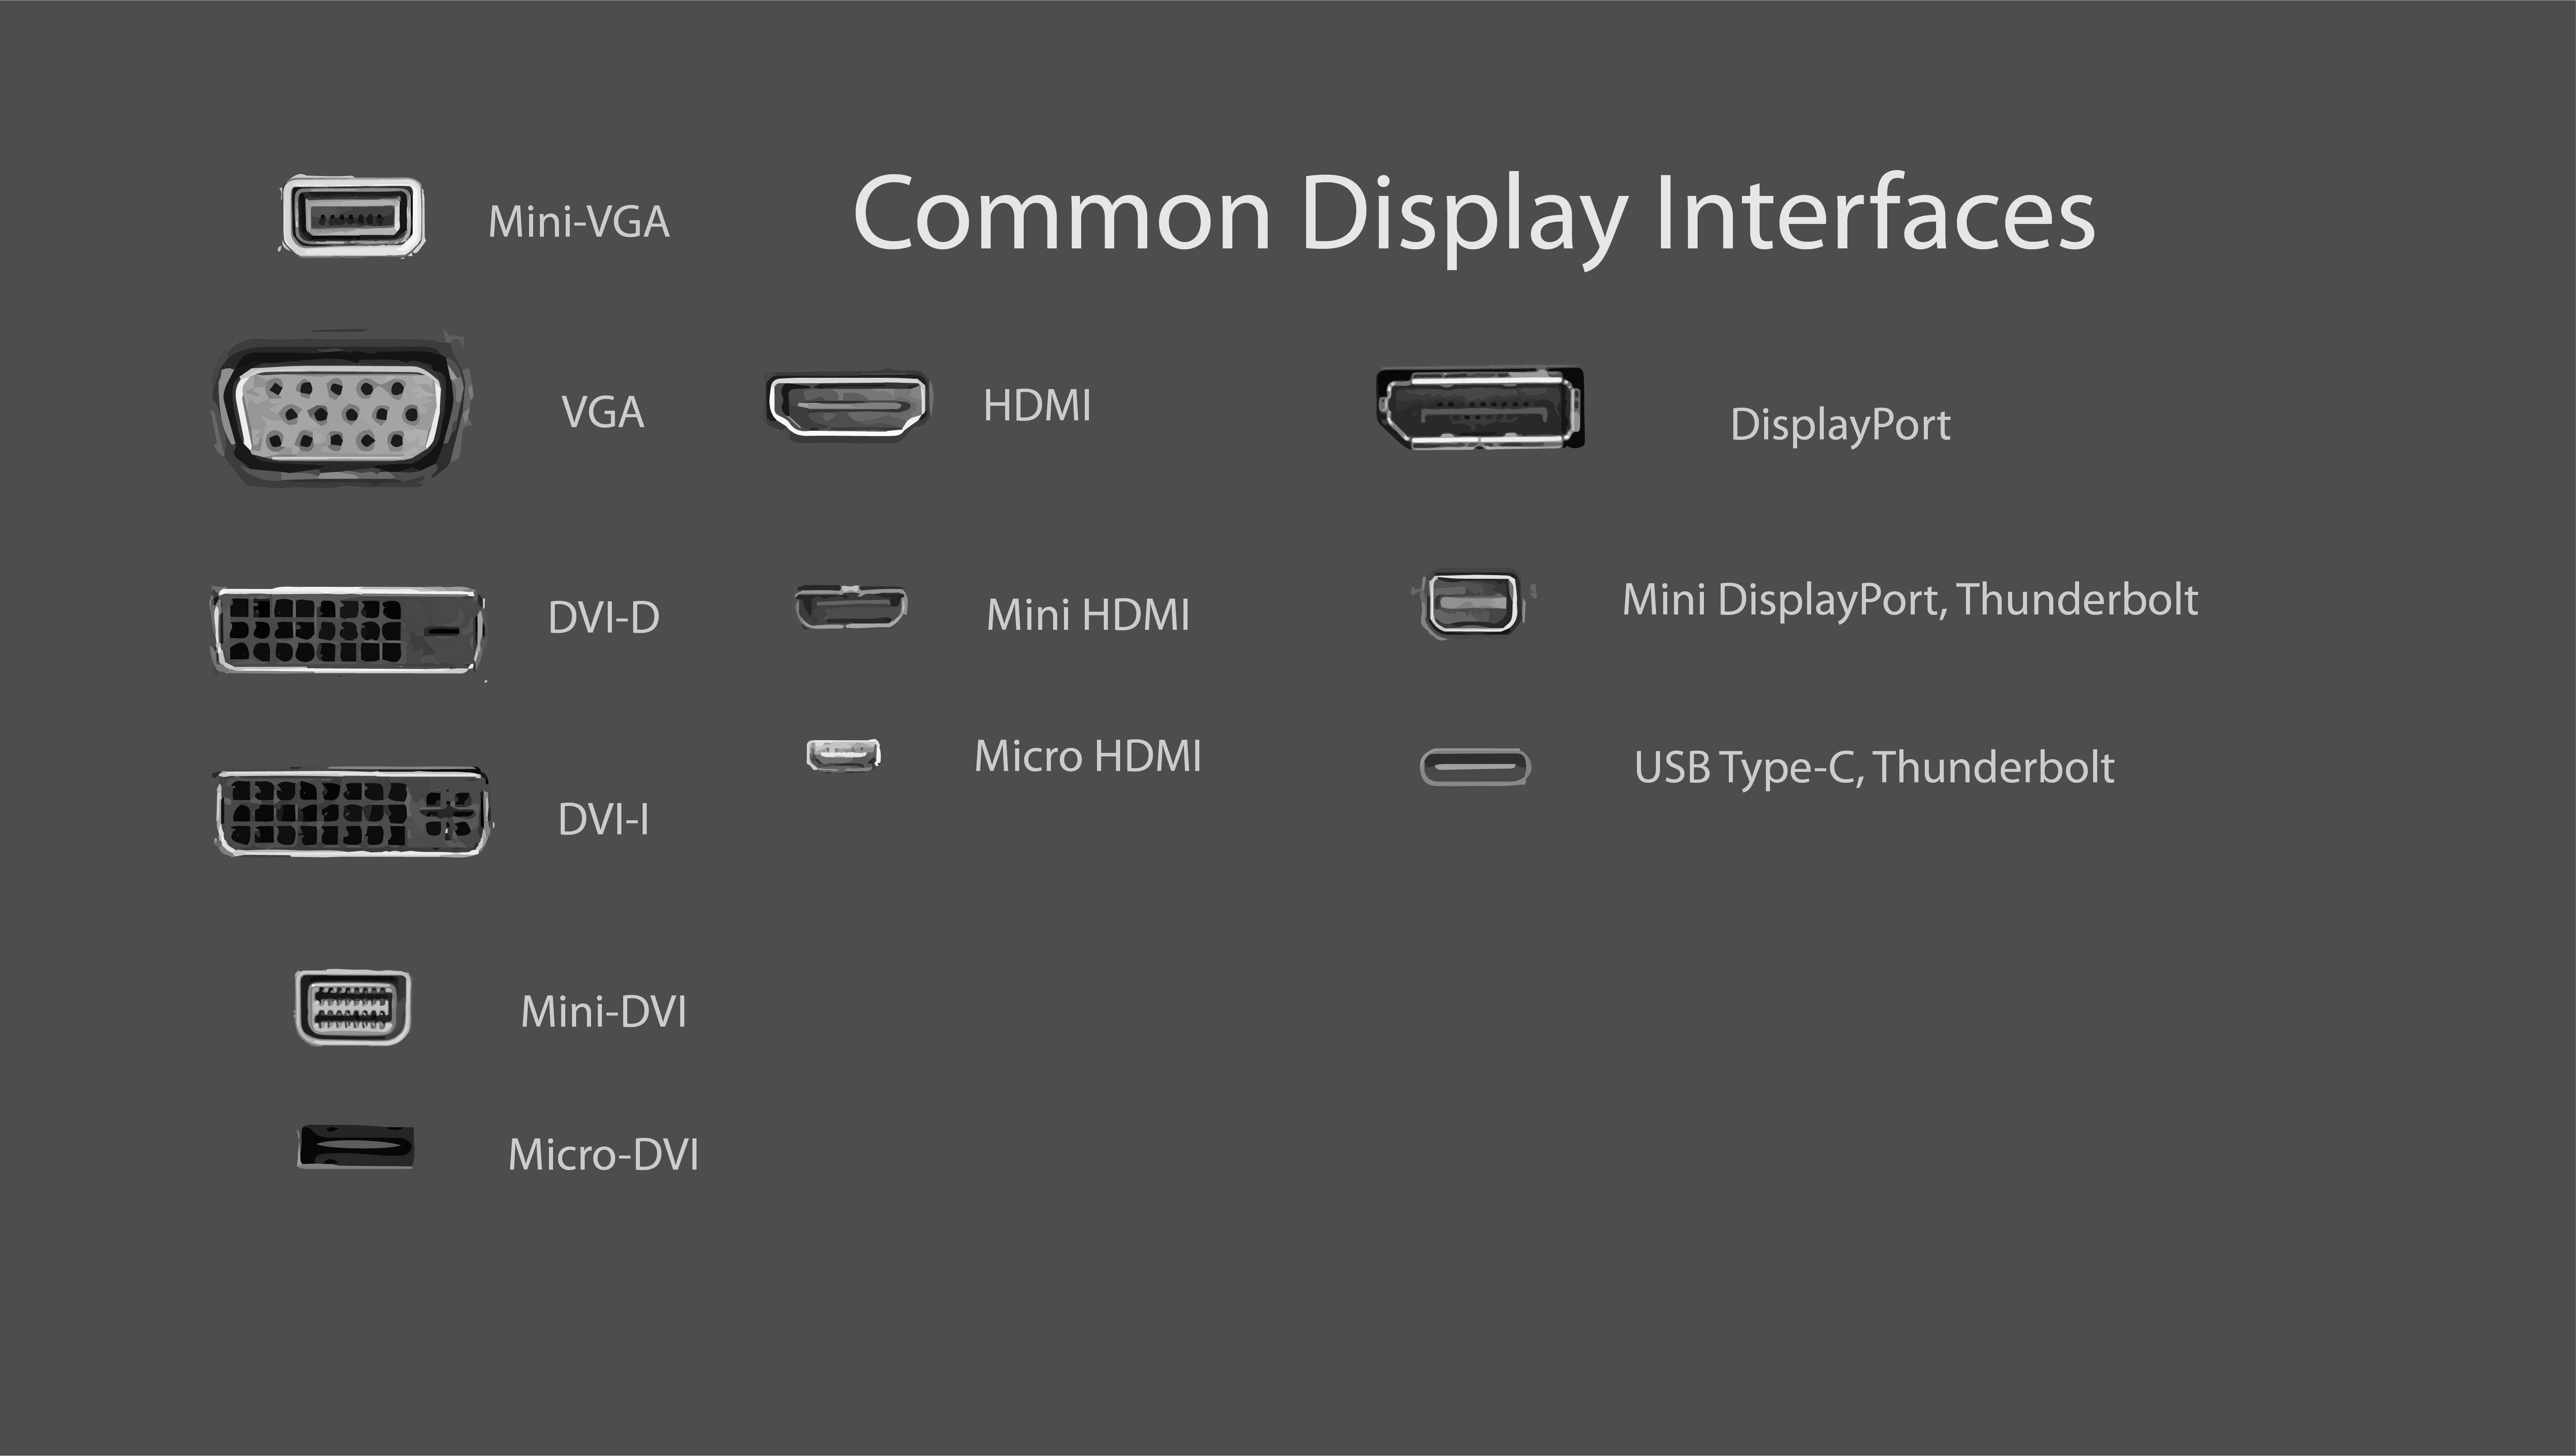
1. Check the connections: Ensure that all cables connecting the monitor to the computer are securely plugged in. This includes the video cable (such as HDMI, DVI, VGA, or DisplayPort) as well as any additional cables for audio or USB connections.
2. Test with another device: Connect the monitor to another device, such as a laptop or another computer, to see if it displays properly. This will help determine if the issue is with the monitor or the computer itself.
3. Adjust the brightness: Sometimes, the brightness settings on the monitor may be set too low, making it appear black. Use the monitor’s buttons or on-screen display to increase the brightness and see if that resolves the issue.
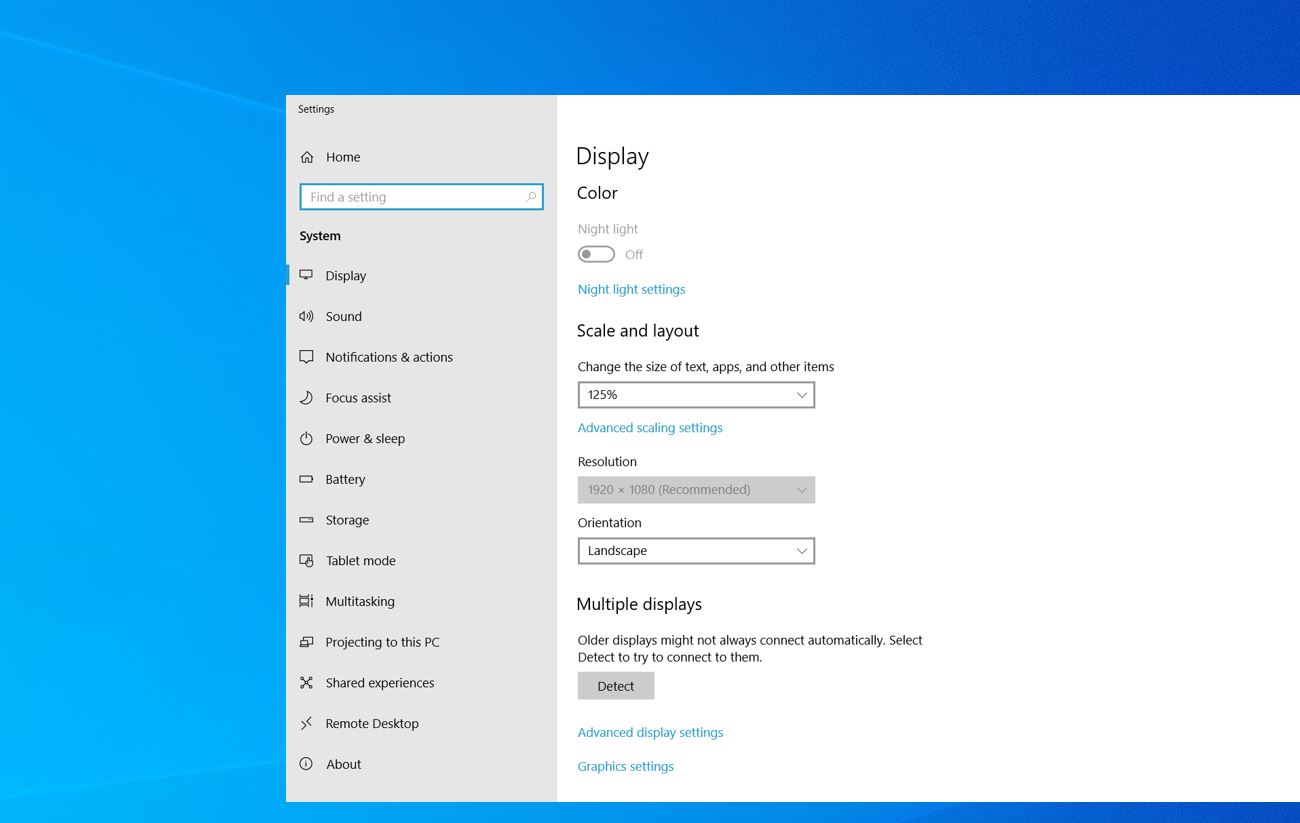
4. Check the display settings: On your computer, check the display settings to make sure the correct resolution and refresh rate are selected. Incorrect settings can cause the monitor to display a black screen.
5. Restart in safe mode: Restart your computer in safe mode to see if the black screen issue persists. If it doesn’t, it may indicate a problem with a software or driver conflict.
6. Update graphics drivers: Outdated or incompatible graphics drivers can cause issues with the display. Visit the manufacturer’s website for your graphics card and download the latest drivers.
7. Perform a power-on self-test: Many monitors have a built-in self-test feature that can help diagnose issues. Refer to the monitor’s manual for instructions on how to perform this test.
Loose or Damaged Cables Inspection
To troubleshoot a black screen on your computer monitor, one of the first things you should check is the cables connecting your monitor to your computer. Loose or damaged cables can often cause display issues. Here’s how to inspect them:
1. Check the power cables: Make sure the AC power plug is securely connected to both the monitor and the power outlet. If you’re using an AC adapter, ensure it’s properly plugged in as well.
2. Inspect the video cables: If you’re using a VGA cable, make sure it’s tightly connected to both the monitor and the graphics card on your computer. For HDMI or DisplayPort cables, check for any visible damage or loose connections.
3. Look for bent or broken pins: If you’re using a VGA or DVI cable, examine the pins on both ends of the cable. If any pins are bent or broken, it can cause display problems. Consider using a different cable if you find any damage.
4. Try a different cable: If you suspect a cable issue, swap it out with a known working cable of the same type. This will help determine if the problem lies with the cable itself.
5. Test with a different monitor: If you have access to another monitor, try connecting it to your computer using the same cables. If the new monitor works fine, it’s likely that your original monitor is the problem.
Video Cable and Connectors Examination
When troubleshooting a computer monitor black screen issue, it’s important to examine the video cable and connectors to ensure they are properly connected and functioning. Here are some tips to help you with this step:
1. Check the physical connection of the video cable: Ensure that the cable is securely plugged into both the computer’s video output port and the monitor’s input port. If the cable appears loose, try disconnecting and reconnecting it firmly.
2. Inspect the video cable for any signs of damage: Look for any visible signs of wear or fraying along the cable. If you notice any damage, it may be necessary to replace the cable.
3. Examine the connectors for any bent pins: Carefully inspect both ends of the video cable for any bent or broken pins. If you see any, try straightening them using a small, non-metallic object like a toothpick.
4. Try a different video cable or connector: If possible, try using a different video cable or connector to see if the issue persists. This will help determine if the problem lies with the cable or connector itself.
5. Test the video signal with another display device: Connect the computer to another display device, such as a TV or a different monitor, using the same video cable. If the alternate display device works fine, it suggests that the issue may be with the original monitor.
Remember to always power off your computer and monitor before examining the video cable and connectors. Additionally, double-check that the monitor is receiving power and that it’s set to the correct input source.
Troubleshoot with Another Monitor
If you’re experiencing a black screen on your computer monitor, one troubleshooting step you can take is to connect another monitor to your computer. This can help determine whether the issue is with your monitor or with your computer hardware or software.
To troubleshoot with another monitor, follow these steps:
1. Power off your computer and your monitor. Make sure both devices are completely powered down before proceeding.
2. Disconnect the cables connecting your current monitor to your computer. This may include the power cable, video cable (such as HDMI or VGA), and any other connectors.
3. Connect the cables from the new monitor to your computer. Make sure all connections are secure.
4. Power on your computer and the new monitor. Turn on your computer and the new monitor to see if the black screen issue persists.
5. Observe the new monitor. If the new monitor displays a normal image, it indicates that the issue is likely with your original monitor. You may need to seek professional help to repair or replace it.
6. If the new monitor also shows a black screen, it suggests that the problem may lie with your computer hardware or software. Try the following troubleshooting steps:
– Check the display settings: Right-click on your desktop and select “Display settings” or “Screen resolution.” Make sure the correct display resolution is selected and that the multiple display option is configured correctly.
– Update your graphics driver: Visit the manufacturer’s website for your graphics card and download the latest driver. Install it and restart your computer.
– Perform a power cycle: Shut down your computer, unplug the power cord, and hold the power button for 30 seconds. Then, reconnect the power cord and turn on your computer.
– Reset your BIOS or UEFI settings: Restart your computer and enter the BIOS or UEFI settings (usually by pressing F2, Del, or Esc during startup). Look for an option to reset to default settings or load optimized defaults. Save and exit.
– Try booting in safe mode: Restart your computer and repeatedly press the F8 key before the Windows logo appears. Select “Safe Mode” from the menu and see if the black screen issue persists.
Adjust Display Resolution
One common issue that computer users may encounter is a black screen on their monitor. This can be frustrating, but there are troubleshooting steps you can take to resolve the problem. Adjusting the display resolution is one potential solution.
To adjust the display resolution:
1. Right-click on the desktop and select “Display settings” from the context menu.
2. In the Display settings window, scroll down to the “Resolution” section.
3. Click on the drop-down menu and select a different resolution option.
4. Click “Apply” to apply the new resolution.
5. If the screen remains black, press the “Esc” key to return to the previous resolution.
It’s important to note that the optimal resolution for your monitor is typically its native resolution. However, if you’re experiencing a black screen, temporarily adjusting the resolution can help troubleshoot the issue.
If adjusting the resolution doesn’t resolve the problem, you may need to explore other troubleshooting options such as checking the cable connections, restarting your computer, or updating your graphics driver.
BIOS and Recovery Options Review
If you are experiencing a black screen on your computer monitor, it could be due to a variety of reasons. One possible solution is to review your BIOS and recovery options. These options can help you troubleshoot and fix the issue.
To access the BIOS menu, restart your computer and look for a message on the screen that prompts you to press a specific key to enter BIOS. This key is usually displayed as “Press [key] to enter setup” or something similar. Once you are in the BIOS menu, navigate to the display settings or video settings section.
Check the display settings: Ensure that the correct display device is selected as the primary display. If you have multiple monitors connected, make sure they are properly detected and configured.
Update the BIOS: If you haven’t updated your BIOS in a while, it might be worth checking for any available updates. Visit the manufacturer’s website and look for the latest BIOS version for your specific motherboard model. Follow the instructions provided to update the BIOS.
Reset BIOS settings: Sometimes, incorrect BIOS settings can cause display issues. To fix this, you can reset the BIOS settings to their default values. Look for an option in the BIOS menu that allows you to reset settings or load default values.
If the black screen issue persists, you can try the following recovery options:
Boot into safe mode: Safe mode loads only essential drivers and services, which can help identify and resolve any software conflicts that may be causing the black screen. Restart your computer and repeatedly press the F8 key until the Advanced Boot Options menu appears. From there, select “Safe Mode” and press Enter.
Perform a system restore: If you recently installed new software or made changes to your system settings, a system restore can help revert your computer back to a previous working state. To perform a system restore, press the Windows key + R to open the Run dialog box. Type “rstrui” and press Enter. Follow the on-screen instructions to select a restore point and initiate the restore process.
Reinstall graphics drivers: Outdated or corrupted graphics drivers can cause display issues. To reinstall the graphics drivers, press the Windows key + X and select “Device Manager” from the menu. Expand the “Display adapters” category, right-click on your graphics card, and select “Uninstall device.” Restart your computer, and Windows will automatically reinstall the drivers.
System Failure Diagnosis
If you’re experiencing a black screen on your computer monitor, it can be frustrating and worrisome. However, with a systematic approach, you can diagnose and resolve the issue efficiently. Here are some troubleshooting tips to help you get your monitor back up and running.
1. Check the connections: Start by ensuring all the cables are securely connected. Inspect the electrical connector and make sure it’s plugged in properly. Also, check the video cable connections, such as Digital Visual Interface (DVI) or Video Graphics Array (VGA), to ensure they are firmly attached to both the monitor and the personal computer.
2. Test the monitor on another device: To determine if the issue lies with your monitor or computer, connect the monitor to another device, such as a laptop or another computer. If it works fine on another device, the problem may be with your computer’s hardware or software.
3. Restart your computer: Sometimes, a simple restart can resolve the black screen issue. Press the power button to turn off your computer and then turn it back on after a few seconds. This can help reset any temporary glitches that might be causing the problem.
4. Check for error messages: If you see a blue screen of death or any error messages on your monitor, take note of them. These messages can provide valuable clues about the underlying issue and help you narrow down the troubleshooting steps.
5. Verify the power source: Ensure that your monitor is receiving power by checking the AC power plug and socket. If necessary, try plugging the monitor into a different power outlet or using a different power cable.
6. Test the keyboard and mouse: Sometimes, the black screen may be due to unresponsive input devices. Disconnect and reconnect both the keyboard and mouse to see if that resolves the issue. Additionally, try pressing buttons on the keyboard and moving the mouse to wake up the monitor from sleep mode.
7. Update your graphics drivers: Outdated or incompatible graphics drivers can cause various display issues, including a black screen. Visit the manufacturer’s website or use Windows Update to download and install the latest drivers for your graphics card.
8. Seek expert help: If you’ve tried all the troubleshooting steps and are still facing the black screen issue, it may be time to consult an expert. They can diagnose the problem more accurately and provide solutions tailored to your specific hardware and software setup.
Optimize Startup Applications
- Open Task Manager by pressing Ctrl+Shift+Esc
- Click on the Startup tab
- Review the list of applications that are set to start automatically when your computer boots up
- Disable any unnecessary or suspicious applications by right-clicking on them and selecting Disable
- Open the System Configuration utility
- Press Windows Key + R to open the Run dialog box
- Type msconfig and press Enter
- Select the Startup tab in the System Configuration window
- Uncheck any applications that you don’t need to start with your computer
- Click Apply and then OK
- Restart your computer for the changes to take effect
- Use a third-party startup manager tool
- Install a reliable startup manager software
- Open the software and review the list of startup applications
- Disable any unnecessary or suspicious applications
- Save the changes and restart your computer
Unplug Unnecessary Accessories
To troubleshoot a computer monitor black screen, start by unplugging any unnecessary accessories. This includes devices such as a computer keyboard, mouse, and any other peripherals that are not essential for the monitor to function.
Disconnect these accessories from the computer completely by unplugging them from their respective electrical connectors. This will help determine if any of these accessories are causing the black screen issue.
Next, check the cables connecting the monitor to the computer. Make sure they are securely connected to both the monitor and the computer’s video output port. If any cables appear loose or damaged, try replacing them with a known working cable.
If the monitor is still not displaying anything, try restarting the computer. Press and hold the power button on the computer to turn it off, then press it again to turn it back on. This can sometimes resolve minor software glitches that may be causing the black screen.
If the issue persists, try connecting the monitor to a different computer or laptop if possible. This will help determine if the problem lies with the monitor itself or the computer’s hardware or software.
In some cases, the monitor’s settings may need to be adjusted. Press the menu button on the monitor to access its settings. Look for options related to brightness, contrast, and the input source. Make sure the monitor is set to the correct input source, such as VGA or HDMI, depending on the type of connection you are using.
BIOS/UEFI Reset and Boot Order Verification
BIOS/UEFI Reset and Boot Order Verification
If you are experiencing a black screen on your computer monitor, one possible solution is to reset the BIOS/UEFI settings and verify the boot order. This can help resolve any issues related to the computer’s startup process.
To reset the BIOS/UEFI settings, follow these steps:
1. Start by turning off your computer completely. Make sure it is not in sleep mode or hibernation.
2. Locate the BIOS/UEFI reset button on your motherboard. It is usually a small button or a set of pins that can be shorted with a jumper cap.
3. Use a small screwdriver or a metal object to short the reset button/pins. This will clear the BIOS/UEFI settings and restore them to default.
4. After resetting the BIOS/UEFI, turn on your computer and enter the BIOS/UEFI setup menu. This is typically done by pressing a specific key, such as Esc or F2, during the power-on self-test (POST) process.
5. In the BIOS/UEFI setup menu, navigate to the boot order settings. This is where you can specify the order in which the computer looks for an operating system to boot from.
6. Ensure that the correct boot device is selected as the first option. This is usually the hard drive or SSD where your operating system is installed. Use the arrow keys on your keyboard to move the desired device to the top of the list.
7. Save the changes and exit the BIOS/UEFI setup menu. This will restart your computer with the new boot order settings.
By resetting the BIOS/UEFI settings and verifying the boot order, you can eliminate any potential issues that may be causing the black screen on your computer monitor. If the problem persists, it may be related to other hardware or software issues, and further troubleshooting may be necessary.
Launch Windows Repair
If you are experiencing a black screen on your computer monitor, one troubleshooting option you can try is launching Windows Repair. This feature can help identify and fix any software issues that may be causing the black screen.
To launch Windows Repair, follow these steps:
1. Press the Windows key on your computer keyboard to open the Start menu.
2. Type “Windows Repair” in the search bar and select the Windows Repair option from the search results.
3. Click on the Windows Repair icon to open the application.
Once Windows Repair is open, it will guide you through a series of steps to diagnose and repair any issues. It may take some time to complete the process, so be patient.
During the repair process, Windows Repair may prompt you to restart your computer. Follow the on-screen instructions to do so.
After the repair process is complete and your computer has restarted, check if the black screen issue has been resolved. If not, you may need to try other troubleshooting methods or seek further assistance.
Remember to always ensure that your computer is plugged into a power source and that all cables and connections are secure. Additionally, make sure your computer’s display settings are configured correctly, including the resolution.
By using Windows Repair, you can potentially resolve the black screen issue and get your computer monitor back up and running.
Boot into Safe Mode for Driver Updates
1. Start by turning off your computer completely. Press and hold the power button until it shuts down.
2. Once the computer is off, press the power button to turn it back on. As soon as you see the manufacturer’s logo or any display on the screen, press the F8 key repeatedly until you see the Advanced Boot Options menu.
3. In the Advanced Boot Options menu, use the arrow keys on your keyboard to select “Safe Mode” and press Enter.
4. Your computer will now boot into Safe Mode, which loads only essential drivers and services. The screen may appear different, with a lower resolution and larger icons.
5. Once in Safe Mode, you can proceed with updating your drivers. To do this, press the Windows key + X on your keyboard to open the context menu. From the menu, select “Device Manager.”
6. In Device Manager, expand the category that corresponds to the device you want to update. For example, if you want to update your graphics driver, expand the “Display adapters” category.
7. Right-click on the device you want to update and select “Update driver.” Choose the option to search automatically for updated driver software. If an update is found, follow the on-screen instructions to install it.
8. After updating the driver, restart your computer normally. Press the Windows key + R on your keyboard to open the Run dialog box. Type “shutdown /r” (without quotes) and press Enter.
9. Your computer will now restart and boot into the normal mode. Check if the black screen issue is resolved.
Roll Back or Update Drivers
Rolling back or updating drivers can often resolve issues with a computer monitor black screen. Here’s how to do it:
1. Start by identifying the type of connection between your computer and the monitor. It could be a Digital Visual Interface (DVI), Video Graphics Array (VGA), or another type of connection.
2. Once you know the connection type, go to the manufacturer’s website or the website of the graphics card manufacturer to download the latest drivers for your graphics card.
3. Uninstall the current graphics card drivers by going to the Control Panel, selecting “Uninstall a program” or “Add or remove programs,” and finding the graphics card drivers in the list. Follow the prompts to uninstall them.
4. Restart your computer after uninstalling the drivers.
5. After the restart, install the latest drivers you downloaded earlier. Follow the installation instructions provided by the manufacturer.
6. Restart your computer once again to complete the driver installation.
7. If updating the drivers didn’t resolve the black screen issue, you can try rolling back the drivers to a previous version. Go to the Device Manager by right-clicking on the Start menu and selecting “Device Manager.”
8. In the Device Manager, expand the “Display adapters” category and right-click on your graphics card. Select “Properties” and go to the “Driver” tab.
9. Click on the “Roll Back Driver” button. If this option is grayed out, it means there are no previous drivers to roll back to.
10. Restart your computer once again to complete the driver rollback.
Rolling back or updating drivers can often fix issues with a computer monitor black screen.
Frequently Asked Questions
Why is my monitor on but black?
Your monitor may be on but black due to a potential issue with the power source, display cable, or video input mode. Additionally, if the monitor displays a message, the problem could lie with the computer. To troubleshoot, check the power LED and ensure it is not off, examine the power cable, and try unplugging and replugging it.
Why is my PC turning on but no display?
Your PC may be turning on but not displaying anything due to improper or unplugged connections. Make sure to check all cables and reseat the RAM. If the issue persists, try testing with one stick of RAM at a time. If the problem still persists, consider removing the GPU and connecting your video to the motherboard.
Why is my monitor connected but no display?
Your monitor may be connected but not displaying anything due to potential damage to the video port on the computer or monitor, or a damaged video cable with bent pins. To troubleshoot, inspect these components for any signs of damage. If there is no visible damage, try reconnecting the monitor to the computer. Alternatively, you can try using a different video cable to connect the two devices.
Why is my computer booting up to a black screen?
Your computer may be booting up to a black screen due to a corrupt driver, GPU failure, or a corrupted BIOS. Repairing or replacing the motherboard may be necessary in this situation.
