Are you frustrated with your Windows 10 computer constantly showing 100% disk usage? Find effective solutions to fix this issue and improve your system’s performance.
Understanding 100% Disk Usage
If you’re experiencing 100% disk usage on your Windows 10 computer, it can significantly impact your system’s performance. This issue occurs when your computer’s disk usage is constantly at its maximum capacity, causing slow response times and freezing. Fortunately, there are a few steps you can take to fix this problem.
1. Check Task Manager: Open Task Manager by pressing Ctrl + Shift + Esc and go to the “Processes” tab. Look for any processes that are using a high amount of disk usage. If you find any suspicious processes, try ending them to see if it resolves the issue.
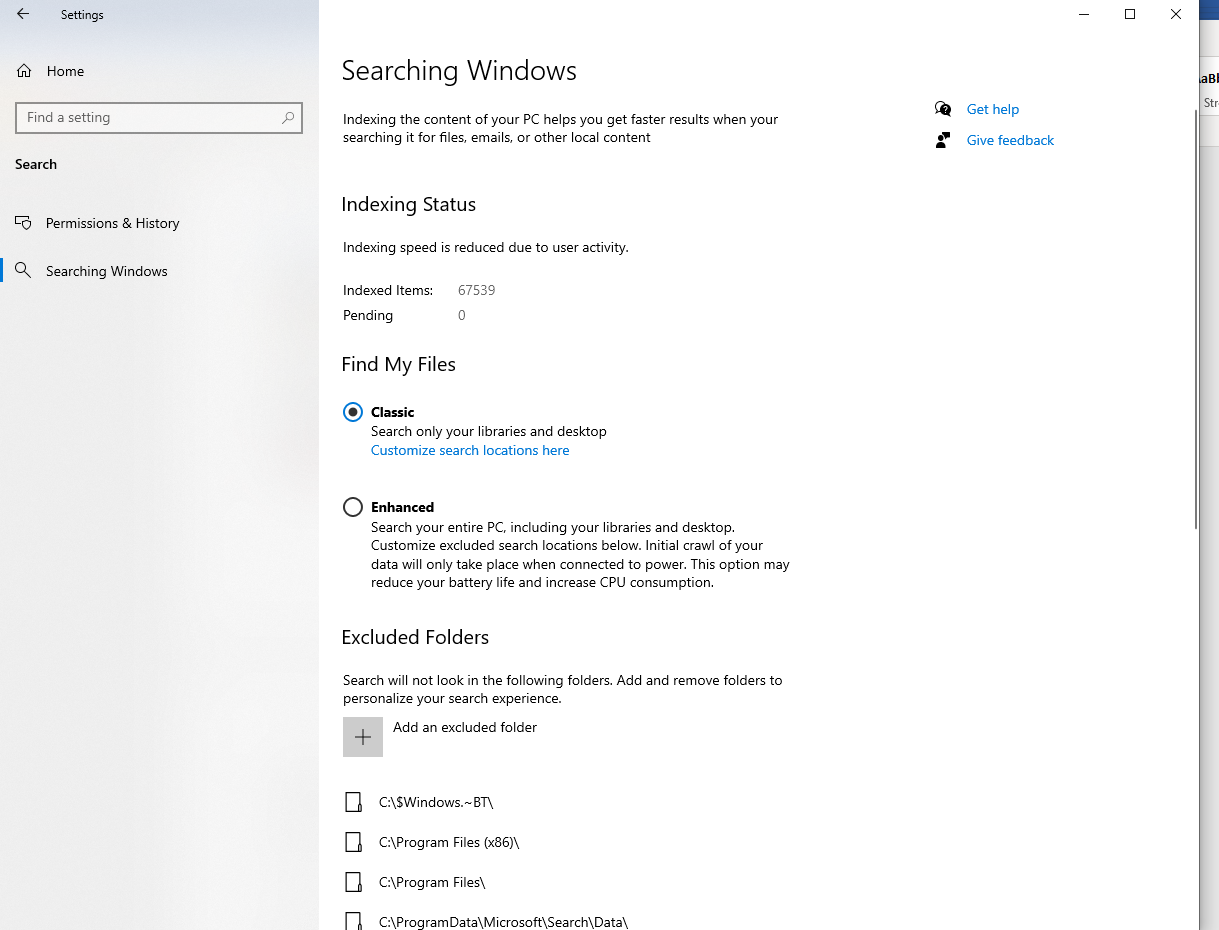
2. Disable Windows Search: Windows Search can sometimes cause high disk usage. To disable it, open the Services console by pressing Win + R and typing “services.msc” followed by Enter. Locate “Windows Search” in the list, right-click it, and select “Properties.” Change the startup type to “Disabled” and click “OK.”
3. Enable High-Performance Mode: Switching to high-performance mode can help reduce disk usage. Open the Control Panel by pressing Win + X and selecting “Control Panel.” Go to “Power Options” and select “High Performance.” This will ensure your system is utilizing maximum resources.
4. Check for Malware: Malware can also cause high disk usage. Run a thorough scan with a reliable antivirus software like Avira to detect and remove any malicious programs that could be affecting your system.
5. Disable Windows Tips and Notifications: Windows tips and notifications can consume system resources, including disk usage. To disable them, go to “Settings” and click on “System.” Select “Notifications & actions” and toggle off the options for tips and notifications.
6. Check for Hard Drive Errors: Hard drive errors can lead to high disk usage. Open Command Prompt as an administrator by pressing Win + X and selecting “Command Prompt (Admin).” Type “chkdsk /f /r” and press Enter. This will scan and fix any errors on your hard drive.
Identifying Causes of High Disk Usage
- Check for resource-intensive processes
- Open Task Manager by pressing Ctrl+Shift+Esc
- Click on the Processes tab
- Sort the processes by Disk column to identify any processes with high disk usage
- Note down the names of the processes with the highest disk usage
- Scan for malware or viruses
- Open Windows Security by searching for it in the Start menu
- Click on Virus & Threat Protection
- Click on Quick Scan to scan your system for malware or viruses
- Follow the on-screen instructions to remove any detected threats
- Disable Windows Search
- Open Services by typing “services.msc” in the Run dialog (Win+R)
- Scroll down and locate Windows Search
- Right-click on Windows Search and select Properties
- In the General tab, set the Startup type to Disabled
- Click Apply and then OK
- Update device drivers
- Open Device Manager by searching for it in the Start menu
- Expand the categories to find any devices with a yellow exclamation mark
- Right-click on the device and select Update driver
- Choose Search automatically for updated driver software
- Follow the on-screen instructions to complete the driver update process
Updating Windows and Drivers
To update Windows and drivers to fix 100% disk usage in Windows 10, follow these steps:
1. Open the Start menu and search for “Windows Update.” Click on “Windows Update settings” to open the Windows Update page.
2. Click on “Check for updates” to see if there are any available updates for your system. If there are updates, click on “Download” and let them install. This will ensure that your operating system is up to date.
3. After updating Windows, it’s important to update your device drivers as well. Press the Windows key + X and select “Device Manager” from the menu.
4. In Device Manager, expand the different categories to find the devices that need driver updates. Right-click on a device and select “Update driver.”
5. Choose the option to search automatically for updated driver software. Windows will search for the latest drivers and install them for you. Repeat this process for all devices that need updating.
6. Additionally, you can visit the manufacturer’s website for your computer or individual hardware components to download and install the latest drivers manually.
7. Restart your computer to apply the updates and changes.
Updating Windows and drivers can resolve compatibility issues and improve system performance, which may help reduce the 100% disk usage problem.
Disabling Superfetch and Windows Search
1. Open the Start menu and type “services.msc” in the search bar. Press Enter.
2. In the Services window, scroll down and find “Superfetch” in the list.
3. Right-click on Superfetch and select “Properties.”
4. In the Properties window, go to the “General” tab and change the startup type to “Disabled.”
5. Click “Apply” and then “OK” to save the changes.
To disable Windows Search, follow these steps:
1. Press the Windows key + R to open the Run dialog box.
2. Type “services.msc” and press Enter.
3. In the Services window, scroll down and find “Windows Search” in the list.
4. Right-click on Windows Search and select “Properties.”
5. In the Properties window, go to the “General” tab and change the startup type to “Disabled.”
6. Click “Apply” and then “OK” to save the changes.
By disabling Superfetch and Windows Search, you can reduce the strain on your disk and potentially fix the issue of 100% disk usage in Windows 10.
Checking for and Removing Malware
Malware can often be the cause of high disk usage in Windows 10. To ensure your computer is free from malware, follow these steps:
1. Run a full system scan with a reliable antivirus software such as Avira. This will help identify and remove any malicious programs that may be causing the issue.
2. Use the Task Manager to identify any suspicious processes consuming a significant amount of disk usage. Right-click on the taskbar and select “Task Manager.” In the Processes tab, look for any processes with high disk usage. End those processes by right-clicking on them and selecting “End Task.”
3. Check your computer for any unwanted programs or browser extensions that may be causing the high disk usage. Go to the Control Panel and uninstall any suspicious or unnecessary software. In your browser, disable or remove any suspicious extensions.
4. Use the CHKDSK utility to scan and repair any errors on your hard disk drive. Open Command Prompt as an administrator, then type “chkdsk /f” and press Enter. Follow the on-screen instructions to complete the process.
5. If the issue persists, it may be worth considering a clean installation of Windows. This will remove any potential malware or system errors that are causing the high disk usage.
Remember to regularly update your antivirus software and keep your operating system up to date to prevent future malware infections and ensure optimal performance.
Managing Antivirus Software and Background Applications
To manage antivirus software and background applications in Windows 10 and fix 100% disk usage, follow these steps:
1. Open Task Manager by pressing Ctrl + Shift + Esc.
2. In the Task Manager window, click on the “Processes” tab.
3. Sort the processes by the “Disk” column to identify which processes are using the most disk resources.
4. If you notice any antivirus software or background applications consuming a high amount of disk usage, consider temporarily disabling them or adjusting their settings.
5. To disable antivirus software temporarily, right-click on the antivirus program’s icon in the system tray and select the option to disable or pause protection. Remember to re-enable it later to ensure your computer stays protected.
6. To adjust background application settings, go to the “Settings” app in Windows 10 and click on “Privacy.”
7. In the “Privacy” settings, click on “Background apps” on the left-hand side.
8. Here, you can toggle off the background apps that you don’t need running in the background. This can help reduce disk usage.
9. Additionally, you can also check if any unnecessary programs are set to run at startup. To do this, open the Task Manager again and go to the “Startup” tab. Disable any programs that you don’t need to launch at startup.
10. Finally, consider optimizing your computer’s performance by cleaning up unnecessary files, updating your drivers, and running a disk cleanup. This can help improve overall system performance and reduce disk usage.
By managing antivirus software and background applications, you can effectively fix the 100% disk usage issue in Windows 10 and ensure smooth operation of your computer.
Optimizing Virtual Memory and Energy Settings
To fix the issue of 100% disk usage in Windows 10, optimizing virtual memory and energy settings can be quite effective.
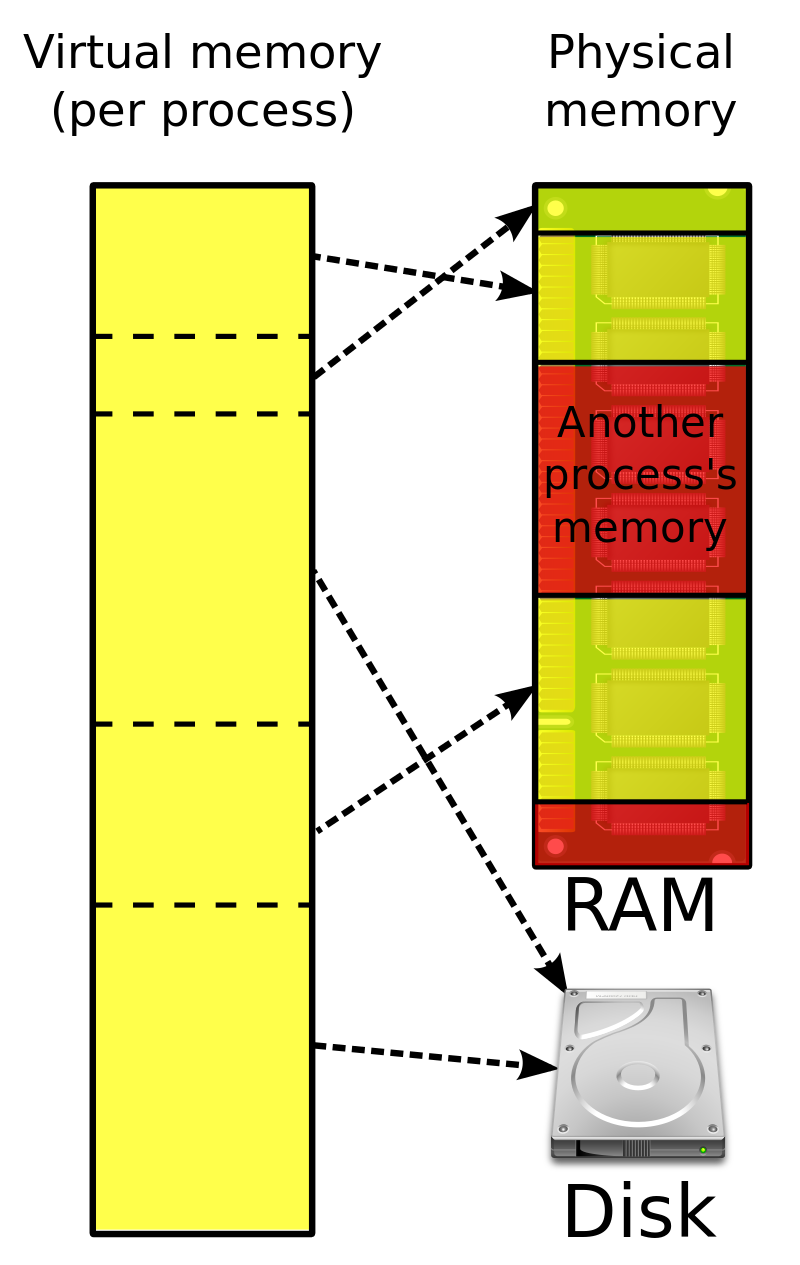
First, let’s start with virtual memory. This is a feature that allows your computer to use a portion of the hard drive as additional RAM when the physical RAM is running low. By adjusting the virtual memory settings, you can improve the performance of your system.
To optimize virtual memory settings, follow these steps:
1. Open the Control Panel by pressing the Windows key + X and selecting “Control Panel” from the menu.
2. In the Control Panel, click on “System and Security,” then “System.”
3. In the System window, click on “Advanced system settings” on the left-hand side.
4. In the System Properties window, go to the “Advanced” tab and click on the “Settings” button under the Performance section.
5. In the Performance Options window, go to the “Advanced” tab and click on the “Change” button under the Virtual memory section.
6. Uncheck the option that says “Automatically manage paging file size for all drives.”
7. Select your system drive (usually C:) and choose the “Custom size” option.
8. Set the initial size and maximum size values for the virtual memory. It is recommended to set both values to the same number, which should be 1.5 times the amount of physical RAM you have installed. For example, if you have 4 GB of RAM, set the values to 6144 MB (4 GB x 1.5).
9. Click on the “Set” button and then “OK” to save the changes.
10. Restart your computer for the new settings to take effect.
Now, let’s move on to optimizing energy settings to conserve power and improve performance.
To optimize energy settings, follow these steps:
1. Press the Windows key + X and select “Power Options” from the menu.
2. In the Power Options window, select the power plan you are currently using or want to optimize.
3. Click on “Change plan settings” next to the selected power plan.
4. In the Edit Plan Settings window, click on “Change advanced power settings.”
5. In the Power Options window, go through each category and adjust the settings according to your preference. For example, you can set the “Processor power management” to “Maximum performance” or adjust the “Hard disk” and “Wireless adapter settings” to conserve power when not in use.
6. Once you have made the desired changes, click on “Apply” and then “OK” to save the settings.
By optimizing virtual memory and energy settings, you can significantly reduce disk usage and improve the overall performance of your Windows 10 system. Give these steps a try and experience a smoother computing experience.
Repairing Hard Disk and Firmware Issues
- Check for malware or viruses (malware or viruses)
- Update your device drivers (device drivers)
- Disable Windows Search service (Windows Search service)
- Perform a disk cleanup (disk cleanup)
- Disable Windows SuperFetch (Windows SuperFetch)
- Disable Windows Update Delivery Optimization (Windows Update Delivery Optimization)
- Reset Virtual Memory (Virtual Memory)
- Check for faulty hardware (faulty hardware)
- Update your BIOS (BIOS)
- Run a disk check (disk check)
- Check for firmware updates (firmware updates)
Deleting Temporary and Page Files
To fix the issue of 100% disk usage in Windows 10, one effective solution is to delete temporary and page files. These files can accumulate over time and take up valuable disk space, causing your system to slow down. By removing them, you can free up disk space and potentially improve system performance.
To delete temporary files, follow these steps:
1. Press the Windows key + R to open the Run dialog box.
2. Type “%temp%” (without quotes) and press Enter. This will open the Temporary Files folder.
3. Select all the files and folders in the folder by pressing Ctrl + A.
4. Press the Delete key or right-click and select Delete. Confirm the action if prompted.
To delete page files, follow these steps:
1. Press the Windows key + R to open the Run dialog box.
2. Type “sysdm.cpl” (without quotes) and press Enter. This will open the System Properties window.
3. Go to the Advanced tab and click on the Settings button under the Performance section.
4. In the Performance Options window, go to the Advanced tab.
5. Under the Virtual Memory section, click on the Change button.
6. Uncheck the box that says “Automatically manage paging file size for all drives.”
7. Select the drive where Windows is installed (usually C:) and choose “No paging file.”
8. Click on the Set button and then click OK to confirm the changes.
Remember to restart your computer after deleting temporary and page files to ensure the changes take effect.
By regularly deleting these files, you can keep your disk space optimized and potentially resolve the 100% disk usage issue in Windows 10.
Adjusting Settings in Common Applications
To fix 100% disk usage in Windows 10, adjusting settings in common applications can be helpful. Here’s how you can do it:
1. Open the Task Manager by pressing Ctrl + Shift + Esc and go to the “Processes” tab.
2. Look for any applications or processes that are using a significant amount of disk usage. Right-click on them and select “End Task” to close them.
3. Check your antivirus software settings. Some antivirus programs can cause high disk usage. Open your antivirus software and look for options to adjust the scanning frequency or disable certain features that may be causing the issue.
4. Adjust the settings in your web browser. Browsers like Chrome or Firefox can consume a lot of disk usage, especially if you have multiple tabs or extensions open. Go to the browser settings and disable unnecessary extensions or plugins. You can also clear your browsing history and cache to free up disk space.
5. Optimize your video editing software settings. Video editing programs are resource-intensive and can contribute to high disk usage. Reduce the number of background processes or tasks running while using the software. Consider changing the video rendering settings to a lower quality or resolution.
6. Review your Windows settings. Open the Control Panel and navigate to “Power Options.” Select the “High Performance” power plan to ensure maximum performance. You can also adjust the virtual memory settings by going to “System Properties” and selecting the “Advanced” tab.
By adjusting settings in common applications, you can potentially reduce disk usage and improve overall system performance.
Practicing Good File Management
- Organize your files into folders and subfolders based on their categories or relevance.
- Delete unnecessary files and folders regularly to free up storage space.
- Use descriptive and concise file names to make them easier to identify.
- Backup important files and folders to an external storage device or cloud storage.
- Apply proper file extensions to ensure compatibility and easy recognition.
- Utilize file compression techniques to reduce file sizes and save disk space.
- Sort files by date, size, or type to locate them quickly when needed.
- Implement a file naming convention to maintain consistency and organization.
- Monitor disk space usage regularly to prevent it from reaching 100% capacity.
- Empty the recycle bin or trash folder to permanently delete files and free up space.
- Remove temporary files and caches that accumulate over time.
- Protect sensitive files with passwords or encryption to ensure privacy and security.
- Use file management software or tools to automate and streamline the process.
Preventing Damage and Data Loss
To prevent damage and data loss while fixing 100% disk usage in Windows 10, follow these steps:
1. Identify resource-hungry processes: Open Task Manager by pressing Ctrl+Shift+Esc. Go to the “Processes” tab and look for processes with high disk usage. Note down the names of these processes.
2. Disable unnecessary startup programs: Press Ctrl+Shift+Esc to open Task Manager again. Go to the “Startup” tab and disable any programs that are not essential. This will free up resources and reduce disk usage.
3. Update device drivers: Outdated or faulty drivers can cause high disk usage. Update your drivers by going to the manufacturer’s website or using a driver update tool.
4. Disable Windows search indexing: Open the Control Panel and search for “Indexing Options.” Click on it and select “Modify” to disable indexing for unnecessary folders. This will reduce disk usage.
5. Adjust power settings: Open the Control Panel and search for “Power Options.” Click on it and select “High Performance” mode. This will optimize your system for better performance and reduce disk usage.
6. Check for malware: Run a full system scan using your preferred antivirus software. Malware can cause high disk usage and potentially lead to data loss. Remove any detected threats.
7. Clean up your hard drive: Use the built-in Disk Cleanup tool or a third-party disk cleaning software to remove unnecessary files and free up disk space. This will help improve disk performance and reduce usage.
8. Disable Superfetch and Windows Search services: Press Win+R, type “services.msc,” and press Enter. Locate the “Superfetch” and “Windows Search” services, right-click on them, and select “Properties.” Set the startup type to “Disabled” for both services.
9. Disable Windows tips and notifications: Open the Settings app and go to “System” > “Notifications & actions.” Disable unnecessary notifications and turn off the “Show me tips about Windows” option.
10. Limit background apps: Open the Settings app and go to “Privacy” > “Background apps.” Disable unnecessary apps from running in the background, which can help reduce disk usage.
F.A.Qs
Why is my disk running at 100%?
Your disk may be running at 100% because of various reasons such as running too many programs simultaneously, a malfunctioning hard drive, or the presence of malware running in the background.
Why is my SSD at 100 active time?
Your SSD is at 100% active time because it is constantly reading data from the disk and going to sleep, only to wake up again immediately to read more data. The 100% idle time is mainly spent waiting for the PCIE link to retrain before sending data.
How do I free up disk space?
To free up disk space, you can perform a disk cleanup, uninstall unnecessary programs, remove unnecessary files, and consider storing files in the cloud.
How do I reduce disk usage?
To reduce disk usage, you can try the following steps:
– Restart your PC
– Check for any malware infections
– Disable your antivirus program temporarily
– Disable Windows Defender
– Disable Windows Search
– Disable the Superfetch service
– Check your disk for errors
